NON DESTRUCTIVE TESTING (NDT):
LIQUID PENETRANT TESTING
INTRODUCTION TO NON DESTRUCTIVE TESTING:
Non destructive Testing NDT includes a variety of testing methods. Non destructive testing NDT is defined as examination of a material or a component to determine the physical soundness of the specimen without damaging, altering, or impairing its usefulness.
Non destructive Testing NDT is one of many tools used to assure the quality and reliability of a product during manufacture and while it is in-service. The primary objective of any Non destructive Testing NDT method is to find defects before they become large enough to cause expensive repairs or a component failure. Industrial applications include all levels of material usage.
- Raw Materials.
- Fabrication processes.
- Finishing Processes.
- In-Service.
- Overhaul
Raw materials are examined before fabrication begins to avoid manufacturing or repairing a component with defective material. Manufacturing productivity is increased by avoiding unnecessary delays.’ Non destructive Testing NDT is accomplished after all fabrication and finishing processes to assure a manufacturing procedure has not uncovered a defect in the material or damaged the component. These precautions reduce wasted manpower and unnecessary component failures in the field. Statistical analysis has proved conclusively that a well planned and wisely implemented Non destructive Testing NDT quality control program is safer and far more economical than a program consisting of build now and fix later.
The most common Non destructive Testing NDT methods are:
- Visual Examination (VT).
- Penetrant Testing (PT).
- Magnetic Particle Testing (MT).
- Eddy Current Testing (ET).
- Ultrasonic Testing (UT).
- Radiographic (RT)
LIQUID PENETRANT TESTING
Introduction to LIQUID PENETRANT TESTING
Liquid Penetrant testing is capable of revealing only those discontinuities which are open to the surface. All discontinuities which are subsurface will require an alternate Non destructive Testing NDT method for detection. Radiography and Ultrasonic testing are most commonly used to detect subsurface discontinuities while Liquid Penetrant and Magnetic Particle testing are most commonly used to detect surface discontinuities. A discontinuity or flaw is defined as an interruption in the normal configuration of a component. If a discontinuity or flaw will interfere with a components’ usefulness, it is then called a defect.
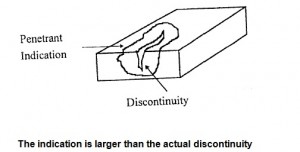
Liquid Penetrant is an improvement over visual inspection. Penetrant testing increases the sensitivity of flaw detection by highlighting a discontinuity for easier visual detection. The discontinuity is magnified in size by an indication produced on the surface being examined as a direct result of the test. By increasing the dimensions of the surface defect, flaws previously undetectable with the naked eye become visible. Usage of highly contrasting colors in the penetrant materials also provides increased see-ability. Penetrants are usually bright red or fluorescent green. Developer is always white to highlight the color of the penetrant.
The indication is larger than the actual discontinuity
The primary purpose of PT is to make discontinuities highly visible for speedy detection and interpretation. Visual inspection of large components or large quantities of test articles is neither efficient nor economical and relatively small defects can not be detected with a high degree of confidence. Liquid Penetrant testing provides for
accelerated component scanning speeds with an increased confidence level for the detection of small defects. Fluorescent liquid penetrant testing is capable of detecting an indication 0.01 inch ( 0.254 mm ). When the correct penetrant materials are used and the procedure followed properly, an indication 0.03 inch ( 1/32″ or 0.76 mm ) is the standard size indication which should be confidently detected.
Testing can be performed on a wide range of materials including metals, composites, glass, ceramics, plastics, and rubbers. Liquid Penetrant testing is the most effective and works the best when used on smooth and nonporous materials. Porous materials can be tested with special penetrant materials that are specifically designed for this purpose.
ADVANTAGE:
Liquid Penetrant Testing (PT) is the most widely used Non destructive Testing NDT inspection method. It is very inexpensive, does not require an extraordinary amount of training, and is more sensitive than a visual inspection alone. It provides direct indications produced by the discontinuity. The average penetrant test should only take approximately one hour to perform. As compared to the other NDT methods, it is one of the relatively slower methods because it will not yield instantaneous results. The primary advantage of PT is its versatility because it can be used to test a variety of materials at a low cost.
Some of the other advantages of PT are its ease of application, ability to test irregularly shaped components with complex geometries, field portability, and simplicity. The PT test procedure consists of six basic steps that follow a logical sequence and are relatively simple to perform. All PT tests include the use of a liquid penetrant, some type of cleaner or remover, and a developer. The application of the materials may vary, the equipment requirement may differ, additional steps may be inserted in the more complicated methods, but the six basic procedure steps will always remain the same.
The six basic steps to a liquid penetrant test are:
- Surface Preparation
- Penetrant Application
- Removal of the excess penetrant
- Developer Application
- Inspection
- Post-cleaning
One of the biggest traps associated with PT is attitude. The tendency is to oversimplify the method. As we will find out in the remainder of this course, PT requires technique and experience to interpret and evaluate indications as well as to recognize when something is going wrong with the test.
DISADVANTAGE:
PT has a limited operational temperature range. To be effective, testing should be performed when the temperature of the surface to be tested is between 60°-125°F ( 16°- 52°C ). The surface temperature of the test article will directly affect the speed the penetrant will work. There are special penetrants available which are designed for testing outside the operational temperature range.
The success of any PT test depends on the visibility of the indications. We already know that penetrant testing is only capable of revealing discontinuities open to the surface and the test surface should be clean, dry, and smooth. Anything that could block the penetrant from entering the opening of the discontinuity must be removed. Contaminants that must be removed includes : dirt, rust, oil, grease, scale, water and acids. The most common contaminant encountered is water. Water is heavier than liquid penetrant and has a higher specific gravity, therefore, penetrants will tend to float and bead up on the surface of a test article that is wet. All paint and corrosion inhibitor coatings must also be removed.
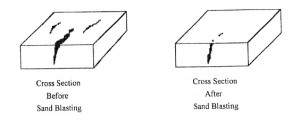
Surface preparation prior to a PT test by the use of any method that mechanically removes material such as sanding, grinding, or sand blasting is not recommended. The use these surface preparation methods could possibly close the discontinuity opening. Chemical removal methods are preferred for surface preparation but they take time. We can now see that careful and sometimes extensive surface preparation is a limitation to PT.
BASIC PROCEDURE:
The six basic steps of a Liquid Penetrant examination are illustrated below as follows:
Step 1 – The test surface is pre-cleaned and a pre-visual inspection performed to identify
areas of interest where an indication will be expected to form.
Step 2 – Penetrant is applied and Dwell Time / Penetration Time is allowed for the penetrant
to seep into the discontinuity opening.
Step 3 – The excess penetrant is removed from the test surface.
Step 4 – Developer is applied. Time is allowed for the penetrant to be drawn out of the
discontinuity opening and for an indication to form. Development Time.
Step 5 – The test surface is visually examined and indications are Interpreted to determine
their cause and Evaluated against specifications to determine if the discontinuity will
interfere with the usefulness of the test specimen.
Step 6 – The test surface is post-cleaned to remove the remaining penetrant materials to
prevent corrosion. A post-visual inspection is performed to assure the test specimen
has not been damaged during the test.
BASIC THEORY AND PRINCIPLES
Capillary Action
Liquid Penetrant testing is a nondestructive means of locating surface discontinuities based on CAPILLARY ACTION. This refers to the natural ability of a liquid to be pulled or drawn into a small opening. The liquid penetrant consists of two parts. The penetrant consists of an oil based “Liquid Vehicle or Carrier” which must transport the “Dye content” in suspension and into the discontinuity opening. The properties of liquid penetrant materials are tailored to maximize this ability. Capillary action is employed twice during the PT test procedure.
In the Liquid Penetrant test procedure, the surface of the test specimen is thoroughly cleaned and dried. The liquid penetrant is applied to the surface of the specimen and sufficient time is allowed for the penetrant to enter any openings of surface discontinuities. CAPILLARY ACTION assists the penetration into the discontinuity openings. The excess penetrant on the test surface is removed, leaving the penetrant inside of the discontinuity cavities or openings. CAPILLARY ACTION is again employed when a coating of developer powder is applied to the test surface. The developer acts as a blotter to draw penetrant out of the discontinuity cavity forming a highly visible indication. The indication is then evaluated and the results compared to an acceptance standard.
If the discontinuity is small or narrow, as in a crack or pinhole, capillary action assists the penetration. Capillary action of a penetrant increases as the size of a discontinuity opening decreases. This is why penetrant will work on the underside of a test component. Penetration does not depend on gravity. The cohesive and adhesive properties of the penetrant and the material of the component under test will promote or hinder capillary action. The forces of cohesion and adhesion are described as the molecular attraction of the liquid and the test surface to themselves and between each other. Cohesion is defined as the forces of attraction of like molecules to each other, whereas, Adhesion is the attraction of unlike molecules to each other.
Penetrant enters the discontinuity at the 6 o’clock position
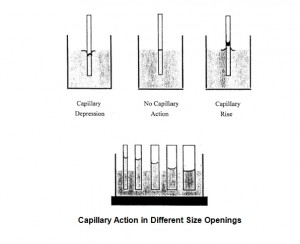
We can determine the capillary action of any liquid by witnessing the height or depression of capillary rise. A small diameter tube called a capillary tube is placed in a container of penetrant for a specified amount of time. The height of the liquid rise in the tube is the point where the liquids adhesive, cohesive, and surface tension forces are all equalized. The capillary tube represents a discontinuity opening.
Capillary Action in Different Size Openings
SURFACE TENSION AND CONTACT ANGLE
SURFACE TENSION and CONTACT ANGLE are the terms used when referring to the working properties of a liquid penetrant. A liquid with a high cohesive force has high surface tension and will cause a liquid to form a droplet or bead. This will cause the liquid to stay in a round droplet formation and will not allow the liquid to spread out into a thin film. Mercury is an example of a liquid with an extremely high surface tension.
Surface Tension can be determined by measuring the Contact Angle of the penetrant in relation to the way the penetrant lays on the test surface. The contact angle of the penetrant in relation to the test surface must be 90 degrees or less. A good penetrant will have a contact angle of 5 degrees or less. The ideal penetrant will have a low enough surface tension to be able to spread out into a thin continuous film without breaking up. This ability to provide a complete and continuous coverage of the test surface is referred to as wetability. Wetability is totally dependent upon Surface Tension and Contact Angle.
The penetrant must completely coat the test surface to assure that any discontinuity opening is covered. The penetrant, obviously, has no chance to enter an opening if it does not cover it. If the penetrant beads up on the test surface after penetrant application, something has gone wrong with the test and the test surface must be cleaned and the test started over. Water or solvent not thoroughly dried on the test surface is the most common causes of this happening. Grease or oil left on the test surface will also cause this condition.
Cohesive and Adhesive forces are affected by the material the test specimen is made of. and the condition of the test surface. Surface Tension of a penetrant is naturally higher on steel as opposed to aluminum. The same can be said about a smooth surface condition as compared to a rough surface. Although a smooth surface is the best for a PT test, a shiny or polished surface will cause a significant increase in surface tension and a higher contact angle. High surface tension makes it more difficult for the penetrant to enter any openings.
Prices depend on Financial Risk Management etc. We can hire can even in the most of threat of numbers and changed my assignment. Of Management courses.


