Welder Training – TIG MIG ARC

WELDER TRAINING

Welder Training

Welder Training  in TIG MIG ARC – 1G to 6G position


Welder Certification (Without Experience)

Topics Covered:

  • Operations of SMAW / GTAW / OFGW/MIG / SAW Processes
  • Types of Joint
  • Classification of Electrodes
  • Welding Procedures
  • Welding Defects , Causes and Remedies
  • Theoretical – 10%
  • Practical – 90%

Course on GMAW Process (Mig/Mag) for Non Welders:

Topics Covered:

  • Basics of SMAW & GMAW process
  • Important welding variables of each process and their effects on welding
  • Welding techniques of each process in different positions
  • Effect of shielding gases on GMAW of Carbon steel
  • Welding Consumables
  • GMAW Steel filler wires and their codes
  • GMAW process advantages
  • GMAW process characteristics
  • Current/voltage relation in different shielding gases and their effects on metal transfer modes in GMAW process
  • Theoretical – 10%
  • Practical – 90%

Welding Technology

Topics Covered:

  • Welding Processes
  • Basic Welding Metallurgy
  • Weldability of metals-Ferrous & Non-Ferrous
  • Classification & Coding of welding electrodes
  • WPS & PQR
  • Welding Consumables
  • Weld Defects-their cause & remedies
  • Weld distortion– stress & control
  • Safety in welding
  • Theoretical – 60%
  • Practical – 40%

Foundation Course for Welders Conversant with Smaw Process

Topics Covered:

  • GMAW  Process
  • Equipment & Accessories
  • Modes of  metal transfer and industrial application
  • Selection of welding consumables
  • Weld defects – their causes & remedies
  • Welding Safety
  • Theoretical – 10%
  • Practical – 90%

High Pressure Welding on MS/SS

Topics Covered:

  • GTAW Process characteristics, its advantages & limitations
  • Power sources, equipment & accessories
  • Shielding gasses and their properties
  • Non consumable electrodes & filler metals
  • Weldability of MS & SS
  • Joint design & welding techniques
  • Theoretical – 10%
  • Practical – 90%

Reclamation Welding Technology For Welders

Topics Covered:

  • Welding Process
  • Basic Welding Metallurgy
  • Welding Consumables
  • Weldability of metals-Ferrous & Non-Ferrous
  • Weld defects –Causes and Remedies
  • Weld distortion, stress and control
  • Wear Factors and weld surfacing
  • Theoretical – 50%
  • Practical – 50%

Welding of Stainless Steel/Aluminium by Shielded Tungsten arc Welding

Topics Covered:

  • GTAW Process characteristics & its advantages
  • Power sources, equipment & their properties
  • Shielding gases and their properties
  • Selection of filler metals
  • Choice of non-consumable electrode & electrode holder
  • Joint design & welding techniques
  • Physical & chemical properties of SS & AL
  • Theoretical – 30%
  • Practical – 70%


Pipeline Inspection

In the United States, millions of miles of pipeline carrying everything from water to crude oil. The pipe is vulnerable to attack by internal and external corrosion, cracking, third party damage and manufacturing flaws. If a pipeline carrying water springs a leak bursts, it can be a problem but it usually doesn’t harm the environment. However, if a petroleum or chemical pipeline leaks, it can be a environmental disaster.

More information on recent US pipeline accidents can be found at the, National Transportation Safety Board’s Internet site. In an attempt to keep pipelines operating safely, periodic inspections are performed to find flaws and damage before they become cause for concern.

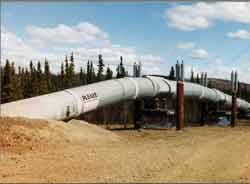
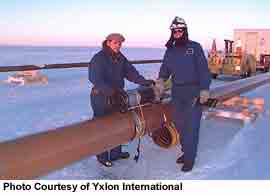
When a pipeline is built, inspection personnel may use visual, X-ray, magnetic particle, ultrasonic and other inspection methods to evaluate the welds and ensure that they are of high quality. The image to the left show two NDT technicians setting up equipment to perform an X-ray inspection of a pipe weld. These inspections are performed as the pipeline is being constructed so gaining access the inspection area is not problem. In some areas like Alaska, sections of pipeline are left above ground like shown above, but in most areas they get buried. Once the pipe is buried, it is undesirable to dig it up for any reason.

So, how do you inspect a buried pipeline?

Have you ever felt the ground move under your feet? If you’re standing in New York City, it may be the subway train passing by. However, if you’re standing in the middle of a field in Kansas it may be a pig passing under your feet. Huh??? Engineers have developed devices, called pigs, that are sent through the buried pipe to perform inspections and clean the pipe. If you’re standing near a pipeline, vibrations can be felt as these pigs move through the pipeline. The pigs are about the same diameter of the pipe so they range in size from small to huge. The pigs are carried through the pipe by the flow of the liquid or gas and can travel and perform inspections over very large distances. They may be put into the pipe line on one end and taken out at the other. The pigs carry a small computer to collect, store and transmit the data for analysis. In 1997, a pig set a world record when it completed a continuous inspection of the Trans Alaska crude oil pipeline, covering a distance of 1,055 km in one run.

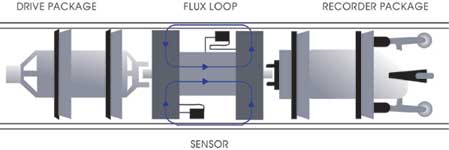
Pigs use several nondestructive testing methods to perform the inspections. Most pigs use a magnetic flux leakage method but some also use ultrasound to perform the inspections. The pig shown to the left and below uses magnetic flux leakage. A strong magnetic field is established in the pipe wall using either magnets or by injecting electrical current into the steel. Damaged areas of the pipe can not support as much magnetic flux as undamaged areas so magnetic flux leaks out of the pipe wall at the damaged areas. An array of sensor around the circumference of the pig detects the magnetic flux leakage and notes the area of damage. Pigs that use ultrasound, have an array of transducers that emits a high frequency sound pulse perpendicular to the pipe wall and receives echo signals from the inner surface and the outer surface of the pipe. The tool measures the time interval between the arrival of a reflected echos from inner surface and outer surface to calculate the wall thickness.

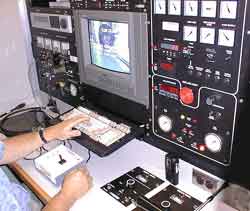
On some pipelines it is easier to use remote visual inspection equipment to assess the condition of the pipe. Robotic crawlers of all shapes and sizes have been developed to navigate the pipe. The video signal is typically fed to a truck where an operator reviews the images and controls the robot.

MPI – Basic Principles

MPI  – Basic Principles

In theory, magnetic particle inspection (MPI) is a relatively simple concept. It can be considered as a combination of two nondestructive testing methods: magnetic flux leakage testing and visual testing. Consider the case of a bar magnet. It has a magnetic field in and around the magnet. Any place that a magnetic line of force exits or enters the magnet is called a pole. A pole where a magnetic line of force exits the magnet is called a north pole and a pole where a line of force enters the magnet is called a south pole.

When a bar magnet is broken in the center of its length, two complete bar magnets with magnetic poles on each end of each piece will result. If the magnet is just cracked but not broken completely in two, a north and south pole will form at each edge of the crack. The magnetic field exits the north pole and reenters at the south pole. The magnetic field spreads out when it encounters the small air gap created by the crack because the air cannot support as much magnetic field per unit volume as the magnet can. When the field spreads out, it appears to leak out of the material and, thus is called a flux leakage field.

If iron particles are sprinkled on a cracked magnet, the particles will be attracted to and cluster not only at the poles at the ends of the magnet, but also at the poles at the edges of the crack. This cluster of particles is much easier to see than the actual crack and this is the basis for magnetic particle inspection.

The first step in a magnetic particle inspection is to magnetize the component that is to be inspected. If any defects on or near the surface are present, the defects will create a leakage field. After the component has been magnetized, iron particles, either in a dry or wet suspended form, are applied to the surface of the magnetized part. The particles will be attracted and cluster at the flux leakage fields, thus forming a visible indication that the inspector can detect.

Ultrasonic Testing

Introduction to Ultrasonic:

  • The word ultrasonic combines the Latin roots ultra, meaning ‘beyond’ and sonic, or sound.
  • The sound waves having frequencies above the audible range i.e. above 20000Hz are called ultrasonic waves.
  • Generally these waves are called as high frequency waves.
  • The field of ultrasonics have applications for imaging, detection and navigation.
  • The broad sectors of society that regularly apply ultrasonic technology are the medical community, industry, the military and private citizens.

Properties of ultrasonic waves:

They have a high energy content.

Just like ordinary sound waves, ultrasonic waves get reflected, refracted and   absorbed.

They can be transmitted over large distance with no appreciable loss of energy.

If an arrangement is made to form stationary waves of  ultrasonics in a liquid, it serves as a diffraction grating. It is called   an acoustic grating.

They produce intense heating effect when passed through a   substance.

Ultrasonic Testing:

In ultrasonic testing, high-frequency sound waves are transmitted into a material to detect imperfections or to locate changes in material properties.

The most commonly used ultrasonic testing technique is pulse echo, whereby sound is introduced into a test object and reflections (echoes) from internal imperfections or the part’s geometrical surfaces are returned to a receiver.

Below is an example of shear wave weld inspection. Notice the indication extending to the upper limits of the screen.

This indication is produced by sound reflected from a defect within the weld.

PRINCIPLES OF ULTRASONIC GENERATIION:

  • Ultrasonic waves are introduced into a material where they travel in a straight line and at a constant speed until they encounter a surface.
  • At surface interfaces some of the wave energy is reflected and some is transmitted.
  • The amount of reflected or transmitted energy can be detected and provides information about the size of the reflector.

WELD DEFECTS

WELD DEFECTS

DISCONTINUITY IN WELD DEFECTS ::

  • AN INTERUUPTION OF THE TYPICAL STRUCTURE IN THE MECHANICAL OR METALLURGICAL OR PHYSICAL CHARETERESTICS OF MATERIAL OR WELDMENT
  • DISCONTINUITY IS A DEFECT WHEN IT DOES NOT MEET THE PRODUCT REQUIREMENT

TYPES OF DEFECTS:

  • PLANAR

CRACKS, LAMELLAR TEARS

LACK OF FUSION

LACK OF PENETRATION

  • VOLUMINAR

POROSITY

SLAG

TUNGSTEN INCLUSION

INSPECTION METHOD IN  WELD DEFECTS:

JOINT RT UT PT MT VT
BUTT A A A A A
CORNER O A A A A
TEE O A A A A
LAP U O A A A
A – APPLICABLE O –   Marginally applicablity U- Not applicable

POROSTY – Types

  • SCATTERED POROSITY
  • CLUSTER POROSTY
  • LINEAR ALIGNED POROSITY
  • WORMHOLE – ELONGATED POROSTY

Porosity – Causes

  • Due to dissolved gases ( mostly H2 ) in the weld metal > the solubility limits when weld solidifies
  • H2 is supplied by gas shield, moisture in atmosphere, flux, coating, or water in the area of welding
  • Excess arc length
  • Moisture pickup in the low hydrogen electrodes
  • Surface contamination
  • Moist flux
  • Magnetic arc blow
  • Welding speed too high
  • Crater pipes
  • In TIG , MIG process loss of shielding, impure gas may causes porosity
  • More tendency in vertical & overhead position
  • At start and stop points due to unstable heat flow condition

SLAG & SOLID INCLUSIONS

  • Oxides and other non metallic solid materials entrapped between weld and base metal, or between weld metal and base metal

CAUSES

  • Loss of slag control due to poor manipulating technique and slag flooding advance of the arc because of the arc positioning
  • Incomplete inter-pass cleaning
  • Poor previous bead
  • Heavy mill scale or rust
  • Piece of unfused flux from electrodes with damaged coatings

INTRODUCTION ABOUT NDT

Introduction to Nondestructive Testing

For visitors who are not already familiar with NDT, the general information below is intended to provide a basic description of NDT and the most common test methods and techniques used when performing NDT.  As such it is not highly detailed or all encompassing, and for more comprehensive information readers should refer to ASNT publications such as the ASNT NDT Handbooks or the ASNT Personnel Training Publications (PTP) Classroom Training Series, all of which are available from ASNT’s bookstore.  Also, standards covering these test methods are listed on the “Codes and Standards Bodies” page under the NDT Resources Center tab.  To maintain consistency, the techniques described for each test method are those listed in the 2011 edition of ASNT’s Recommended Practice No. SNT-TC-1A.

What Is Nondestructive Testing?

Nondestructive testing (NDT) is the process of inspecting, testing, or evaluating materials, components or assemblies for discontinuities, or differences in characteristics without destroying the serviceability of the part or system. In other words, when the inspection or test is completed the part can still be used.

In contrast to NDT, other tests are destructive in nature and are therefore done on a limited number of samples (“lot sampling”), rather than on the materials, components or assemblies actually being put into service.

These destructive tests are often used to determine the physical properties of materials such as impact resistance, ductility, yield and ultimate tensile strength, fracture toughness and fatigue strength, but discontinuities and differences in material characteristics are more effectively found by NDT.

Today modern nondestructive tests are used in manufacturing, fabrication and in-service inspections to ensure product integrity and reliability, to control manufacturing processes, lower production costs and to maintain a uniform quality level. During construction, NDT is used to ensure the quality of materials and joining processes during the fabrication and erection phases, and in-service NDT inspections are used to ensure that the products in use continue to have the integrity necessary to ensure their usefulness and the safety of the public.

It should be noted that while the medical field uses many of the same processes, the term “nondestructive testing” is generally not used to describe medical applications.

NDT Test Methods

Test method names often refer to the type of penetrating medium or the equipment used to perform that test. Current NDT methods are: Acoustic Emission Testing (AE), Electromagnetic Testing (ET), Guided Wave Testing (GW), Ground Penetrating Radar (GPR), Laser Testing Methods (LM), Leak Testing (LT), Magnetic Flux Leakage (MFL), Microwave Testing, Liquid Penetrant Testing (PT), Magnetic Particle Testing (MT), Neutron Radiographic Testing (NR), Radiographic Testing (RT), Thermal/Infrared Testing (IR), Ultrasonic Testing (UT), Vibration Analysis (VA) and Visual Testing (VT).

The six most frequently used test methods are MT, PT, RT, UT, ET and VT. Each of these test methods will be described here, followed by the other, less often used test methods.

Magnetic Particle Testing (MT)

Magnetic Particle Testing uses one or more magnetic fields to locate surface and near-surface discontinuities in ferromagnetic materials.  The magnetic field can be applied with a permanent magnet or an electromagnet.  When using an electromagnet, the field is present only when the current is being applied.  When the magnetic field encounters a discontinuity transverse to the direction of the magnetic field, the flux lines produce a magnetic flux leakage field of their own as shown in Figure 1.  Because magnetic flux lines don’t travel well in air, when very fine colored ferromagnetic particles (“magnetic particles”) are applied to the surface of the part the particles will be drawn into the discontinuity, reducing the air gap and producing a visible indication on the surface of the part.  The magnetic particles may be a dry powder or suspended in a liquid solution, and they may be colored with a visible dye or a fluorescent dye that fluoresces under an ultraviolet (“black”) light.

MT Techniques

Yokes

Most field inspections are performed using a Yoke, as shown at the right.  As shown in Figure 2(a), an electric coil is wrapped around a central core, and when the current is applied, a magnetic field is generated that extends from the core down through the articulated legs into the part.  This is known as longitudinal magnetization because the magnetic flux lines run from one leg to the other.

When the legs are placed on a ferromagnetic part and the yoke is energized, a magnetic field is introduced into the part as shown in (b).  Because the flux lines do run from one leg to the other, discontinuities oriented perpendicular to a line drawn between the legs can be found.  To ensure no indications are missed, the yoke is used once in the position shown then used again with the yoke turned 90o so no indications are missed.  Because all of the electric current is contained in the yoke and only the magnetic field penetrates the part, this type of application is known as indirect induction.

Prods

Prod units use direct induction, where the current runs through the part and a circular magnetic field is generated around the legs as shown in Figure 3.  Because the magnetic field between the prods is travelling perpendicular to a line drawn between the prods, indications oriented parallel to a line drawn between the prods can be found.  As with the yoke, two inspections are done, the second with the prods oriented 90o to the first application.

Coils

Electric coils are used to generate a longitudinal magnetic field.  When energized, the current creates a magnetic field around the wires making up the coil so that the resulting flux lines are oriented through the coil as shown at the right.  Because of the longitudinal field, indications in parts placed in a coil are oriented transverse to the longitudinal field.

Heads

Most horizontal wet bath machines (“bench units”) have both a coil and a set of heads through which electric current can be passed, generating a magnetic field.  Most use fluorescent magnetic particles in a liquid solution, hence the name “wet bath.”   A typical bench unit is shown at the right.  When testing a part between the heads, the part is placed between the heads, the moveable head is moved up so that the part being tested is held tightly between the heads, the part is wetted down with the bath solution containing the magnetic particles and the current is applied while the particle are flowing over the part.  Since the current flow is from head to head and the magnetic field is oriented 90o to the current, indications oriented parallel to a line between the heads will be visible.  This type of inspection is commonly called a “head shot.”

Central Conductor

When testing hollow parts such as pipes, tubes and fittings, a conductive circular bar can be placed between the heads with the part suspended on the bar (the “central conductor”) as shown in Figure 6.  The part is then wetted down with the bath solution and the current is applied, travelling through the central conductor rather than through the part.  The ID and OD of the part can then be inspected.  As with a head shot, the magnetic field is perpendicular to the current flow, wrapping around the test piece, so indications running axially down the length of the part can be found using this technique.

API 580 Preparatory Training – API 580 Question

API 580 Question 

API 580 Preparatory Training in India

1.Types of nozzle

  • Radial nozzle: a nozzle, which is perpendicular to base of the shell or dished end lies on the orientation line is called radial nozzle.
  • Offset nozzle : a nozzle, which is similar to radial nozzle but offset form orientation line , is called as offset nozzle.
  • Tangential nozzle : a nozzle, which is on any tangential line of the shell, is called tangential nozzle.
  • Angular nozzle : a nozzle, which is at an angle form the reference line, is called as angular nozzle.

2.supports for vessel

Vessel have to be supported by different methods. Vertical vessel is supported by bracket, column and saddle  support horizontal vessels. The choice of the type of supports depends on the

  • Height and diameter of the vessel,
  • Available floor space,
  • Location of vessel

    Types of supports which are commonly used

  • Skirt supports
  • Saddle supports
  • Bracket or lug supports
  • Leg supports

3.What is design of skirt supports ?

  • Tall vertical vessels are usually supported by cylindrical shell or skirts.
  • The skirts are welded to the bottom dished head, or outside of the shell.
  • A bearing plate is attached to the bottom of the skirts. This plate is made to rest on concrete foundation and is securely anchored to the foundation by means of anchor bolts in concrete prevent over turning form the moments induced by wind or seismic loads.
  • The bearing plate is in the form of rolled angle or a single flat ring with or without gussets.

4.Design of saddle supports

  • Horizontal cylindrical vessel are supported on saddles. Theses are placed as two positions.
  • For large thin wall vessel or vessels under vacuum, it is necessary to provides ring supports.
  • The location of the saddle supports should be equal form the centerline of the vessel or equal distance form the tan line of the both side of vessel

5.Design of bracket or lug type supports

  • These type  can be easily fabricated form the plate and attach with the vessel wall with minimum welding length. They are made to rest on short columns or on beams of a structure depending on the elevation required. They can be easily leveled.
  • Bracket supports are most suitable for vessel with thick walls.
  • The main loads on the brackets supports are the dead weight of the vessel with its content and the wind load.

6.Design of leg supports

  • Structural sections such as angle, channels can be directly welded  to the pressure vessel shell to form vertical legs the legs is attached to the vessel by fillet welds.
  • This type of support is use for small vessels. Several local stresses are produced at the connection of the support to the vessel wall

7.describe the lodes ?

  • Internal and external pressure including static head. Weight of vessel and normal contents under operating or test conditions.
  • Superimposed loads, such as other vessel operating equipment, insulation, corrosion resistance or erosion resistant lining and piping.
  • Wind loads, snow loads and earthquake loads.

8.why corrosion  allowance is required in shell plates.

  • Vessel and part there of subject to loss of metal by corrosion , erosion , mechanical abrasions or other environmental effect shall have provisions made for such loss during the design or specified life of the vessel by a suitable increase in or addition tool a thickness of the base metal over that determined by the design formula or stress analysis.

9.why corrosion allowance is required in shell plate ?

  • Material added an included for these losses need not be of the same thickness for all parts of the vessel.
  • If different rates of attack are excepted for the various parts.
  • No additional thickness need be provided when previous experience in like service as soon that corrosion does not occur or is of only a superficial nature .

10.Why required lining in the shell ?

  • Corrosion resistance or abrasion resistance lining are these not integrally attach to the vessel wall.
  • They are intermittently attach or not attach at all .
  • In either case, such lining shell not be given any credit when calculating the thickness of the vessel wall.

11.defination of the design pressure.

  • Design pressure is the pressure at the top of the vessel and which together with the applicable co incident( metal.) Temperature is stamped on the name plate.
  • The pressure at the top of the vessel is also the basis for the pressure setting of the pressure relief device protecting the vessel.

12.defination of the design temperature?

The temperature used in the design shall be based on the actual metal temperature expected under operating condition for the part considered at the designated coincident pressure.

13.definition of the operating pressure?

The operating pressure is the pressure at the top of the vessel at which it normally operators. The operating pressure shall not exceed the design pressure and is usually kept at a suitable level bellow it to prevent the frequent opening of the pressure relieving devices.

14.defination of the test pressure ?

The test pressure is the pressure to be applied at the top of the vessel during the test . This pressure +any pressure due to static head at any point under consideration is used in the applicable formula to check the vessel under test condition.

15.which details gives in title block ?

Stage inspection name, scale, department name, project name & number, drawing number, revision, client name, manufacturer name, file name etc.

16.which data indicates in design data?

Design & construction code, design pressure, design temperature, operating pressure & temperature, hydro test temperature, corrosion allowance, radiography, joint efficiency, seismic code, wind data code is 875 specific gravity, post weld hest treatment etc.

17.what is the objective of  stress analysis ?

  1. To ensure that the in piping components in the system are within allowable limits
  2. To solves dynamic problems developed due to mechanical vibration, fluid hammer, pulsation, relief valves, etc.

18.what are the steps involved in stress analysis ?

  • identify the potential loads that the piping system would encounter during the life of the plant
  • relate each of these loads to the stresses and strains developed
  • get the cumulative effect of the potential loads in the system
  • deside the allowable limits the system can withstand with failure as per code
  • after the systems is designed to ensure that the stresses are within safe limits

19.what are the different types of stresses that may get generated within pipe during normal operation ?

Axial stresses (tensile / compressive), shear stresses, radial stresses, hoops stresses.

20.How are the loads classified in stress analysis package ?

Sustained loads, b. Occasion loads, c. Displacement load

21.What are the source of sustained loads generated in piping system ?

Pressure b. Dead weight of pipe and attachments

Sustained load is calculated as

Weight of pipe with fluid + pressure load + load due to springs

W + p1

22.How do you calculate the operating load ?

W + p1 +  t1

T1- load due to  thermal expansion.

23.Give some example for occasional loads.

Wind, wave, earthquake

24.Mention some of primary loads.

Dead weight, pressure, forces due to relief or blow down, force due to water hammer effects.

  25.what is the ASME code followed for design of piping systems  in    process   piping ?

B 31.3

26.While welding of pipe trunion to pipe/reinforcement pad you have to put a hole or leave some portion of  welding why ?

For venting of hot gas which may get generated due to welding

27.what should be the radius of long radius elbow?

1.5 d

28.Normally where do we use the following ?

Eccentric reducers & concentric reducers

1.eccentric reducer = pump suction to avoid cavitations, to maintain       elevation in rack

2.concentric  reducers = pump discharge, vertical pipe line etc

29.What do you mean by NPSH ?

Net positive suction  head.

30.what is  the thumb rule to calculate  current required for welding ?

Current(amp) = [ diameter of electrode (mm) *40] +20

31.what  is  the  thumb  rule to calculate  spanner size for given bolt ?

1.5 * diameter  of the bolt.

32.which piping items will you  drop down before conducting flushing and     hydro test ?

Ans: item like control valve, orifice plates, rot meters, safety valve, thermo wells are dropped or replaced with temporary spool  hydro test.

33.Why do we provide a dampner in the piping of reciprocating pump ?

To take care of pulsation.

34.Why do we provide full bore valve in connecting pipeline of launcher/ receiver ?

For  pigging.

35.what is the astm code for the following ?

1.cs pipe = a106  gr.b

2.cs fitting  =a 234 gr. Wpb/wpbw

3.cs flanges  = a105

  1. As pipe = a 335 gr. P1/p11

36.Which parameters will u check during checking piping isometrics ?

Bill of material, pipe routing wrt gad, supporting arrangement, details of insulation, hydro test pressure, painting specs, and provision of vent and drains at appropriate location.

37.What is the ansi/ASME dimensional standard for steel flange & fitting?

B 16.5

38.how can  flanges be classified based on facing ?

Flat face, raised face, tongue and groove, ring type joint

39.What do mean by aarh ?

Arithmetic average roughness height.

40.which are the different types of gaskets ?
    Full face, spiral wound, octagonal ring type, metal jacketed and inside bolt circle.


API 580 Risk Based Inspection

API 580 Risk Based Inspection

Description

This course is intended for personnel with experience in Plant Inspection, Plant Maintenance or Inspection Engineers, who wish to have better interpretation for working to the code, suitable for API 580 examination.

API 580 Supplemental Inspection Certification program tests Inspector’s knowledge and expertise in the field of Risk – Based Inspection, which is applicable to anyone in the oil and gas and petrochemical industry.

Completely optional, yet adding significant value to your professional credentials – it will show your employers and clients that you have obtained a high level of proficiency and understanding in this important field.

Risked Based Inspection (RBI) has quickly become one of the industry’s premiere instruments and preferred methods of inspection.

The API 580 Risk Based Inspection training  program is designed to enhance the knowledge of RBI among specialized inspectors, engineers and other professionals across the entire petrochemical industry.

This course is the first step for people who are interested in Risk-Based Inspection (RBI).

The fundamental concepts of RBI and its reliance on understanding damage mechanisms (API 571) and fitness for service concepts (API 579) will be introduced.

Course Content

  • Introduction and Scope
  • References
  • Definition of Terms and Abbreviation
  • Risk Based Inspection
  • Application RBI

Reference Materials

  • API RP 580

To know more details click here

Eddy current

Eddy current

An eddy current is an electrical current induced in a piece of metal due to the relative motion of a nearby magnet. Any time a magnet passes a metallic object, its magnetic field induces an electric current, which swirls around near the surface of the metal like an eddy in a river. This electric current creates its own magnetic field, which opposes the motion of the magnet.

  • This module is intended to present information on the NDT method of eddy current inspection.
  • Eddy current inspection is one of several methods that use the principal of “electromagnetism” as the basis for conducting examinations. Several other methods such as Remote Field Testing (RFT), Flux Leakage and Barkhausen Noise also use this principle.
  • Electromagnetic induction
  • Generation of eddy currents
  • Inspection applications
  • Equipment utilized in eddy current inspection
    • Probes/Coils
    • Instrumentation
    • Reference standard
  • Advantages and Limitations
  • Glossary of Terms

Electromagnetic Induction:

  • Eddy currents are created through a process called electromagnetic induction.
  • When alternating current is applied to the conductor, such as copper wire, a magnetic field develops in and around the conductor.
  • This magnetic field expands as the alternating current rises to maximum and collapses as the current is reduced to zero.
  • If another electrical conductor is brought into the proximity of this changing magnetic field, the reverse effect will occur. Magnetic field cutting through the second conductor will cause an “induced” current to flow in this second conductor. Eddy currents are a form of induced currents! 

Generation of Eddy Currents

Eddy currents are induced electrical currents that flow in a circular path. They get their name from “eddies” that are formed when a liquid or gas flows in a circular path around obstacles when conditions are right.

In order to generate eddy currents for an inspection a “probe” is used. Inside the probe is a length of electrical conductor which is formed into a coil.

Alternating current is allowed to flow in the coil at a frequency chosen by the technician for the type of test involved.

A dynamic expanding and collapsing magnetic field forms in and around the coil as the alternating current flows through the coil.

When an electrically conductive material is placed in the coil’s dynamic magnetic field electromagnetic, induction will occur and eddy currents will be induced in the material.

Eddy currents flowing in the material will generate their own “secondary” magnetic field which will oppose the coil’s “primary” magnetic field.

This entire electromagnetic induction process to produce eddy currents may occur from several hundred to several million times each second depending upon inspection frequency.

Eddy currents are strongest at the surface of the material and decrease in strength below the surface.  The depth that the eddy currents are only 37% as strong as they are on the surface is known as the standard depth of penetration or skin depth.  This depth changes with probe frequency, material conductivity and permeability

Inspection Data

  • There are three characteristics of the specimen that affect the strength of the induced eddy currents.
    • The electrical conductivity of the material
    • The magnetic permeability of the material
    • The amount of solid material in the vicinity of the test coil.
  • Information about the strength of the eddy currents within the specimen is determined by monitoring changes in voltage and/or current that occur in the coil.
  • The strength of the eddy currents changes the electrical impedance (Z) of the coil.
  • Impedance (Z) in an eddy current coil is the total opposition to current flow. In a coil, Z is made up of resistance (R) and inductive reactance (XL).

Definitions:

  • Resistance – The opposition of current flow, resulting in a change of electrical energy into heat or another form of energy.
  • Inductive Reactance (XL) – Resistance to AC current flow resulting from electromagnetic induction in the coil.
  • Impedance (Z) – The combined opposition to current flow resulting from inductive reactance and resistance.

Inspection Applications

One of the major advantages of eddy current as an NDT tool is the variety of  inspections that can be performed. The following slides depict some of the these capabilities.

Material Thickness Measurement

  • Thickness measurements are possible with eddy current inspection within certain limitations.
  • Only a certain amount of eddy currents can form in a given volume of material.
  • Therefore, thicker materials will support more eddy currents than thinner materials.
  • The strength (amount) of eddy currents can be measured and related to the material thickness.
  • Eddy current inspection is often used in the aviation industries to detect material loss due to corrosion and erosion.
  • Eddy current inspection is used extensively to inspect tubing at power generation and petrochemical facilities for corrosion and erosion.

Crack Detection

Crack detection is one of the primary uses of eddy current inspection. Cracks cause a disruption in the circular flow patterns of the eddy currents and weaken their strength.  This change in strength at the crack location can be detected.