Ultrasonic Testing

ULTRASONIC TESTING

INTRODUCTION:

  • This module presents an introduction to the NDT method of ultrasonic testing.
  • Ultrasonic testing uses high frequency sound energy to conduct examinations and make measurements.
  • Ultrasonic examinations can be conducted on a wide variety of material forms including castings, forgings, welds, and composites.

A considerable amount of information about the part being examined can be collected, such as the presence of discontinuities, part or coating thickness; and acoustical properties can often be correlated to certain properties of the material

OUTLINE FOR ULTRASONIC TESTING :

  • Basic Principles of sound generation
  • Transducers
  • Instrumentation
  • Advantages and Limitations

BASIC PRINCIPLES OF SOUND:

  • Sound is produced by a vibrating body and travels in the form of a wave.
  • Sound waves travel through materials by vibrating the particles that make up the material.
  • The pitch of the sound is determined by the  frequency of the wave  (vibrations or cycles  completed in a certain
    period of time).
  • Ultrasound is sound with a pitch too high to be detected by the human ear.

ULTRASONIC GENERATION IN ULTRASONIC TESTING:

              Ultrasound is generated with a transducer in ultrasonic testing.

PRINCIPLES OF ULTRASONIC GENERATIION:

  • Ultrasonic waves are introduced into a material where they travel in a straight line and at a constant speed until they encounter a surface.
  • At surface interfaces some of the wave energy is reflected and some is transmitted.
  • The amount of reflected or transmitted energy can be detected and provides information about the size of the reflector.

TRANSDUCERS IN ULTRASONIC TESTING:

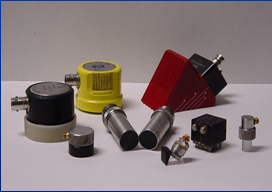
  • Transducers are manufactured in a variety of forms, shapes and sizes for varying applications.
Ultrasonic testing

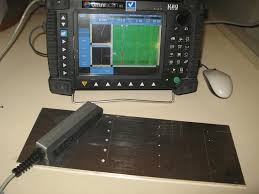
Transducer

INSTRUMENTATION IN ULTRASONIC TESTING:

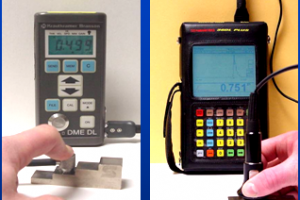
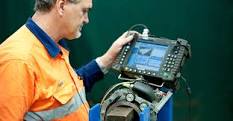
  • In Ultrasonic testing, Ultrasonic equipment is usually purchased to satisfy specific inspection needs, some users may purchase general purpose equipment to fulfill a number of inspection applications.
Ultrasonic testing

Instrument

ADVANTAGES OF ULTRASONIC TESTING:

  • Ultrasonic testing is sensitive to small discontinuities both surface and subsurface.
  • Depth of penetration for flaw detection or measurement is superior to other methods.
  • Only single-sided access is needed when pulse-echo technique is used.
  • Ultrasonic testing has high accuracy in determining reflector position and estimating size and shape.
  • Minimal part preparation required.
  • In Ultrasonic testing, Electronic equipment provides instantaneous results.
  • Detailed images can be produced with automated systems.
  • Has other uses such as thickness measurements, in addition to flaw detection.

LIMITATIONS OF ULTRASONIC TESTING:

  • In Ultrasonic testing, surface must be accessible to transmit ultrasound.
  • Skill and training is more extensive than with some other methods.
  • Ultrasonic testing normally requires a coupling medium to promote transfer of sound energy into test specimen.
  • Materials that are rough, irregular in shape, very small, exceptionally thin or not homogeneous are difficult to inspect.
  • Cast iron and other coarse grained materials are difficult to inspect in ultrasonic testing  due to low sound transmission and high signal noise.
  • Linear defects oriented parallel to the sound beam may go undetected.
  • Reference standards are required for both equipment calibration, and characterization of flaws in Ultrasonic testing.

To Learn Ultrasonic Testing Kindly Contact Us…


Magnetic Particle Testing MT


Magnetic Particle Testing  MT


INTRODUCTION

Magnetic Particle Testing MT  , also known as a mag test is a common method of nondestructive examination (NDE). It is a flexible technique that can be performed under a variety of conditions, including underwater.

When discussing magnetic particle theory, we usually classify materials into the following three categories:

Diamagnetic – those materials that cannot be magnetized (Copper, Gold Silver)

Paramagnetic – those materials that will accept magnetism but only slightly (Magnesium, Lithium, Titanium)

Ferromagnetic – those materials that can be strongly magnetized and are suitable for magnetic particle inspection (Iron, Cobalt, Nickel and their alloys)

Ferromagnetic materials are not magnetized in direct proportion to the applied magnetizing force. There is a limit, called the saturation point, beyond which a part cannot be made more magnetic.

You can use an Magnetic Particle Testing MT on all types of welds as long as the material is ferromagnetic. You will normally use an Magnetic Particle Testing MT to inspect finished welds. However, you may also use it to inspect each pass of a multiple-pass weld.

An MT can detect surface and near-surface discontinuities. However, do not use an Magnetic Particle Testing MT as a substitute for radiographic (RT) or ultrasonic (UT) testing for subsurface defects.

The purpose of this module is to train you to perform an Magnetic Particle Testing  MT on finished or partial welds.

In this Introduction, you will become familiar with the principals of magnetism for an Magnetic Particle Testing MT.


Principals of Magnetism for the Magnetic Particle Testing  MT

Magnetic Poles

A material that possesses the ability to attract iron pieces is called a magnet. Ferromagnetic materials make the best magnets.

Magnets may be permanent, retaining their magnetism more or less permanently, or temporary, retaining their magnetism only as long a magnetizing force is being applied.

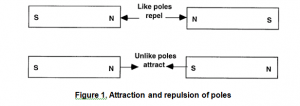
Each magnet has at least two opposite poles. Opposite, or unlike, poles attract each other; like poles repel (see Figure 1). The magnet’s ability to attract or repel is not uniform over its surface; it is concentrated in its poles.

Magnetic Particle Testing MT

Magnetic Lines of Force

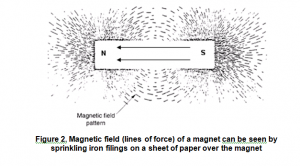
Lines of force represent the direction and strength of a magnet’s field, or power. All magnets have magnetic lines of force, also called a magnetic field or flux. In Figure 2, a bar magnet is covered with a sheet of paper and iron filings are scattered over the paper. The iron filings arrange themselves to follow the magnetic lines of force. As you can see, the lines of force never cross; they seek the path of least resistance.

Figure 2 shows that the lines of force are most densely packed at the poles of the magnet. The flow is from north to south outside the magnet, but within the magnet the flow is from south to north.

Magnetic Particle Testing MT

Magnetic lines of force have the following characteristics:

  1. They form closed loops.
  2. They return upon themselves and form closed paths.
  3. They never cross.
  4. They seek the path of least resistance.
  5. They are most densely packed at the poles.
  6. They flow from north to south outside the magnet and from south to north inside the magnet.

Horseshoe Magnet

If a bar magnet is bent, it becomes a horseshoe magnet (Figure 3, left side).

When the magnet is bent to make a complete circle and the ends are fused together, the poles disappear and a closed magnetic circuit is formed (circular magnet) (Figure 3, center).

If the circle is cut, either partially or all the way through, the poles will reappear (Figure 3, right side). This break causes a deformity in the lines of force. This deformity in the lines of force is the basis for the principle of magnetic particle examination.


To Learn Magnetic Particle Testing (MT)  Contact us….


Visual Inspection


VISUAL INSPECTION

Introduction
VISUAL INSPECTION is a nondestructive testing technique that provides a means of detecting and examining a variety
of surface flaws, such as corrosion, contamination, surface finish, and surface discontinuities on joints (for example,
welds, seals, solder connections, and adhesive bonds). Visual inspection is also the most widely used method for detecting
and examining surface cracks, which are particularly important because of their relationship to structural failure
mechanisms. Even when other nondestructive techniques are used to detect surface cracks, visual inspection often
provides a useful supplement. For example, when the eddy current examination of process tubing is performed, visual
inspection is often performed to verify and more closely examine the surface disturbance.
Given the wide variety of surface flaws that may be detectable by visual examination, the use of visual inspection may
encompass different techniques, depending on the product and the type of surface flaw being monitored. This article
focuses on some equipment used to aid the process of visual inspection. The techniques and applicability of visual
inspection for some products are considered in the Selected References in this article and in the Section “Nondestructive
Inspection of Specific Products” in this Volume.
The methods of visual inspection involve a wide variety of equipment, ranging from examination with the naked eye to
the use of interference microscopes for measuring the depth of scratches in the finish of finely polished or lapped
surfaces. Some of the equipment used to aid visual inspection includes:
· Flexible or rigid borescopes for illuminating and observing internal, closed or otherwise inaccessible
areas
· Image sensors for remote sensing or for the development of permanent visual records in the form of
photographs, videotapes, or computer-enhanced images
· Magnifying systems for evaluating surface finish, surface shapes (profile and contour gaging), and
surface microstructures
· Dye and fluorescent penetrants and magnetic particles for enhancing the observation of surface cracks
(and sometimes near-surface conditions in the case of magnetic particle inspection)
This article will review the use of the equipment listed above in visual inspection, except for dye penetrants and magnetic
particles, which are discussed in the articles “Liquid Penetrant Inspection” and “Magnetic Particle Inspection,”
respectively, in this Volume.

Visual Inspection
Borescopes
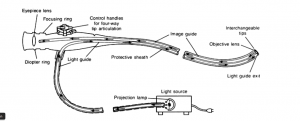
A borescope (Fig. 1) is a long, tubular optical device that illuminates and allows the inspection of surfaces inside narrow
tubes or difficult-to-reach chambers. The tube, which can be rigid or flexible with a wide variety of lengths and diameters,
provides the necessary optical connection between the viewing end and an objective lens at the distant, or distal, tip of the
borescope. This optical connection can be achieved in one of three different ways:
· By using a rigid tube with a series of relay lenses
· By using a tube (normally flexible but also rigid) with a bundle of optical fibers
· By using a tube (normally flexible) with wiring that carries the image signal from a charge-coupled
device (CCD) imaging sensor at the distal tip
These three basic tube designs can have either fixed or adjustable focusing of the objective lens at the distal tip. The distal
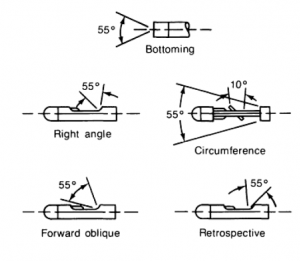
tip also has prisms and mirrors that define the direction and field of view (see Fig. 2). These views vary according to the
type and application of borescope. The design of illumination system also varies with the type of borescope. Generally, a
fiber optic light guide and a lamp producing white light is used in the illumination system, although ultraviolet light can
be used to inspect surfaces treated with liquid fluorescent penetrants. Light-emitting diodes at the distal tip are sometimes
used for illumination in videoscopes with working lengths greater than 15 m (50 ft).

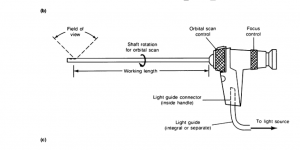
Visual Inspection Visual Inspection Fig. 1 Three typical designs of borescopes. (a) A rigid borescope with a lamp at the distal end. (b) A flexible
fiberscope with a light source. (c) A rigid borescope with a light guide bundle in the shaft
Visual Inspection


Rigid Borescopes
Rigid borescopes are generally limited to applications with a straight-line path between the observer and the area to be observed. The sizes range in lengths from 0.15 to 30 m (0.5 to 100 ft) and in diameters from 0.9 to 70 mm (0.035 to 2.75 in.). Magnification is usually 3 to 4×,
but powers up to 50× are available. The illumination system is either an incandescent lamp located at the distal tip end (Fig. 1a) or a light guide bundle made from optical fibers (Fig. 1c) that conduct light from an external source.The choice of viewing heads for rigid borescopes (Fig.
2) varies according to the application, as described in the section “Selection” in this article. Rigid borescopes generally have a 55° field of view, although the fields of view can range from 10 to 90°. Typically, the distal tips are not interchangeable, but some models (such as the
extendable borescopes) may have interchangeable viewing heads. Some rigid borescopes have orbital scan (Fig. 1c), which involves the rotation of the optical shaft for scanning purposes. Depending on the borescope model, the amount of rotation can vary from 120 to 370°. Some rigid borescopes also have movable prisms at the tip for scanning. Rigid borescopes are available in a variety of models having significant variations in the design of the shaft, the distal tip, and the illumination system. Some of these design variations are described below. Basic Design. The rigid borescope typically has a series of achromatic relay lenses in the optical tube. These lenses preserve the resolution of the image as it travels from the objective lens to the eyepiece. The tube diameter of these borescopes ranges from 4 to 70 mm (0.16 to 2.75 in.). The illumination system can be either a distal lamp or a light guide bundle, and the various features may include orbital scan, various viewing heads, and adjustable focusing of the objective lens. Miniborescopes. Instead of the conventional relay lenses, miniborescopes have a single image-relaying rod or quartz fiber in the optical tube. The lengths of miniborescopes are 110 and 170 mm (4.3 and 6.7 in.), and the diameters range from 0.9 to 2.7 mm (0.035 to 0.105 in.). High magnification (up to 30×) can be reached at minimal focal lengths, and an adjustable focus is not required, because the scope has an infinite depth of field. The larger sizes have forward, side view, and forward-oblique views. The 0.9 mm (0.035 in.) diam size has only a forward view. Miniborescopes have an integral light guide bundle. Hybrid borescopes utilize rod lenses combined with convex lenses to relay the image. The rod lenses have fewer glass-air boundaries; this reduces scattering and allows for a more compact optical guide. Consequently, a larger light guide bundle can be employed with an increase in illumination and an image with a higher degree of contrast. Hybrid borescopes have lengths up to 990 mm (39 in.), with diameters ranging from 5.5 to 12 mm (0.216 to 0.47 in.). All hybrid borescopes have adjustable focusing of the objective lens and a 370° rotation for orbital scan. The various viewing directions are forward, side, retrospective, and forward-oblique. Extendable borescopes allow the user to construct a longer borescopic tube by joining extension tubes. Extendable borescopes are available with either a fiber-optic light guide or an incandescent lamp at the distal end. Extendable borescopes with an integral lamp have a maximum length of about 30 m (100 ft). Scopes with a light guide bundle have a shorter maximum length (about 8 m, or 26 ft), but do allow smaller tube diameters (as small as 8 mm, or 0.3 in.). Interchangeable viewing heads are also available. Extendable borescopes do not have adjustable focusing of the objective lens.

Visual Inspection
Fig. 2 Typical directions and field of view with rigid borescopes
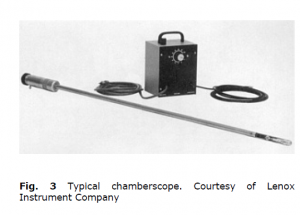
Rigid chamber scopes allow more rapid inspection of larger chambers. Chamber scopes (Fig. 3) have variable
magnification (zoom), a lamp at the distal tip, and a scanning mirror that allows the user to observe in different directions.
The higher illumination and greater magnification of chamber scopes allow the inspection of surfaces as much as 910 mm
(36 in.) away from the distal tip of the scope.

Mirror sheaths

Visual Inspection

Mirror sheaths can convert a direct-viewing borescope into a side-viewing scope. A mirror sheath is designed to fit over the tip of the scope and thus reflect an image from the side of the scope. However, not all applications are suitable for this device. A side, forward-oblique, or retrospective viewing head provides better resolution and a higher degree of image contrast. A mirror sheath also produces an inverse
image and may produce unwanted reflections from the shaft. Scanning. In addition to the orbital scan feature
described earlier, some rigid borescopes have the ability to scan longitudinally along the axis of the shaft. A movable prism with a control at the handle accomplishes this scanning. Typically, the prism can shift the direction of view through an arc of 120°.
Flexible Borescopes
Flexible borescopes are used primarily in applications that do not have a straight passageway to the point of observation.
The two types of flexible borescopes are flexible fiberscopes and videoscopes with a CCD image sensor at the distal tip.
Flexible Fiberscopes. A typical fiberscope (Fig. 1b) consists of a light guide bundle, an image guide bundle, an
objective lens, interchangeable viewing heads, and remote controls for articulation of the distal tip. Fiberscopes are
available in diameters from 1.4 to 13 mm (0.055 to 0.5 in.) and in lengths up to 12 m (40 ft). Special quartz fiberscopes
are available in lengths up to 90 m (300 ft).
The fibers used in the light guide bundle are generally 30 m (0.001 in.) in diameter. The second optical bundle, called
the image guide, is used to carry the image formed by the objective lens back to the eyepiece. The fibers in the image
guide must be precisely aligned so that they are in an identical relative position to each other at their terminations for
proper image resolution.
The diameter of the fibers in the image guide is another factor in obtaining good image resolution. With smaller diameter
fibers, a brighter image with better resolution can be obtained by packing more fibers in the image guide. With higher
resolution, it is then possible to use an objective lens with a wider field of view and also to magnify the image at the
eyepiece. This allows better viewing of objects at the periphery of the image (Fig. 4). Image guide fibers range from 6.5
to 17 m (255 to 670 in.).

The interchangeable distal tips provide various directions and fields of view on a single fiberscope. However, because the
tip can be articulated for scanning purposes, distal tips with either a forward or side viewing direction are usually
sufficient. Fields of view are typically 40 to 60°, although they can range from 10 to 120°. Most fiberscopes provide
adjustable focusing of the objective lens.
Videoscopes with CCD probes involve the electronic transmission of color or black and white images to a video
monitor. The distal end of electronic videoscopes contains a CCD chip, which consists of thousands of light-sensitive
elements arrayed in a pattern of rows and columns. The objective lens focuses the image of an object on the surface of the
CCD chip, where the light is converted to electrons that are stored in each picture element, or pixel, of the CCD device.
The image of the object is thus stored in the form of electrons on the CCD device. At this point, a voltage proportional to
the number of electrons at each pixel is determined electronically for each pixel site. This voltage is then amplified,
filtered, and sent to the input of a video monitor.
Videoscopes with CCD probes produce images (Fig. 5) with spatial resolutions of the order of those described in Fig. 6.
Like rigid borescopes and flexible fiberscopes, the resolution of videoscopes depends on the object-to-lens distance and
the fields of view, because these two factors affect the amount of magnification (see the section “Magnification and Field
of View” in this article). Generally, videoscopes produce higher resolution than fiberscopes, although fiberscopes with
smaller diameter fibers (Fig. 4a) may be competitive with the resolution of videoscopes.

Another advantage of videoscopes is their longer working length. With a given amount of illumination at the distal tip,
videoscopes can return an image over a greater length than fiberscopes. Other features of videoscopes include:
· The display can help reduce eye fatigue (but does not allow the capability of direct viewing through an
eyepiece)
· There is no honeycomb pattern or irregular picture distortion as with some fiberscopes
· The electronic form of the image signal allows digital image enhancement and the potential for
integration with automatic inspection systems.
· The display allows the generation of reticles on the viewing screen for point-to-point measurements.

Special Features
Measuring borescopes and fiberscopes contain a movable cursor that allows measurements during viewing . When the object under measurement is in focus, the movable cursor provides a reference for dimensional measurements in the optical plane of the object. This capability eliminates the need to know the object-to-lens distance when determining magnification factors. Working channels are used in borescopes and fiberscopes to pass working devices to the distal tip. Working channels are presently used to pass measuring instruments, retrieval devices, and hooks for aiding the insertion of thin, flexible fiberscopes. Working channels are used in flexible fiberscopes with diameters as small as 2.7 mm (0.106 in.). Working channels are also under consideration for the application and removal of dye penetrants and for the passage of wires and sensors in eddy current measurements. Selection Flexible and rigid borescopes are available in a wide variety of standard and customized designs, and several factors can influence the selection of a scope for a particular application. These factors include focusing, illumination, magnification, working length, direction of view, and environment. Focusing and Resolution. If portions of long objects are at different planes, the scope must have sufficient focus adjustment to achieve an adequate depth of field. If the scope has a fixed focal length, the object will be in focus only at a specific lensto- object distance. To allow the observation of surface detail at a desired size, the optical system of a borescope must also provide adequate resolution and image contrast. If resolution is adequate but contrast is lacking, detail cannot be observed. In general, the optical quality of a rigid borescope improves as the size of the lens increases; consequently, a borescope
with the largest possible diameter should be used. For fiberscopes, the resolution is dependent on the accuracy of alignment and the diameter of the fibers in the image bundle. Smaller-diameter fibers provide more resolution and edge contrast (Fig. 4), when combined with good geometrical alignment of the fibers. Typical resolutions of videoscopes are given in Fig. 6. Illumination. The required intensity of the light source is determined by the reflectivity of the surface, the area of surface to be illuminated, and the transmission losses over the length of the scope. At working lengths greater than 6 m (20 ft), rigid borescopes with a lamp at the distal end provide the greatest amount of illumination over the widest area. However, the heat generated by the light source may deform rubber or plastic materials. Fiber-optic illumination in scopes
with working lengths less than 6 m (20 ft) is always brighter and is suitable for heat-sensitive applications because filters
can remove infrared frequencies. Because the amount of illumination depends on the diameter of the light guide bundle, it
is desirable to use the largest diameter possible. Magnification and field of view are interrelated; as magnification is increased, the field of view is reduced. The precise relationship between magnification and field of view is specified by the manufacturer. The degree of magnification in a particular application is determined by the field of view and the distance from the objective lens to the object. Specifically, the magnification increases when either the field of view or the lens-to-object distance decreases. Working Length. In addition to the obvious need for a scope of sufficient length, the working length can sometimes dictate the use of a particular type of scope. For example, a rigid borescope with a long working length may be limited by the need for additional supports. In general, videoscopes allow a longer working length than fiberscopes.
Direction of View. The selection of a viewing direction is influenced by the location of the access port in relation to the object to be observed. The following sections describe some criteria for choosing the direction of view shown in Fig. 2. Flexible fiberscopes or videoscopes, because of their articulating tip, are often adequate with either a side or forward viewing tip. Circumferential or panoramic heads are designed for the inspection of tubing or other cylindrical structures. A centrally located mirror permits right-angle viewing of an area just scanned by the panoramic view. The forward viewing head permits the inspection of the area directly ahead of the viewing head. It is commonly used
when examining facing walls or the bottoms of blind holes and cavities.
Courtesy of Olympus Corporation Forward-oblique heads bend the viewing direction at an angle to the borescope axis, permitting the inspection of corners at the end of a bored hole. The retrospective viewing head bends the cone of view at a retrospective angle to the
borescope axis, providing a view of the area just passed by the advancing borescope. It is especially suited to inspecting
the inside neck of cylinders and bottles. Environment. Flexible and rigid borescopes can be manufactured to withstand a variety of environments. Although most scopes can operate at temperatures from -34 to 66 °C (-30 to 150 °F), especially designed scopes can be used at
temperatures to 1925 °C (3500 °F). Scopes can also be manufactured for use in liquid media. Special scopes are required for use in pressures above ambient and in atmospheres exposed to radiation. Radiation can cause the multicomponent lenses and image bundles to turn brown. When a scope is used in atmospheres exposed to radiation, quartz fiberscopes are generally used. Scopes used in a gaseous environment should be made explosionproof to minimize the potential of an accidental explosion.
Applications
Rigid and flexible borescopes are available in different designs suitable for a variety of applications. For example, when inspecting straight process piping for leaks rigid borescopes with a 360° radial view are capable of examining inside diameters of 3 to 600 mm (0.118 to 24 in.). Scopes are also used by building inspectors and contractors to see insidewalls, ducts, large tanks, or other dark areas. The principal use of borescope is in equipment maintenance programs, in which borescopes can reduce or eliminate the need for costly teardowns. Some types of equipment, such as turbines, have access ports that are specifically designed for borescopes. Borescopes provide a means of checking in-service defects in a variety of equipment, such as turbines.Borescopes are also extensively used in a variety of manufacturing industries to ensure the product quality of difficult-toreach components. Manufacturers of hydraulic cylinders, for example, use borescopes to examine the interiors of bores for pitting, scoring, and tool marks. Aircraft and aerospace manufacturers also use borescopes to verify the proper placement and fit of seals, bonds, gaskets, and subassemblies in difficult-to-reach regions.

NOTE: Continue our next visual inspection discussion  on tomorrow…


Magnetic Particle Testing


NDT Training On Magnetic Particle Testing


Magnetic particle testing is one of the most widely utilized NDT methods since it is fast and relatively easy to apply and part surface preparation is not as critical as it is for some other methods. This method uses magnetic fields and small magnetic particles (i.e.iron filings) to detect flaws in components. The only requirement from an inspectability standpoint is that the component being inspected must be made of a ferromagnetic material (a materials that can be magnetized) such as iron, nickel, cobalt, or some of their alloys.

The method is used to inspect a variety of product forms including castings, forgings, and weldments. Many different industries use magnetic particle inspection such as structural steel, automotive, petrochemical, power generation, and aerospace industries. Underwater inspection is another area where magnetic particle inspection may be used to test items such as offshore structures and underwater pipelines.
NDT TRAINING

magnetic particle testing


Basic Principles Magnetic particle testing

In theory,

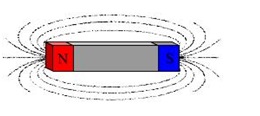
magnetic particle testing has a relatively simple concept. It can be considered as a combination of two nondestructive testing methods: magnetic flux leakage testing and visual testing. For the case of a bar magnet, the magnetic field is in and around the magnet. Any place that a magnetic line of force exits or enters the magnet is called a “pole” (magnetic lines of force exit the magnet from north pole and enter from the south pole).

When a bar magnet is broken in the center of its length, two complete bar magnets with magnetic poles on each end of each piece will result. If the magnet is just cracked but not broken completely in two, a north and south pole will form at each edge of the crack. The magnetic field exits the north pole and reenters at the south pole. The magnetic field spreads out when it encounters the

small air gap created by the crack because the air cannot support as much magnetic field per unit volume as the magnet can. When the field spreads out, it appears to leak out of the material and, thus is called a flux leakage field.


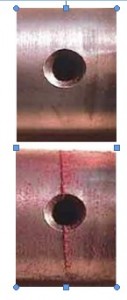
If iron particles are sprinkled on a cracked magnet, the particles will be attracted to and cluster not only at the poles at the ends of the magnet, but also at the poles at the edges of the crack. This cluster of particles is much easier to see than the actual crack and this is the basis for magnetic particle inspection.

The first step in a magnetic particle testing is to magnetize the component that is to be inspected. If any defects on or near the surface are present, the defects will create a leakage field. After the component has been magnetized, iron particles, either in a dry or wet suspended form, are applied to the surface of the magnetized part. The particles will be attracted and cluster at the flux leakage fields, thus forming a visible indication that the inspector can detect.
NDT Training

magnetic particle testing

Advantages and Disadvantages

The primary advantages and disadvantages when compared to other NDT methods are:

Advantages


  • High sensitivity (small discontinuities can be detected).


  • Indications are produced directly on the surface of the part and constitute a visual representation of the flaw.
  • Minimal surface preparation (no need for paint removal)


  • Portable (small portable equipment & materials available in spray cans)


  • Low cost (materials and associated equipment are relatively inexpensive)


Disadvantages


  • Only surface and near surface defects can be detected.


  • Only applicable to ferromagnetic materials.


  • Relatively small area can be inspected at a time.


  • Only materials with a relatively nonporous surface can be inspected.


  • The inspector must have direct access to the surface being inspected.

Magnetism

The concept of magnetism centers around the magnetic field and what is known as a dipole. The term “magnetic field” simply describes a volume of space where there is a change in energy within that volume. The location where a magnetic field exits or enters a material is called a magnetic pole. Magnetic poles have never been detected in isolation but always occur in pairs, hence the name dipole. Therefore, a dipole is an object that has a magnetic pole on one end and a second, equal but opposite, magnetic pole on the other. A bar magnet is a dipole with a north pole at one end and south pole at the other.

The source of magnetism lies in the basic building block of all matter, the atom. Atoms are composed of protons, neutrons and electrons. The protons and neutrons are located in the atom’s nucleus and the electrons are in constant motion around the nucleus. Electrons carry a negative electrical charge and produce a magnetic field as they move through space. A magnetic field is produced whenever an electrical charge is in motion. The strength of this field is called the magnetic moment.

When an electric current flows through a conductor, the movement of electrons through the conductor causes a magnetic field to form around the conductor. The magnetic field can be detected using a compass. Since all matter is comprised of atoms, all materials are affected in some way by a magnetic field; however, materials do not react the same way to the magnetic field.

Reaction of Materials to Magnetic Field

When a material is placed within a magnetic field, the magnetic forces of the material’s electrons will be affected. This effect is known as Faraday’s Law of Magnetic Induction. However, materials can react quite differently to the presence of an external magnetic field. The magnetic moments associated with atoms have three origins: the electron motion, the change in motion caused by an external magnetic field, and the spin of the electrons.

In most atoms, electrons occur in pairs where these pairs spin in opposite directions. The opposite spin directions of electron pairs cause their magnetic fields to cancel each other. Therefore, no net magnetic field exists. Alternately, materials with some unpaired electrons will have a net magnetic field and will react more to an external field.According to their interaction with a magnetic field, materials can be classified as:

Diamagnetic materials: which have a weak, negative susceptibility to magnetic fields. Diamagnetic materials are slightly repelled by a magnetic field and the material does not retain the magnetic properties when the external field is removed. In diamagnetic materials all the electrons are paired so there is no permanent net magnetic moment per atom. Most elements in the periodic table, including copper, silver, and gold, are diamagnetic.

Paramagnetic materials: which have a small, positive susceptibility to magnetic fields. These materials are slightly attracted by a magnetic field and the material does not retain the magnetic properties when the external field is removed.

Paramagnetic materials have some unpaired electrons. Examples of paramagnetic materials include magnesium, molybdenum, and lithium.

Ferromagnetic materials: have a large, positive susceptibility to an external magnetic field. They exhibit a strong attraction to magnetic fields and are able to retain their magnetic properties after the external field has been removed. Ferromagnetic materials have some unpaired electrons so their atoms have a net magnetic moment. They get their strong magnetic properties due to the presence of magnetic domains. In these domains, large numbers of atom’s moments are aligned parallel so that the magnetic force within the domain is strong (this happens during the solidification of the material where the atom moments are aligned within each crystal ”i.e., grain” causing a strong magnetic force in one direction). When a ferromagnetic material is in the

unmagnetized state, the domains are nearly randomly organized (since the crystals are in arbitrary directions) and the net magnetic field for the part as a whole is zero. When a magnetizing force is applied, the domains become aligned to produce a strong magnetic field within the part. Iron, nickel, and cobalt are examples of ferromagnetic materials. Components made of these materials are commonly inspected using the magnetic particle method.

Magnetic Field Characteristics

Magnetic Field In and Around a Bar Magnet

The magnetic field surrounding a bar magnet can be seen in the magnetograph below. A magnetograph can be created by placing a piece

of paper over a magnet and sprinkling the paper with iron filings. The particles align themselves with the lines of magnetic force produced by the magnet. It can be seen in the magnetograph that there are poles all along the length of the magnet but that the poles are concentrated at the ends of the magnet (the north and south poles).

Magnetic Fields in and around Horseshoe and Ring Magnets

Magnets come in a variety of shapes and one of the more common is the horseshoe (U) magnet. The horseshoe magnet has north and south poles just like a bar magnet but the magnet is curved so the poles lie in the same plane. The magnetic lines of force flow from pole to pole just like in the bar magnet. However, since the poles are located closer together and a more direct path exists for the lines of flux to travel between the poles, the magnetic field is concentrated between the poles.

General Properties of Magnetic Lines of Force


Magnetic lines of force have a number of important properties, which include:

  • They seek the path of least resistance between opposite magnetic poles (in a single bar magnet shown, they attempt to form closed loops from pole to pole).
  • They never cross one another.
  • They all have the same strength.
  • Their density decreases with increasing distance from the poles.
  • Their density decreases (they spread out) when they move from an area of higher permeability to an area of lower permeability.
  • They are considered to have direction as if flowing, though no actual movement occurs.


  •   They flow from the south pole to the north pole within a material and north pole to south pole in air.


Electromagnetic Fields


Magnets are not the only source of magnetic fields. The flow of electric current through a conductor generates a magnetic field. When electric current flows in a long straight wire, a circular magnetic field is generated around the wire and the intensity of this magnetic field is directly proportional to the amount of current

carried by the wire. The strength of the field is strongest next to the wire and diminishes with distance. In most conductors, the magnetic field exists only as long as the current is flowing.


However, in ferromagnetic materials the electric current will cause some or all of the magnetic domains to align and a residual magnetic field will remain.


Also, the direction of the magnetic field is dependent on the direction of the electrical current in the wire. The direction of the magnetic field around a conductor can be determined using a simple rule called the “right-hand clasp rule”. If a person grasps a conductor in one’s right hand with the thumb pointing in the direction of the current, the fingers will circle the conductor in the direction of the magnetic field.


Note: remember that current flows from the positive terminal to the negative terminal (electrons flow in the opposite direction).


Magnetic Field Produced by a Coil

When a current carrying wire is formed into several loops to form a coil, the magnetic field circling each loop combines with the fields from the other loops to produce a concentrated field through the center of the coil (the field flows along the longitudinal axis and circles back around the outside of the coil).


When the coil loops are tightly wound, a uniform magnetic field is developed throughout the length of the coil. The strength of the magnetic field increases not only with increasing current but also with each loop that is added to the coil. A long, straight coil of wire is called a solenoid and it can be used to generate a nearly uniform magnetic field similar to that of a bar magnet. The concentrated magnetic field inside a coil is very useful in magnetizing ferromagnetic materials for inspection using the magnetic particle testing method.


Quantifying Magnetic Properties


The various characteristics of magnetism can be measured and expressed quantitatively. Different systems of units can be used for quantifying magnetic properties. SI units will be used in this material. The advantage of using SI units is that they are traceable back to an agreed set of four base units; meter, kilogram, second, and Ampere.

  • The unit for magnetic field strength H is ampere/meter (A/m). A magnetic field strength of 1 A/m is produced at the center of a single circular conductor with a 1 meter diameter carrying a steady current of 1 ampere.


  • The number of magnetic lines of force cutting through a plane of a given area at a right angle is known as the magnetic flux density, B. The flux density or magnetic induction has the Tesla as its unit. One Tesla is equal to 1 Newton/(A/m). From these units, it can be seen that the flux density is a measure of the force applied to a particle by the magnetic field.


  • The total number of lines of magnetic force in a material is called magnetic flux, ɸ. The strength of the flux is determined by the number of magnetic domains


that are aligned within a material. The total flux is simply the flux density applied over an area. Flux carries the unit of a weber, which is simply a Tesla-meter2.


  • The magnetization M is a measure of the extent to which an object is magnetized. It is a measure of the magnetic dipole moment per unit volume of the object. Magnetization carries the same units as a magnetic field A/m.


Quantity SI Units SI Units CGS Units
(Sommerfeld) (Kennelly) (Gaussian)
Field H A/m A/m oersteds
(Magnetization
Force)
Flux Density B Tesla Tesla gauss
(Magnetic
Induction)
Flux ɸ Weber Weber maxwell
Magnetization M A/m erg/Oe-cm3


The Hysteresis Loop and Magnetic Properties


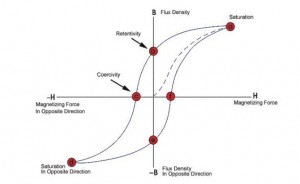
A great deal of information can be learned about the magnetic properties of a material by studying its hysteresis loop. A hysteresis loop shows the relationship between the induced magnetic flux density (B) and the magnetizing force (H). It is often referred to as the B-H loop. An example hysteresis loop is shown below.
NDT Training

magnetic particle testing


The loop is generated by measuring the magnetic flux of a ferromagnetic material while the magnetizing force is changed. A ferromagnetic material that has never been previously magnetized or has been thoroughly demagnetized will follow the dashed line as H is increased. As the line demonstrates, the greater the amount of current applied (H+), the stronger the magnetic field in the component (B+). At point “a

almost all of the magnetic domains are aligned and an additional increase in the magnetizing force will produce very little increase in magnetic flux. The material has reached the point of magnetic saturation. When H is reduced to zero, the curve will move from point “a” to point “b“. At this point, it can be seen that some magnetic flux remains in the material even though the magnetizing force is zero. This is referred to as the point of retentivity on the graph and indicates the level of residual magnetism in the material (Some of the magnetic domains remain aligned but some have lost their alignment). As the magnetizing force is reversed, the curve moves to point “c“, where the flux has been reduced to zero. This is called the point of coercivity on the curve (the reversed magnetizing force has flipped enough of the domains so that the net flux within the material is zero). The force required to remove the residual magnetism from the material is called the coercive force or coercivity of the material.


As the magnetizing force is increased in the negative direction, the material will again become magnetically saturated but in the opposite direction, point “d“. Reducing H to zero brings the curve to point “e“. It will have a level of residual magnetism equal to that achieved in the other direction. Increasing H back in the positive direction will return B to zero. Notice that the curve did not return to the origin of the graph because some force is required to remove the residual magnetism. The curve will take a different path from point “f” back to the saturation point where it with complete the loop.


From the hysteresis loop, a number of primary magnetic properties of a material can be determined:


  1. Retentivity – A measure of the residual flux density corresponding to the saturation induction of a magnetic material. In other words, it is a material’s ability to retain a certain amount of residual magnetic field when the magnetizing force is removed after achieving saturation (The value of B at point b on the hysteresis curve).


  1. Residual Magnetism or Residual Flux – The magnetic flux density that remains in a material when the magnetizing force is zero. Note that residual magnetism and retentivity are the same when the material has been magnetized to the saturation point. However, the level of residual magnetism may be lower than the retentivity value when the magnetizing force did not reach the saturation level.


  1. Coercive Force – The amount of reverse magnetic field which must be applied to a magnetic material to make the magnetic flux return to zero (The value of H at point c on the hysteresis curve).


  1. Permeability, µ – A property of a material that describes the ease with which a magnetic flux is established in the material.


  1. Reluctance – Is the opposition that a ferromagnetic material shows to the establishment of a magnetic field. Reluctance is analogous to the resistance in an electrical circuit.


Permeability


As previously mentioned, permeability (µ) is a material property that describes the ease with which a magnetic flux is established in a component. It is the ratio of the flux density (B) created within a material to the magnetizing field (H) and is represented by the following equation:


µ = B/H

This equation describes the slope of the curve at any point on the hysteresis loop. The permeability value given in letrature for materials is usually the maximum permeability or the maximum relative permeability. The maximum permeability is the point where the slope of the B/H curve for the unmagnetized material is the greatest. This point is often taken as the point where a straight line from the origin is tangent to the B/H curve.


The shape of the hysteresis loop tells a great deal about the material being magnetized. The hysteresis curves of two different materials are shown in the graph.

  • Relative to other materials, a material with a wider hysteresis loop has:


  • Lower Permeability
  • Higher Retentivity
  • Higher Coercivity


  • Higher Reluctance


  • Higher Residual Magnetism


  • Relative to other materials, a material with a narrower hysteresis loop has:


  • Higher Permeability
  • Lower Retentivity


  • Lower Coercivity
  • Lower Reluctance


– Lower Residual Magnetism


In magnetic particle testing, the level of residual magnetism is important. Residual magnetic fields are affected by the permeability, which can be related to the carbon content and alloying of the material. A component with high carbon content will have low permeability and will retain more magnetic flux than a material with low carbon content.


Magnetic Field Orientation and Flaw Detectability


To properly inspect a component for cracks or other defects, it is important to understand that the orientation of the crack relative to the magnetic lines of force determinies if the crack can or cannot be detected. There are two general types of magnetic fields that can be established within a component.

  • A longitudinal magnetic field has magnetic lines of force that run parallel to the long axis of the part. Longitudinal magnetization of a component can be accomplished using the longitudinal field set up by a coil or solenoid. It can also be accomplished using permanent magnets or electromagnets.


  • A circular magnetic field has magnetic lines of force that run circumferentially around the perimeter of a part. A circular magnetic field is induced in an article by either passing current through the component or by passing current through a conductor surrounded by the component.

The type of magnetic field established is determined by the method used to magnetize the specimen. Being able to magnetize the part in two directions is important because the best detection of defects occurs when the lines of magnetic force are established at right angles to the longest dimension of the defect. This

orientation creates the largest disruption of the magnetic field

within the part and the greatest flux leakage at the surface of the part. If the magnetic field is parallel to the defect, the field will see little disruption and no flux leakage field will be produced.


An orientation of 45 to 90 degrees between the magnetic field and the defect is necessary to form an indication. Since defects may occur in various and unknown directions, each part is normally magnetized in two directions at right angles to each other. If the component shown is considered, it is known that passing current through the part from end to end will establish a circular magnetic field that will be 90 degrees to the direction of the current.

Therefore, defects that have a significant dimension in the direction of the current (longitudinal defects) should be detectable, while transverse-type defects will not be detectable with circular magnetization.


Magnetization of Ferromagnetic Materials


There are a variety of methods that can be used to establish a magnetic field in a component for evaluation using magnetic particle inspection. It is common to classify the magnetizing methods as either direct or indirect.


Magnetization Using Direct Induction (Direct Magnetization)


With direct magnetization, current is passed directly through the component. The flow of current causes a circular magnetic field to form in and around the conductor. When using the direct magnetization method, care must be taken to ensure that good electrical contact is established and maintained between the test equipment and the test component to avoid damage of the the component (due to arcing or overheating at high resistance ponts).


There are several ways that direct magnetization is commonly accomplished.


  • One way involves clamping the component between two electrical contacts in a special piece of equipment. Current is passed through the component and a circular magnetic field is established in and around the component. When the magnetizing current is stopped, a residual magnetic field will remain within the component. The strength of the induced magnetic field is proportional to the amount of current passed through the component.


  • A second technique involves using clamps or prods, which are attached or placed in contact with the component. Electrical current flows through the component from contact to contact. The current sets up a circular magnetic field around the path of the current.


Magnetization Using Indirect Induction (Indirect Magnetization)


Indirect magnetization is accomplished by using a strong external magnetic field to establish a magnetic field within the component. As with direct magnetization, there are several ways that indirect magnetization can be accomplished.

  • The use of permanent magnets is a low cost method of establishing a magnetic field. However, their use is limited due to lack of control of the field strength and the difficulty of placing and removing strong permanent magnets from the component.


  • Electromagnets in the form of an adjustable horseshoe magnet (called a yoke) eliminate the problems associated with permanent magnets and are used extensively in industry. Electromagnets only exhibit a magnetic flux when electric current is flowing around the soft iron core. When the magnet is placed on the component, a magnetic field is established between the north and south poles of the magnet.


  • Another way of indirectly inducting a magnetic field in a material is by using the magnetic field of a current carrying conductor. A circular magnetic field can be established in cylindrical components by using a central conductor. Typically, one or more cylindrical components are hung from a solid copper bar running through the inside diameter. Current is passed through the copper bar and the resulting circular magnetic field establishes a magnetic field within the test components.


  • The use of coils and solenoids is a third method of indirect magnetization. When the length of a component is several times larger than its diameter, a longitudinal


magnetic field can be established in the component. The component is placed longitudinally in the concentrated magnetic field that fills the center of a coil or solenoid. This magnetization technique is often referred to as a “coil shot“.


Types of Magnetizing Current


As mentioned previously, electric current is often used to establish the magnetic field in components during magnetic particle inspection. Alternating current (AC) and direct current (DC) are the two basic types of current commonly used. The type of current used can have an effect on the inspection results, so the types of currents commonly used are briefly discussed here.


Direct Current


Direct current (DC) flows continuously in one direction at a constant voltage. A battery is the most common source of direct current. The current is said to flow from the positive to the negative terminal, though electrons flow in the opposite direction. DC is very desirable when inspecting for subsurface defects because DC generates a magnetic field that penetrates deeper into the material. In ferromagnetic materials, the magnetic field produced by DC generally penetrates the entire cross-section of the component.


Alternating Current


Alternating current (AC) reverses in direction at a rate of 50 or 60 cycles per second. Since AC is readily available in most facilities, it is convenient to make use of it for magnetic particle inspection. However, when AC is used to induce a magnetic field in ferromagnetic materials, the magnetic field will be limited to a thin layer at the surface of the component. This phenomenon is known as the “skin effect” and it occurs because the changing magnetic field generates eddy currents in the test object. The eddy currents produce a magnetic field that opposes the primary field, thus reducing the net magnetic flux below the surface. Therefore, it is recommended that AC be used only when the inspection is limited to surface defects.

Rectified Alternating Current


Clearly, the skin effect limits the use of AC since many inspection applications call for the detection of subsurface defects. Luckily, AC can be converted to current that is very much like DC through the process of rectification. With the use of rectifiers, the reversing AC can be converted to a one directional current. The three commonly used types of rectified current are described below.

Half Wave Rectified Alternating Current (HWAC)


When single phase alternating current is passed through a rectifier, current is allowed to flow in only one direction. The reverse half of each cycle is blocked out so that a one directional, pulsating current is produced. The current rises from zero to a maximum and then returns to zero. No current flows during the time when the reverse cycle is blocked out. The HWAC repeats at same rate as the unrectified current (50 or 60 Hz). Since half of the current is blocked out, the amperage is half of the unaltered AC. This type of current is often referred to as half wave DC or pulsating DC. The pulsation of the HWAC helps in forming magnetic particle indications by vibrating the particles and giving them added mobility where that is especially important when using dry particles. HWAC is most often used to power electromagnetic yokes.


Full Wave Rectified Alternating Current (FWAC) (Single Phase)

Full wave rectification inverts the negative current to positive current rather than blocking it out. This produces a pulsating DC with no interval between the pulses. Filtering is usually performed to soften the sharp polarity switching in the rectified current. While particle mobility is not as good as half-wave AC due to the reduction in pulsation, the depth of the subsurface magnetic field is improved.


Three Phase Full Wave Rectified Alternating Current

Three phase current is often used to power industrial equipment because it has more favorable power transmission and line loading characteristics. This type of electrical current is also highly desirable for magnetic particle testing because when it is rectified and filtered, the resulting current very closely resembles direct current. Stationary magnetic particle equipment wired with three phase AC will usually have the ability to magnetize with AC or DC (three phase full wave rectified), providing the inspector with the advantages of each current form.

Magnetic Fields Distribution and Intensity

Longitudinal Fields

When a long component is magnetized using a solenoid having a shorter length, only the material within the solenoid and

about the same length on each side of the solenoid will be strongly magnetized. This occurs because the magnetizing force diminishes with increasing distance from the solenoid. Therefore, a long component must be magnetized and inspected at several locations along its length for complete inspection coverage.

Circular Fields


When a circular magnetic field is forms in and around a conductor due to the passage of electric current through it, the following can be said about the distribution and intensity of the magnetic field:

  • The field strength varies from zero at the center of the component to a maximum at the surface.
  • The field strength at the surface of the conductor decreases as the radius of the conductor increases (when the current strength is held constant).
  • The field strength inside the conductor is dependent on the current strength, magnetic permeability of the material, and if magnetic, the location on the B-H curve.
  • The field strength outside the conductor is directly proportional to the current strength and it decreases with distance from the conductor.


The images below show the magnetic field strength graphed versus distance from the center of the conductor when current passes through a solid circular conductor.


  • In a nonmagnetic conductor carrying DC, the internal field strength rises from zero at the center to a maximum value at the surface of the conductor.
  • In a magnetic conductor carrying DC, the field strength within the conductor is much greater than it is in the nonmagnetic conductor. This is due to the permeability of the magnetic material. The external field is exactly the same for the two materials provided the current level and conductor radius are the same.
  • When the magnetic conductor is carrying AC, the internal magnetic field will be concentrated in a thin layer near the surface of the conductor (skin effect). The external field decreases with increasing distance from the surface same as with DC.

The magnetic field distribution in and around a solid conductor of a nonmagnetic material carrying direct current.In a hollow circular conductor there is no magnetic field in the void area. The magnetic field is zero at the inner surface and rises until it reaches a maximum at the outer surface.


  • Same as with a solid conductor, when DC current is passed through a magnetic conductor, the field strength within the conductor is much greater than in nonmagnetic conductor due to the permeability of the magnetic material. The external field strength decreases with distance from the surface of the conductor. The external field is exactly the same for the two materials provided the current level and conductor radius are the same.


  • When AC current is passed through a hollow circular magnetic conductor, the skin effect concentrates the magnetic field at the outside diameter of the component.

The magnetic field distribution in and around a hollow conductor of a nonmagnetic material carrying direct current.

As can be seen from these three field distribution images, the field strength at the inside surface of hollow conductor is very low when a circular magnetic field is established by direct magnetization. Therefore, the direct method of magnetization is not recommended when inspecting the inside diameter wall of a hollow component for shallow defects (if the defect has significant depth, it may be detectable using DC since the field strength increases rapidly as one moves from the inner towards the outer surface).


  • A much better method of magnetizing hollow components for inspection of the ID and OD surfaces is with the use of a central conductor. As can be seen in the field distribution image, when current is passed through a nonmagnetic central conductor (copper bar), the magnetic field produced on the inside diameter surface of a magnetic tube is much greater and the field is still strong enough for defect detection on the OD surface.


Demagnetization


After conducting a magnetic particle inspection, it is usually necessary to demagnetize the component. Remanent magnetic fields can:


  • affect machining by causing cuttings to cling to a component.


  • interfere with electronic equipment such as a compass.


  • create a condition known as “arc blow” in the welding process. Arc blow may cause the weld arc to wonder or filler metal to be repelled from the weld.
  • cause abrasive particles to cling to bearing or faying surfaces and increase wear.


Removal of a field may be accomplished in several ways. The most effective way to demagnetize a material is by heating the material above its curie temperature (for instance, the curie temperature for a low carbon steel is 770°C). When steel is heated above its curie temperature then it is cooled back down, the the orientation of the magnetic domains of the individual grains will become randomized again and thus the component will contain no residual magnetic field. The material should also be placed with it long axis in an east-west orientation to avoid any influence of the Earth’s magnetic field.

However, it is often inconvenient to heat a material above its curie temperature to demagnetize it, so another method that returns the material to a nearly unmagnetized state is commonly used.

Subjecting the component to a reversing and decreasing magnetic field will return the dipoles to a nearly random orientation throughout the material. This can be accomplished by pulling a component out and away from a coil with AC passingthrough it. With AC Yokes, demagnetization of local areas may be accomplished by placing the yoke contacts on the surface, moving them in circular patterns around the area, and slowly withdrawing the yoke while the current is applied. Also, many stationary magnetic particle inspection units come with a demagnetization feature that slowly reduces the AC in a coil in which the component is placed.

A field meter is often used to verify that the residual flux has been removed from a component. Industry standards usually require that the magnetic flux be reduced to less than 3 Gauss (3×10⁻⁴ Tesla) after completing a magnetic particle inspection.

Measuring Magnetic Fields

When performing a magnetic particle inspection, it is very important to be able to determine the direction and intensity of the magnetic field. The field intensity must be high enough to cause an indication to form, but not too high to cause nonrelevant indications to mask relevant indications. Also, after magnetic inspection it is often needed to measure the level of residual magnetezm.

Since it is impractical to measure the actual field strength within the material, all the devices measure the magnetic field that is outside of the material. The two devices commonly used for quantitative measurement of magnetic fields n magnetic particle inspection are the field indicator and the Hall-effect meter, which is also called a gauss meter.


Field Indicators

Field indicators are small mechanical devices that utilize a soft iron vane that is deflected by a magnetic field. The vane is attached to a needle that rotates and moves the pointer for the scale. Field indicators can be adjusted and calibrated so that quantitative information can be obtained. However, the measurement range of field indicators is usually small due to the mechanics of the device (the one shown in the image has a range from plus 20 to minus 20 Gauss). This limited range makes them best suited for measuring the residual magnetic field after demagnetization.

Hall-Effect (Gauss/Tesla) Meter

A Hall-effect meter is an electronic device that provides a digital readout of the magnetic field strength in Gauss or Tesla units. The meter uses a very small conductor or semiconductor element at the tip of the probe. Electric

current is passed through the conductor. In a magnetic field, a force is exerted on the moving electrons which tends to push them to one side of the conductor. A buildup of charge at the sides of the conductors will balance this magnetic influence, producing a measurable voltage between the two sides of the conductor. The probe is placed in the magnetic field such that the magnetic lines of force intersect the major dimensions of the sensing element at a right angle.

Magnetization Equipment for Magnetic Particle Testing

To properly inspect a part for cracks or other defects, it is important to become familiar with the different types of magnetic fields and the equipment used to generate them. As discussed previously, one of the primary requirements for detecting a defect in a ferromagnetic material is that the magnetic field induced in the part must intercept the defect at a 45 to 90 degree angle. Flaws that are normal (90 degrees) to the magnetic field will produce the strongest indications because they disrupt more of the magnet flux. Therefore, for proper inspection of a component, it is important to be able to establish a magnetic field in at least two directions.


A variety of equipment exists to establish the magnetic field for magnetic particle testing. One way to classify equipment is based on its portability. Some equipment is designed to be portable so that inspections can be made in the field and some is designed to be stationary for ease of inspection in the laboratory or manufacturing facility.

Portable Equipment


Permanent Magnets


Permanent magnets can be used for magnetic particle inspection as the source of magnetism (bar magnets or horseshoe magnets). The use of industrial magnets is not popular because they are very strong (they require significant strength to remove them


from the surface, about 250 N for some magnets) and thus they are difficult and sometimes dangerous to handle. However, permanent magnets are sometimes used by divers for inspection in underwater environments or other areas, such as explosive environments, where electromagnets cannot be used. Permanent magnets can also be made small enough to fit into tight areas where electromagnets might not fit.


Electromagnetic Yokes


An electromagnetic yoke is a very common piece of equipment that is used to establish a magnetic field. A switch is included in the electrical circuit so that the current and, therefore, the magnetic field can be turned on

and off. They can be powered with AC from a wall socket or by DC from a battery pack. This type of magnet generates a very strong magnetic field in a local area where the poles of the magnet touch the part being inspected. Some yokes can lift weights in excess of 40 pounds.


Prods


Prods are handheld electrodes that are pressed against the surface of the component being inspected to make contact for passing electrical current (AC or DC) through the metal. Prods are typically made from copper and have an insulated handle to help protect the operator. One of the prods has a trigger switch so that the current can be quickly and easily turned on and off. Sometimes the two prods are connected by any insulator, as shown in the image, to facilitate one hand operation. This is referred to as a dual prod and is commonly used for weld inspections.

However, caution is required when using prods because electrical arcing can occur and cause damage to the component if proper contact is not maintained between the prods and the component surface. For this reason, the use of prods is not allowed when inspecting aerospace and other critical components. To help prevent arcing, the prod tips should be inspected frequently to ensure that they are not oxidized, covered with scale or other contaminant, or damaged.

Portable Coils and Conductive Cables

Coils and conductive cables are used to establish a longitudinal magnetic field within a component. When a preformed coil is used, the component is placed against the inside surface on the coil. Coils typically have three or five turns of a copper cable within the molded frame. A foot switch is often used to energize the coil.

Also, flexible conductive cables can be wrapped around a component to form a coil. The number of wraps is determined by the magnetizing force needed and of course, the length of the cable. Normally, the wraps are kept as close together as possible. When using a coil or cable wrapped into a coil, amperage is usually expressed in ampere-turns. Ampere-turns is the amperage shown on the amp meter times the number of turns in the coil.

Portable Power Supplies

Portable power supplies are used to provide the necessary electricity to the prods, coils or cables. Power supplies are commercially available in a variety of sizes. Small power supplies generally provide up to 1,500A of half-wave DC or AC. They are small and light enough to be carried and operate on either 120V or 240V electrical service.

When more power is necessary, mobile power supplies can be used. These units come with wheels so that they can be rolled where needed. These units also operate on 120V or 240V electrical service and can provide up to 6,000A of AC or half-wave DC.

Stationery Equipment

Stationary magnetic particle inspection equipment is designed for use in laboratory or production environment. The most common stationary system is the wet horizontal (bench) unit. Wet horizontal units are designed to allow for batch inspections of a variety of components. The units have head and tail stocks (similar to a lathe) with electrical contact that the part can be clamped between. A circular magnetic field is produced with direct magnetization.

Most units also have a movable coil that can be moved into place so the indirect magnetization can be used to produce a longitudinal magnetic field. Most coils have five turns and can be obtained in a variety of sizes. The wet magnetic particle solution is collected and held in a tank. A pump and hose system is used to apply the particle solution to the components being inspected. Some of the systems offer a variety of options in electrical current used for magnetizing the component (AC, half wave DC, or full wave DC). In some units, a

demagnetization feature is built in, which uses the coil and decaying AC.

Magnetic Field Indicators

Determining whether a magnetic field is of adequate strength and in the proper direction is critical when performing magnetic particle testing. There is actually no easy-to-apply method that permits an exact measurement of field intensity at a given point within a material. Cutting a small slot or hole into the material and measuring the leakage field that crosses the air gap with a Hall-effect meter is probably the best way to get an estimate of the actual field strength within a part. However, since that is not practical, there are a number of tools and methods that are used to determine the presence and direction of the field surrounding a component.

Hall-Effect Meter (Gauss Meter)

As discussed earlier, a Gauss meter is commonly used to measure the tangential field strength on the surface of the part. By placing the probe next to the surface, the meter measures the intensity of the field in the air adjacent to the component when a magnetic field is applied. The advantages of this device are: it provides a quantitative measure of the strength of magnetizing force tangential to the surface of a test piece, it can be used for measurement of residual magnetic fields, and it can be used repetitively. The main disadvantage is that such devices must be periodically calibrated.

Quantitative Quality Indicator (QQI)

The Quantitative Quality Indicator (QQI) or Artificial Flaw Standard is often the preferred method of assuring proper field direction and adequate field strength (it is used with the wet method only). The QQI is a thin strip (0.05 or 0.1 mm thick) of AISI 1005 steel with a specific pattern, such as concentric circles or a plus sign, etched on it. The QQI is placed directly on the surface, with the itched side facing the surface, and it is usually fixed to the surface using a tape then the component is then magnetized and particles applied. When the field strength is adequate, the particles will adhere over the engraved pattern and provide information about the field direction.

Pie Gage

The pie gage is a disk of highly permeable material divided into four, six, or eight sections by non-ferromagnetic material (such as copper). The divisions serve as artificial defects that radiate out in different directions from the center. The sections are furnace brazed and copper plated. The gage is placed on the test piece copper side up and the test piece is magnetized. After particles are applied and the excess removed, the indications provide the inspector the orientation of the magnetic field. Pie gages are mainly used on flat surfaces such as weldments or steel castings where dry powder is used with a yoke or prods. The pie gage is not recommended for precision parts with complex shapes, for wet-method applications, or for proving field magnitude. The gage should be demagnetized between readings.

Slotted Strips

Slotted strips are pieces of highly permeable ferromagnetic material with slots of different widths. These strips can be used with the wet or dry method. They are placed on the test object as it is inspected. The indications produced on the strips give the inspector a general idea of the field strength in a particular area.

Magnetic Particles

As mentioned previously, the particles that are used for magnetic particle inspection are a key ingredient as they form the indications that alert the inspector to the presence of defects. Particles start out as tiny milled pieces of iron or iron oxide. A pigment (somewhat like paint) is bonded to their surfaces to give the particles color. The metal used for the particles has high magnetic permeability and low retentivity. High magnetic permeability is important because it makes the particles attract easily to small magnetic leakage fields from discontinuities, such as flaws. Low retentivity is important because the particles themselves never become strongly magnetized so they do not stick to each other or the surface of the part. Particles are available in a dry mix or a wet solution.

Dry Magnetic Particles

Dry magnetic particles can typically be purchased in red, black, gray, yellow and several other colors so that a high level of contrast between the particles and the part being inspected can be achieved. The size of the magnetic particles is also very important. Dry magnetic particle products are produced to include a range of particle sizes. The fine particles have a diameter of about 50 µm while the course particles have a diameter of 150 µm (fine particles are more than 20 times lighter than the coarse particles). This makes fine particles more sensitive to the leakage fields from very small discontinuities. However, dry testing particles cannot be made exclusively of the fine particles where coarser particles are needed to bridge large discontinuities and to reduce the powder’s dusty nature. Additionally, small particles easily adhere to surface contamination, such as remnant dirt or moisture, and get

trapped in surface roughness features. It should also be recognized that finer particles will be more easily blown away by the wind; therefore, windy conditions can reduce the sensitivity of an inspection. Also, reclaiming the dry particles is not recommended because the small particles are less likely to be recaptured and the “once used” mix will result in less sensitive inspections.

The particle shape is also important. Long, slender particles tend align themselves along the lines of magnetic force. However, if dry powder consists only of elongated particles, the application process would be less than desirable since long particles lack the ability to flow freely. Therefore, a mix of rounded and elongated particles is used since it results in a dry powder that flows well and maintains good sensitivity. Most dry particle mixes have particles with L/D ratios between one and two.

Wet Magnetic Particles

Magnetic particles are also supplied in a wet suspension such as water or oil. The wet magnetic particle testing method is generally more sensitive than the dry because the suspension provides the particles with more mobility and makes it possible for smaller particles to be used (the particles are typically 10 µm and smaller) since dust and adherence to surface contamination is reduced or eliminated. The wet method also makes it easy to apply the particles uniformly to a relatively large area.

Wet method magnetic particles products differ from dry powder products in a number of ways. One way is that both visible and fluorescent particles are available. Most non-fluorescent particles are ferromagnetic iron oxides, which are either black or brown in color. Fluorescent particles are coated with pigments that fluoresce when exposed to ultraviolet light. Particles that fluoresce green-yellow are most common to take advantage of the peak color sensitivity of the eye but other fluorescent colors are also available.

The carrier solutions can be water or oil-based. Water-based carriers form quicker indications, are generally less expensive, present little or no fire hazard, give off no petrochemical fumes, and are easier to clean from the part. Water-based solutions are usually formulated with a corrosion inhibitor to offer some corrosion protection. However, oil-based carrier solutions offer superior corrosion and hydrogen embrittlement protection to those materials that are prone to attack by these mechanisms.

Also, both visible and fluorescent wet suspended particles are available in aerosol spray cans for increased portability and ease of application.

Dry Particle Inspection

In this magnetic particle testing technique, dry particles are dusted onto the surface of the test object as the item is magnetized. Dry particle inspection is well suited for the inspections conducted on rough surfaces. When an electromagnetic yoke is used, the AC current creates a pulsating magnetic field that provides mobility to the powder.

Dry particle inspection is also used to detect shallow subsurface cracks. Dry particles with half wave DC is the best approach when inspecting for lack of root penetration in welds of thin materials.

Steps for performing dry particles inspection:

  • Surface preparation – The surface should be relatively clean but this is not as critical as it is with liquid penetrant inspection. The surface must be free of grease, oil or other moisture that could keep particles from moving freely. A thin layer of paint, rust or scale will reduce test sensitivity but can sometimes be left in place with adequate results. Specifications often allow up to 0.076 mm of a nonconductive coating (such as paint) or 0.025 mm of a ferromagnetic coating (such as nickel) to be left on the surface. Any loose dirt, paint, rust or scale must be removed.

o Some specifications require the surface to be coated with a thin layer of white paint in order to improve the contrast difference between the background and the particles (especially when gray color particles are used).

  • Applying the magnetizing force – Use permanent magnets, an electromagnetic yoke, prods, a coil or other means to establish the necessary magnetic flux.
  • Applying dry magnetic particles – Dust on a light layer of magnetic particles.
  • Blowing off excess powder – With the magnetizing force still applied, remove the excess powder from the surface with a few gentle puffs of dry air. The force of the air needs to be strong enough to remove the excess particles but not strong enough to remove particles held by a magnetic flux leakage field.
  • Terminating the magnetizing force – If the magnetic flux is being generated with an electromagnet or an electromagnetic field, the magnetizing force should be terminated. If permanent magnets are being used, they can be left in place.
  • Inspection for indications – Look for areas where the magnetic particles are

Wet Suspension Inspection

Wet suspension magnetic particle inspection, more commonly known as wet magnetic particle inspection, involves applying the particles while they are suspended in a liquid carrier. Wet magnetic particle inspection is most commonly performed using a stationary, wet, horizontal inspection unit but suspensions are also available in spray cans for use with an electromagnetic yoke.

A wet inspection has several advantages over a dry inspection. First, all of the surfaces of the component can be quickly and easily covered with a relatively uniform layer of particles. Second, the liquid carrier provides mobility to the particles for an extended period of time, which allows enough particles to float to small leakage fields to form a visible indication. Therefore, wet inspection is considered best for detecting very small discontinuities on smooth surfaces. On rough surfaces, however, the particles (which are much smaller in wet suspensions) can settle in the surface valleys and lose mobility, rendering them less effective than dry powders under these conditions.

Steps for performing wet particle inspection:


  • Surface preparation – Just as is required with dry particle inspections, the surface should be relatively clean. The surface must be free of grease, oil and other moisture that could prevent the suspension from wetting the surface and preventing the particles from moving freely. A thin layer of paint, rust or scale will reduce test sensitivity, but can sometimes be left in place with adequate results. Specifications often allow up to 0.076 mm of a nonconductive coating (such as paint) or 0.025 mm of a ferromagnetic coating (such as nickel) to be left on the Any loose dirt, paint, rust or scale must be removed.

o Some specifications require the surface to be coated with a thin layer of white paint when inspecting using visible particles in order to improve the contrast difference between the background and the particles (especially when gray color particles are used).

  • Applying suspended magnetic particles – The suspension is gently sprayed or flowed over the surface of the part. Usually, the stream of suspension is diverted from the part just before the magnetizing field is applied.
  • Applying the magnetizing force – The magnetizing force should be applied immediately after applying the suspension of magnetic particles. When using a wet horizontal inspection unit, the current is applied in two or three short busts (1/2 second) which helps to improve particle mobility.
  • Inspection for indications – Look for areas where the magnetic particles are Surface discontinuities will produce a sharp indication. The indications from subsurface flaws will be less defined and lose definition as depth increases.

Quality & Process Control

Particle Concentration and Condition

Particle Concentration

The concentration of particles in the suspension is a very important parameter and it is checked after the suspension is prepared and regularly monitored as part of the quality system checks. Standards require concentration checks to be performed every eight hours or at every shift change.The standard process used to perform the check requires agitating the carrier for a minimum of thirty minutes to ensure even particle distribution. A sample is then taken in a pear-shaped 100 ml centrifuge tube having a graduated stem (1.0 ml in 0.05 ml increments for fluorescent particles, or 1.5 ml in 0.1 ml increments for visible particles). The sample is then demagnetized so that the particles do not clump together while settling. The sample must then remain undisturbed for a period of time (60 minutes for a petroleum-based carrier or 30 minutes for a water-based carrier). The volume of settled particles is then read. Acceptable ranges are 0.1 to 0.4 ml for fluorescent particles and 1.2 to 2.4 ml for visible particles. If the particle concentration is out of the acceptable range, particles or the carrier must be added to bring the solution back in compliance with the requirement.

Particle Condition After the particles have settled, they should be examined for brightness and agglomeration. Fluorescent particles should be evaluated under ultraviolet light and visible particles under white light. The brightness of the particles should be evaluated weekly by comparing the particles in the test solution to those in an unused reference solution that was saved when the solution was first prepared. Additionally, the particles should appear loose and not lumped together. If the brightness or the agglomeration of the particles is noticeably different from the reference solution, the bath should be replaced.

Suspension Contamination

The suspension solution should also be examined for contamination which may come from inspected components (oils, greases, sand, or dirt) or from the environment (dust). This examination is performed on the carrier and particles collected for concentration testing. Differences in color, layering or banding within the settled particles would indicate contamination. Some contamination is to be expected but if the foreign matter exceeds 30 percent of the settled solids, the solution should be replaced. The liquid carrier portion of the solution should also be inspected for contamination. Oil in a water bath and water in a solvent bath are the primary concerns.

Water Break Test

A daily water break check is required to evaluate the surface wetting performance of water-based carriers. The water break check simply involves flooding a clean surface similar to those being inspected and observing the surface film. If a continuous film forms over the entire surface, sufficient wetting agent is present. If the film of suspension breaks (water break) exposing the surface of the component, insufficient wetting agent is present and the solution should be adjusted or replaced.

Electrical System Checks

Changes in the performance of the electrical system of a magnetic particle inspection unit can obviously have an effect on the sensitivity of an inspection. Therefore, the electrical system must be checked when the equipment is new, when a malfunction is suspected, or every six months. Listed below are the verification tests required by active standards.

Ammeter Check

It is important that the ammeter provide consistent and correct readings. If the meter is reading low, over magnetization will occur and possibly result in excessive background “noise.” If ammeter readings are high, flux density could be too low to produce detectable indications. To verify ammeter accuracy, a calibrated ammeter is connected in series with the output circuit and values are compared to the equipment’s ammeter values. Readings are taken at three output levels in the working range. The equipment meter is not to deviate from the calibrated ammeter more than ±10 percent or 50 amperes, whichever is greater. If the meter is found to be outside this range, the condition must be corrected.

Shot Timer Check

When a timer is used to control the shot duration, the timer must be calibrated. Standards require the timer be calibrated to within ± 0.1 second. A certified timer should be used to verify the equipment timer is within the required tolerances.

Magnetization Strength Check

Ensuring that the magnetization equipment provides sufficient magnetic field strength is essential. Standard require the magnetization strength of electromagnetic yokes to be checked prior to use each day. The magnetization strength is checked by lifting a steel block of a standard weight using the yoke at the maximum pole spacing to be used (10 lb weight for AC yokes or 40 lb weight for DC yokes).

Lighting

Magnetic particle inspection predominately relies on visual inspection to detect any indications that form. Therefore, lighting is a very important element of the inspection process. Obviously, the lighting requirements are different for an inspection conducted using visible particles than they are for an inspection conducted using fluorescent particles.

Light Requirements When Using Visible Particles

Visible particles inspections can be conducted using natural lighting or artificial lighting. However, since natural daylight changes from time to time, the use of artificial lighting is recommended to get better uniformity. Artificial lighting should be white whenever possible (halogen lamps are most commonly used). The light intensity is required to be 100 foot-candles (1076 lux) at the surface being inspected.

Light Requirements When Using Fluorescent Particles

Ultraviolet Lighting

When performing a magnetic particle inspection using fluorescent particles, the condition of the ultraviolet light and the ambient white light must be monitored. Standards and procedures require verification of lens condition and light intensity. Black lights should never be used with a cracked filter as the output of white light and harmful black light will be increased. Also, the cleanliness of the filter should also be checked regularly. The filter should be checked visually and cleaned as necessary before warming-up the light. Most UV light must be warmed up prior to use and should be on for at least 15 minutes before beginning an inspection.

For UV lights used in component evaluations, the normally accepted intensity is 1000 µW/cm2 at 38cm distance from the filter face. The required check should be performed when a new bulb is installed, at startup of the inspection cycle, if a change in intensity is noticed, or every eight hours of continuous use.

Ambient White Lighting

When performing a fluorescent magnetic particle inspection, it is important to keep white light to a minimum as it will significantly reduce the inspector’s ability to detect fluorescent indications. Light levels of less than 2 foot-candles (22 lux) are required by most procedures. When checking black light intensity a reading of the white light produced by the black light may be required to verify white light is being removed by the filter.

White Light for Indication Confirmation

While white light is held to a minimum in fluorescent inspections, procedures may require that indications be evaluated under white light. The white light requirements for this evaluation are the same as when performing an inspection with visible particles. The minimum light intensity at the surface being inspected must be 100 foot-candles (1076 lux).

Light Measurement

Light intensity measurements are made using a radiometer (an instrument that transfers light energy into an electrical current). Some radiometers have the ability to measure both black and white light, while others require a separate sensor for each measurement. Whichever type is used, the sensing area should be clean and free of any materials that could reduce or obstruct light reaching the sensor. Radiometers are relatively unstable instruments and readings often change considerable over time. Therefore, they should be calibrated at least every six months.

NDT TRAINING INSTITUTE

NDT TRAINING INSTITUTE

ESL INDUSTRIAL SUPPORT SERVICES , an NDT TRAINING INSTITUTE , after 15 years of rich experience in India and Abroad ESL came into existence . Since then, ESL has presented more than 100 courses nation wide , specializing in the area of engineering codes and standards (API, ASME, CSWIP,BGAS,NDT , ISO, and others). The ESL instructor staff globally-recognized professional engineers with international accreditations. ESL technical courses are developed for inspectors, engineers, technologists, designers, supervisors, maintenance, and quality assurance personnel who work for owners-users such as petrochemical plants, refineries, gas plants, power plants, oil/gas pipelines, pulp and paper mills, municipalities, or those who work for engineering procurement companies, inspection companies,and fabricators.

ESL INDUSTRIAL SUPPORT SERVICES , an NDT TRAINING INSTITUTE offer specialised training courses for the inspection of pressure systems and mechanical plant. We are one of the main providers of NDT, WELDING, PAINTING, ASME and API certified inspector preparatory and certification courses. Courses are available for individuals and smaller contractors as well as in-house training tailored to the needs of valuable clients.

To ensure the highest quality ESL NDT TRAINING INSTITUTE, all ESL courses are developed and taught by highly knowledgeable and experienced instructors. ESL training ensures course development, delivery, and evaluation is in accordance with CODES and STANDARDS . We not only teach “what” is in the Code or Standard, but more importantly, “why” it is there.

From welder to inspector, the best way to learn more about a potential career in supervisory and managerial positions is through training and certification. By continuing your education in our ESL NDT TRAINING INSTITUTE , you can discover a dream job that is less physically demanding and increases your earning potential. Increase Your Earning Potential. If you are looking to achieve a higher salary over the life of your career: get the training you need to get ahead. Get where you want to be by knowing where you need to be.

GET CERTIFIED. GET HIRED. GET AHEAD.


NDT TRAINING INSTITUTE

The field of Nondestructive Testing (NDT) is a very broad, interdisciplinary field that plays a critical role in assuring that structural components and systems perform their function in a reliable and cost effective fashion. NDT technicians and engineers define and implement tests that locate and characterize material conditions and flaws that might otherwise cause planes to crash, reactors to fail, trains to derail, pipelines to burst, and a variety of less visible, but equally troubling events. These tests are performed in a manner that does not affect the future usefulness of the object or material. In other words, NDT allows parts and material to be inspected and measured without damaging them. Because it allows inspection without interfering with a product’s final use, NDT provides an excellent balance between quality control and cost-effectiveness. Generally speaking, NDT applies to industrial inspections. The technologies that are used in NDT are similar to those used in the medical industry, but nonliving objects are the subjects of the inspections.

Nondestructive evaluation (NDE) is a term that is often used interchangeably with NDT. However, technically, NDE is used to describe measurements that are more quantitative in nature. For example, an NDE method would not only locate a defect, but it would also be used to measure something about that defect such as its size, shape, and orientation. NDE may be used to determine material properties, such as fracture toughness, formability, and other physical characteristics.

ESL NDT TRAINING INSTITUTE OFFERS FOLLOWING COURSES:

  1. PT
  2. UT
  3. RT
  4. MT
  5. LT
  6. ET
  7. VT
  8. RTFI

Visual and Optical Testing (VT)
The most basic NDT method is visual examination. Visual examiners follow procedures that range from simply looking at a part to see if surface imperfections are visible, to using computer controlled camera systems to automatically recognize and measure features of a component. In our ESL NDT TRAINING INSTITUTE we provide a theoretical and industrial oriented practical training.

NDT TRAINING INSTITUTE

visual testing

Radiography (RT)
RT involves using penetrating gamma- or X-radiation on materials and products to look for defects or examine internal or hidden features. An X-ray generator or radioactive isotope is used as the source of radiation. Radiation is directed through a part and onto film or other detector. The resulting shadowgraph shows the internal features and soundness of the part. Material thickness and density changes are indicated as lighter or darker areas on the film or detector. The darker areas in the radiograph below represent internal voids in the component.In our ESL NDT TRAINING INSTITUTE we provide a theoretical and industrial oriented practical training.

NDT TRAINING INSTITUTE

radio graphic testing


Magnetic Particle Testing (MT)
This NDT method is accomplished by inducing a magnetic field in a ferromagnetic material and then dusting the surface with iron particles (either dry or suspended in liquid). Surface and near-surface flaws disrupt the flow of the magnetic field within the part and force some of the field to leak out at the surface. Iron particles are attracted and concentrated at sites of the magnetic flux leakages. This produces a visible indication of defect on the surface of the material. The images above demonstrate a component before and after inspection using dry magnetic particles.In our ESL NDT TRAINING INSTITUTE we provide a theoretical and industrial oriented practical training.

NDT TRAINING INSTITUTE

magnetic particle testing


Ultrasonic Testing (UT)
In ultrasonic testing, high-frequency sound waves are transmitted into a material to detect imperfections or to locate changes in material properties. The most commonly used ultrasonic testing technique is pulse echo, whereby sound is introduced into a test object and reflections (echoes) from internal imperfections or the part’s geometrical surfaces are returned to a receiver. Below is an example of shear wave weld inspection. Notice the indication extending to the upper limits of the screen. This indication is produced by sound reflected from a defect within the weld.In our ESL NDT TRAINING INSTITUTE we provide a theoretical and industrial oriented practical training.

NDT TRAINING INSTITUTE

ultrasonic testing

Penetrant Testing (PT)
With this testing method, the test object is coated with a solution that contains a visible or fluorescent dye. Excess solution is then removed from the surface of the object but is left in surface breaking defects. A developer is then applied to draw the penetrant out of the defects. With fluorescent dyes, ultraviolet light is used to make the bleedout fluoresce brightly, thus allowing imperfections to be readily seen. With visible dyes, a vivid color contrast between the penetrant and developer makes the bleedout easy to see. The red indications in the image represent a defect in this component.In our ESL NDT TRAINING INSTITUTE we provide a theoretical and industrial oriented practical training.

NDT TRAINING INSTITUTE

liquid penetrant testing

Eddy Current Testing (ET)

There are a number of electromagnetic testing methods but the focus here will be on EDDY  current testing. In eddy current testing, electrical currents (eddy currents) are generated in a conductive material by a changing magnetic field. The strength of these eddy currents can be measured. Material defects cause interruptions in the flow of the eddy currents which alert the inspector to the presence of a defect or other change in the material. Eddy currents are also affected by the electrical conductivity and magnetic permeability of a material, which makes it possible to sort some materials based on these properties. The technician in the image is inspecting an aircraft wing for defect.

NDT TRAINING INSTITUTE

eddy current testing

Leak testing (LT)

Leak testing is also sometimes included in NDT and the methods used vary from simple bubble testing by visual examination, to very sensitive methods using radioactive gases.

NDT TRAINING INSTITUTE

leak testing

The main methods are:

hydrostatic water; dye
air pressure soap solution – visual
sound – ultrasonic detector
gas hydrogen – Pirani gauge; mass spectrometer
halogen gas – electron capture gauge
gas helium – mass spectrometer
radioactive gas – pulse counter


The mass spectrometer method with helium and the radioactive gas (Krypton-85) method are the most sensitive, but the latter requires special safety precautions.

Leak testing is widely used on pressure vessels and vacuum systems in situ, or a specimen can be placed inside a gas-filled enclosure and then tested for inward leaks.

JOIN IN ESL, NDT TRAINING INSTITUTEGET CERTIFIED. GET HIRED. GET AHEAD…


NON DESTRUCTIVE TESTING

NON DESTRUCTIVE TESTING NDT


NOTE: CONTINUITY  OF PREVIOUS ARTICLE

Removability

High adhesion between the penetrant and the material of the test specimen will result in the penetrant being very difficult to remove from the test surface. Capillary action also becomes a problem on very rough or porous surfaces. The minute valleys and openings on the test surface tend to hold the penetrant on the surface making the excess penetrant difficult to remove. When the excess penetrant can not be adequately removed, the developer coating will become saturated with penetrant and interpretation of small indications becomes impossible due to a heavy background.

Viscosity

The capillary action of the penetrant and the speed of penetration into the discontinuity openings is controlled by the viscosity of the penetrant. Viscosity is defined as a liquids resistance to flow and is measured in Centistokes ( Cs ). Viscosity is directly affected by the temperature of the test surface. The higher the temperature of the penetrant, the lower the viscosity. The penetrants viscosity will breakdown and cause the penetrant to have a thinner consistency. The lower the viscosity of a penetrant, the thinner the liquid and the faster it will penetrate an opening. The opposite is also true. Lower temperatures of the penetrant will increase viscosity and thicken the consistency of the penetrant causing it to gel and become sluggish. Penetration speed will ultimately decrease. PT is temperature limited because of the effects of temperature on viscosity.


Simply stated, an ideal penetrant will have a low Surface Tension, low Contact Angle, low Viscosity, and good Wetability. There is no one single property that makes a good penetrant.

NON DESTRUCTIVE TESTING

LIQUID PENETRANT CATEGORIES


TYPE OF DYE contained in the penetrant :


  1. FLUORESCENT – penetrants contain a green dye which fluoresces under ultraviolet light. This type of penetrant is considered the most sensitive. Fluorescent penetrants are considered more sensitive than visible dye penetrants because of their lower viscosity and better see-ability.


  1. VISIBLE DYE – penetrants contain a colored dye which is usually red and is visible in white light. This penetrant is the least sensitive because visible dye penetrants have a higher viscosity.


  1. DUAL SENSITIVITY – penetrants contain a combination of orange visible dyes and yellow fluorescent dyes. The test article is viewed under black light when increased sensitivity is required.


  1. METHOD OF EXCESS PENETRANT REMOVAL from the test surface :


Penetrants can be further categorized by one of the three methods used to remove the excess penetrant from the test specimen surface.


  1. WATER-WASHABLE – penetrants contain a built-in emulsifier and are self-emulsifying.    They are removable with plain water in a one step rinse process. The Water-Washable method is the least sensitive.


  1. POST-EMULSIFIED – penetrants require an emulsifier to be added in a separate step to make the penetrant removable with a water rinse. This is a two step removal process.


  1. SOLVENT-REMOVABLE – penetrants must be removed with a solvent. This is the most sensitive method.

Penetrant Removers

There are two basic types of removers and cleaners used to remove the excess penetrant from the test surface. The manufacturer designates the cleaner or remover that will be the best to use with a particular PT system.


  1. Solvent Cleaners and Removers


  1. Halogenated.
  2. Non-halogenated.
  3. Special Application


  1. Emulsifiers


  1. Lipophilic.
  2. Hydrophilic

Developers

Developers come in two basic forms, Wet and Dry. Depending on the manufacturer, developers can be substituted to enhance a PT system sensitivity.


  1. Dry Powder


  1. Non-aqueous Wet.


  1. Aqueous Wet


    1. Water Soluble
    2. Water Suspendable


    1. NON DESTRUCTIVE TESTING

      NON DESTRUCTIVE TESTING

CLASSIFICATION OF LIQUID PENETRANT – METHODS AND TYPES

METHOD A – FLUORESCENT PENETRANTS

Type 1            (Procedure A-1)        Water Washable Penetrant, Dry, Aqueous, or Non-aqueous

                                               Developer.


Type 2            (Procedure A-2)        Post emulsifiable Penetrant, Lipophilic or Hydrophilic

Emulsifier, Dry, Aqueous, or Non-aqueous Developer.


Type 3            (Procedure A-3)        Solvent Removable Penetrant, Solvent Remover / Cleaner,

Non-aqueous Developer.

METHOD B – VISIBLE PENETRANTS

Type 1            (Procedure B-1)        Water Washable Penetrant, Dry, Aqueous, or Non-aqueous

Developer.


Type 2            (Procedure B-2)        Post emulsifiable Penetrant, Lipophilic or Hydrophilic Emulsifier,

Dry, Aqueous, or Non-aqueous Developer.


Type 3            (Procedure B-3)        Solvent Removable Penetrant, Solvent Remover / Cleaner,

Non-aqueous Developer.


PROCESS SELECTION

The Selection of the best process depends upon:


  1. Sensitivity required or the smallest defect to be detected.
  2. Number of articles to be tested.
  3. Surface condition of the part being inspected.
  4. Configuration of the test specimen.
  5. Availability of water, electricity, compressed air and equipment.
  6. Suitability of the environment where the test will be performed.
  7. History of the test specimen:
    1. Manufacturing
    2. Overhaul or Repair
    3. In-Service
    4. Record of prior failures


  1. Governing Specifications and Codes.


Penetrant testing is successfully performed on Metals such as Aluminum, Magnesium, Brass, Copper, Carbon Steel, Stainless Steel, Titanium and most common alloys. It can also be used to test other materials including Glass, Ceramics, Composites, as well as some Plastics and molded Rubber products. Liquid penetrant testing is limited by its inability to detect discontinuities which are not open to the surface. Test surfaces must be clean and free of coatings and contaminants. The discontinuity must be open to the surface.


SPECIAL APPLICATION PENETRANTS

General

Penetrant materials are now biodegradable and safer for the environment. More recently, Dual sensitivity penetrants have given us the added capability of a fluorescent and visible dye mode in a single operation. Today, penetrants also come in gel, crayon, and magic marker forms for testing individual defects. They fit in your pocket.

Filtered Particle Penetrant


Extremely porous surfaces, particularly ceramics and components which have been metal sprayed, can be tested with Filtered Particle penetrants. These penetrants are available in fluorescent filtered particles only. The particles are large and suspended in a liquid penetrant. The properly sized and shaped particles are larger than the opening of the discontinuity which is to be detected. The particles will accumulate at the top of the discontinuity forming an indication.

Liquid Oxygen Penetrants

Special organic penetrants are available for the testing of liquid oxygen components. Liquid oxygen has an average temperature of -275°F below zero and will instantly burst into flames when contact is made with a petroleum based product. Therefore, penetrant materials used to test LOX components must not have a petroleum base. Penetrants designed for this purpose can be used with dry powder and aqueous developers.

High and Low Temperature Penetrants

Liquid penetrant materials have made significant advances in physical characteristics which allow testing to be performed in extreme temperatures, above and below the normal operating temperature range of 60°-125°F ( 16°-52°C ). Viscosity’s of the penetrants have been modified to the point where they are extremely efficient. High viscosity penetrants are available for the testing of hot welds. Low viscosity penetrants are available for testing in extremely cold environments.

EQUIPMENT,LIGHTING, PENETRANT MATERIALS, CLASSIFICATION CODES, AND SAFETY

Penetrant Equipment

There are two types of penetrant equipment; Stationary and Portable. Stationary equipment is found in shops and permanent buildings and is primarily used for testing large components and large quantities of test articles. The equipment is not mobile because of the usage of large dip tanks, wash stations, oven dryers, and developer chambers. The equipment may be arranged in any order to fit the process application.


Portable equipment is primarily used in the field for on site testing. Field portable equipment could consist of portable electrical generators, black lights, pump spray bottles, air compressors, and penetrant kits. Solvent-Removable Penetrant kits contain the necessary materials for testing and were designed specifically to be portable in the field. Solvent Removable PT materials come in aerosol spray cans which also makes them difficult to contaminate.


Water-Washable penetrants are mostly used with stationary equipment but can be used in the field in portable, pressurized, pump bottle dispensers. Three pump bottles are used. One bottle is for the penetrant spray application and one for the rinse water. A third pump bottle may be required for developer application. Portable air compressors can be used to apply the penetrant materials with pressurized air.


Post-Emulsified Penetrant systems are not considered portable because they require an extensive pressurized rinse water supply and the materials are more susceptible to contamination. The Post-Emulsified penetrant process also utilizes more steps in the test process. It is not economical and is more time consuming.


Penetrant equipment also consists of a variety of test panels, light meters, thermometers, and gages necessary to monitor the system performance and the testing process.

BLACK LIGHT

Black light equipment is required when performing fluorescent penetrant inspections. Black light is defined as electromagnetic radiation in the near ultraviolet wavelength range. UV light wavelength is measured in Angstroms ( A ) or Nanometers ( nm ) with 10 Angstroms equaling I Nanometer. The required wavelength of ultraviolet light is 365 nm or 3650 A. It is at this wavelength that the fluorescent dye in the liquid penetrant is activated. The dye absorbs the UV light, is energized, and emits a green fluorescent light at approximately 525 nm which is highly visible to the inspector.

A portable black light may be used with stationary or portable equipment. The black light equipment usually consists of a current regulating transformer, a mercury vapour arc bulb, and a deep purple, long wave, glass ultraviolet filter. The bulb and filter are contained in a reflector lamp unit and transformer and all electrical equipment is located inside the base of bulb.

Black light intensity is measured in microwatts per centimeter squared ( µW/cm2 ). For correct test results, the lamp must produce a minimum intensity of 1000 µW/cm2 for darkened areas or 3000 µW/cm2 for field inspections. It should be noted that black light intensity decreases as the light is moved further away from the test surface. Therefore, a specified distance is required to standardize the measurement. The standard measuring distance is 15 inches ( 38.1 cm ) from the front surface of the filter to the test object surface.

NON DESTRUCTIVE TESTING

NON DESTRUCTIVE TESTING

NON DESTRUCTIVE TESTING

NON DESTRUCTIVE TESTING

Bulbs and Filters

The deep purple filter on the black light is designed to pass only those wavelengths of light at 365 nanometers ( nm ) or 3650 Angstroms ( A ) which will energize the fluorescent dye in the penetrant. Longer wavelengths of the remaining visible light spectrum are filtered out. There are two kinds of filters, smooth and fluted. The smooth filter does not distort the light rays and allows them to pass without changing their path. The fluted filter diffracts the light rays scattering them over a wide area.


There are two types of mercury arc vapor bulbs used in black light equipment, the Spot bulb and the Flood bulb. The Spot bulb concentrates the rays of the light beam on a small area. The Flood bulb disperses the light rays over a wide area. If the Spot and Flood bulbs are rated at the same wattage or strength, the Spot bulb will read a higher intensity when measured because more light rays are concentrated in a smaller area. Both types of bulbs have an overheat switch located in the base of the bulb. The bulb will automatically shut down at a set temperature.


The intended usage of the black light unit and the intensities required for the inspection will dictate the best combination of bulb and filter. Fluted filters used in combination with Flood bulbs were designed for use during penetrant removal and are usually found in the rinse stations of PT stationary equipment. Spot bulbs coupled with Fluted filters are ideal for scanning large parts and large areas for indications. A Spot bulb used with a Smooth filter is best for the inspection of small areas or small components. This combination is best because it gives the maximum intensity on the test surface in the area of interest.


Measurement

Black light can be measured with a Spectroline DM-365X digital readout meter, UVP Black Ray J-221 mechanical gage meter, Spectroline DSE-100X digital readout, combination white and black light meter or an authorized equivalent. The light should be pointed in line with and centered over the light sensor at a distance of 15 inches ( 38.1 cm ) between the sensor and the light. The light can be moved back and forth or side to side until the highest reading is obtained. Black light intensity levels should be recorded on the PT Inspection Report and the Ultraviolet Light Intensity Log Sheet as required. A Light Intensity Log should be kept with the black light at all times.


The ultraviolet light intensity at the examination surface shall be measured:


  1. At least every 4 hours.
  2. Whenever the work location is changed.
  3. After changing a component of the unit such as a filter or bulb.
  4. After a UV light unit failure.

Equipment Operation

The full intensity of the lamp is not attained until the mercury vapor arc bulb is sufficiently heated. At least a 5 minutes warm-up time is required for the bulb to reach the required arc temperature. Should the bulb go out for any reason, intentionally or accidentally, the unit will not restart if it is immediately turned back on. You must always allow a 10 to 20 minutes cool down period before a restart is attempted.


Once turned on, the lamp should be left on during the entire working period. Frequently switching the light on and off, for whatever reason, shortens the life of the bulb significantly. Material is removed from the bulb electrode at each start. A single start is the equivalent of several hours of burning time. A stable electrical source should also be used. Line voltage drops will cause the lamp to extinguish or go out, requiring a restart. Line voltage increases will drastically reduce bulb life.


Mercury vapor arc black light bulbs fade proportionally with operation time. Black light intensity can fade more than 50% before the bulb burns out. Light intensity measurements should be recorded every 4 hours on an Ultraviolet Light Intensity Log sheet. The log sheet should be reviewed periodically to track the bulb intensity for fading trends. A dirty, heavily scratched, or cracked filter can reduce black light intensity. Filters should be cleaned on the inside and the outside and checked before each use. Cracked or excessively scratched filters should be replaced immediately. Cracked lenses expose white light emitted by the mercury vapor arc bulb and are dangerous to the inspector. NEVER look directly into an operating mercury vapor arc bulb without a filter.


Eye Adaptation

A minimum of 5 minutes should be waited after entering a darkened area and before inspection begins. This is called an eye adaptation period and will allow the pupils of the eye to expand and adjust to the darkened condition. A short period for eye reorientation should also be allowed after looking directly into an operating black light. Although it is not harmful, this may cause the eyes to become cloudy due to the cornea of the eye fluorescing. Do not wear glasses with photo-chromatic or light sensitive lenses while performing any PT inspections. UV light will tend to darken the lenses.

Darkened Area Inspection

To achieve maximum black light intensity, fluorescent penetrant inspections should be performed in a darkened area. A maximum white light intensity of 2 ft-candles or 22 lux ( lx ) is allowable in a darkened area or booth. All attempts should be made to darken the area where a fluorescent penetrant inspection will take place in the field. Even if you can not darken the area to 2 ftc ( 22 lx ) or below, darken the area as much as possible. This can be done utilizing a black blanket, hood, or a portable enclosed booth. White light penetrating the darkened booth, in sufficient quantity, absorbs the filtered ultraviolet light. This reduces the intensity of the ultraviolet light, the see-ability of any indications, and the sensitivity of the inspection. It is for this reason that every attempt should be made to darken the test area as much as possible. White light should be measured before each fluorescent penetrant inspection, whether performed in the field or in a darkened area. A white light measurement is taken before performing a fluorescent penetrant examination to determine the minimum black light intensity requirements.

Black Light Usage


The black light will always be used four times during a fluorescent penetrant inspection. The inspector will verify that the Pre-cleaning (Step 1) and Post-cleaning (Step 6) operations have been thorough and complete by scanning the test surface with the black light. Excess Penetrant Removal (Step 3) and the Interpretation and Evaluation (Step 5) of indications will also be performed with the test surface illuminated with black light.

TROUBLESHOOTING AND REVIEW

A bulb and lens filter combination used for a penetrant test must insure the minimum required light intensity is projected on the test surface. The rule of thumb is the highest intensity possible is the most desirable.


Light intensity to be checked every 4 hours, when changing job sites, after a black light unit failure, or after changing a bulb or filter. Minimum intensity should be:


  1. 1000 µm/cm2 @ 15 inches (38.1 cm) for darkened areas 2 ftc(22 lux) or less of white light.


  1. 3000 µw/cm2 @ 15 inches (38.1 cm) for field inspections or areas of white light greater than 2 ftc (22 lux).


Causes for black Light failure:


  1. a) Power disconnected.


  1. b) Line voltage fluctuation.


  1. Low Voltage – Will cause Bulb to turn off.
  2. High Voltage – Will cause bulb to burn out.


  1. c) Overheat – Thermal switch cutout or fan inoperative.


  1. d) Bulb burned out


Causes for low intensity output:


  1. a) Dirty, excessively scratched or cracked lens


  1. b) Bulb fading


  1. c) Excessive ambient white light.


  1. d) Light meter out of calibration.


Procedure to check operation or bulb integrity after a failure:


  1. a) Turn off unit and allow 15 minutes for unit to cool down.
  2. b) Check power to the unit, turn the unit on and allow 5 minutes for bulb warm up.
  3. c) Measure light intensity and check fan operation if so equipped.
  4. d) Replace bulb if inoperative or intensity is below minimum requirements.
  5. e) If bulb is still inoperative, replace unit.

WHITE LIGHT

Requirements


The amount of visible white light necessary to perform a visible dye penetrant inspection is measured in Lux (Lx) or Foot-Candles (ftc). 11. White light intensity of 32.5 ftc (355 Lux) at the examination surface for a field inspection and 100 ftc (1076 Lux) minimum for a bench examination.


White light is necessary throughout the inspection process but is very important during Interpretation and Evaluation (Step 5). Elevated white light intensities greatly increase the contrast of the red penetrant indications against the white developer background. This makes the indications easier to see and reduces eye strain and eye fatigue.

Measurement

White light can be measured using a digital light meter, or an authorized equivalent. When measuring light intensity, the light sensor or meter should be placed on the surface to be inspected in a configuration reproducing the normal viewing of the test specimen by the inspector. White light levels should be measured before each inspection and recorded on the inspection report.

PENETRANT TESTING MATERIALS


Penetrant materials are often restricted to specific groups. The established groups can use a combination of penetrant materials to obtain the best results.


  1. WATER-WASHABLE PENETRANTS – contain an emulsifying agent which makes them easily removable in one (1) step with a water rinse or wash. They were specifically designed for ease of removal from rough surfaces such as castings, for testing large parts, large quantities of parts, and parts with complicated shapes. Penetrant removal is extremely critical because the penetrant is easily over-washed. This type of penetrant can be obtained in either a fluorescent or visible. dye.


  1. POST-EMULSIFIABLE ( PE ) PENETRANTS – are high sensitivity, oil based, visible, or fluorescent penetrants that are not soluble in water. These penetrants must be treated with an emulsifier before they can be removed by a water rinse. The emulsifier is added separately to make the penetrant water soluble and then rinsed off. This procedure is referred to as a two (2) step removal process. PE penetrants are not as easily over-washed as Water-Washable penetrants. They are mostly used in stationary equipment and are not considered portable.


  1. SOLVENT-REMOVABLE PENETRANTS – are oil based penetrants that also do not contain an emulsifying agent. They are identical to PE penetrants except they are manually removed by wiping the test surface with a solvent dampened cloth or rag. These penetrants are specifically designed to be portable and come in pressurized spray cans. They are available in visible or fluorescent types.


  1. EMULSIFIERS – are applied to a penetrant coated surface and makes the resultant mixture removable by a water rinse or wash. Emulsifiers have low penetrating characteristics so they will not remove indications from the test specimen surface. There are two (2) kinds of emulsifiers. Lipophilic emulsifiers quickly diffuse into the penetrant on the test surface in 1 to 4 minutes much like a solvent. Hydrophilic emulsifiers react more slowly. They are commonly sprayed on the test surface in a water mixture. The excess penetrant is removed with the assistance of a scrubbing action water spray like a detergent. Emulsifiers only come in bulk containers and are not portable.
  2. SOLVENT REMOVERS – are designed to be used with specific penetrants. Typical removers are organic or man-made petroleum based chemicals. They come in bulk containers for use in spray guns or portable aerosol spray containers. They are typically used 3 times during a penetrant test for pre-cleaning, excess penetrant removal, and post-cleaning.
  3. DRY DEVELOPERS – are a fluffy, absorbent, white powder that is used in both fluorescent and visible dye penetrant tests. These developers are not mixed with anything and applied in a dry state by dusting. They are only available in bulk and are primarily used with stationary equipment such as dust chambers. They can also be applied manually with a squeeze bulb. Dry developers are very sensitive. They are excellent for use on parts with rough surfaces and


complicated geometries and are easily removed. Dry powder developers are rarely used in the field and not considered portable.

  1. AQUEOUS WET DEVELOPERS – are a mixture of water and white developing powder. Water is used as the delivery vehicle to apply the developer to the test surface. Application is by dipping or spraying. There are two (2) kinds of Aqueous Wet developers. Water Soluble is a mixture of water and powder where the powder dissolves in the water. Water Suspendable

developer keeps the powder particles suspended in the water. The particles do not dissolve in the water. Water Suspendable developer is considered the least sensitive of all the developers. Aqueous developers are best used on parts with smooth surfaces and simple shapes.

  1. NON-AOUEOUS WET DEVELOPERS – differ from wet developers because, the powder particles are mixed with a quick drying solvent. The powder is suspended in the solvent and is applied to the test surface by spraying. These developers are most commonly used in aerosol spray cans which makes them portable. They can not be used in open tanks because the solvent base evaporates too quickly. The use of solvent as a delivery vehicle is what makes Non-aqueous wet developers the most sensitive for the detection of extremely small and tight defects.
  2. LIQUID OXYGEN ( LOX ) COMPATIBLE MATERIALS – must be used when testing parts that will be in contact with either liquid or gaseous oxygen. These materials are specifically designed to be inert when in the presence of LOX.
  3. FILTERED PARTICLE PENETRANTS – are used for testing porous surfaces, such as unfired ceramics and thermal sprayed metal and coatings. They use large fluorescent particles which gather at the top of a discontinuity to form an indication rather than penetrate the into the discontinuity cavity.

Corrosive Contents

Penetrant materials must be designed with a low sulfur and halogen content to avoid harmful effects on the test articles. These chemicals will promote corrosion and in some cases hydrogen Embrittlement. Stainless Steels are especially susceptible to corrosion when exposed to Chlorine and Carbon Steels to Sulfur. Titanium is extremely susceptible to Embrittlement when in contact with Halogens. These harmful chemicals can be found in small amounts in all the penetrant materials and are limited to 1% by weight of content.


Penetrant materials can be used in a variety of combinations. Most materials are available in either bulk quantities or pressurized spray cans. All penetrants are available in either visible or fluorescent types. The flow chart below illustrates the different material combinations. However, it can not be overstated that care should always be taken to assure that the manufacturers specifications and company procedures are closely followed. The manufacturer designed the material groups and designates the groups and combinations that will give the best test results. It is the responsibility of the Saudi Aramco NDT Level III to authorize a compatible material group for use or a suitable substitute material if required.

LIQUID PENETRANT MATERIAL FAMILIES

Penetrant Material Selection

A family or group of penetrant materials will always include a penetrant, cleaner or remover, and developer. The manufacturer designates the compatible family and group. Substituting products from the same manufacturer is not allowed unless the manufacturer recommends it. These are penetrant materials that are designed to work well together and will when selecting your consumables before a PT , NEVER substitute penetrant materials made by different manufacturers in a family. NEVER substitute penetrant materials from different groups either. This is especially true when using fluorescent penetrant materials. Certain chemicals may degrade the brightness of the penetrant indication. A penetrant test procedure using substitute materials from different manufacturers is not valid unless qualified by a certified NDT Level III.

Part Numbers & Batch Numbers

Some material part numbers may have different letters or numbers at the end of the part number. This indicates a revision has taken place. The manufacturer may have changed an ingredient in the material or possibly the propellant in the spray can. It should be confirmed that the product is still compatible with the family. Batch numbers are supplied by the manufacturer to provide traceability from the manufacturer to the inspection test and usually indicate the date the material was manufactured. Batch numbers are usually found somewhere on the material containers stamped in ink. If they are not stamped on the containers or aerosol cans, they may be found on the box the cans were shipped in or the certificate of compliance ( C of C ) received with the shipment. The penetrant batch number will be recorded on the inspection report along with the part numbers of all the penetrant materials used for the test.

Batch Numbers

Batch numbers are supplied by the manufacturer to provide traceability from the manufacturer to the inspection test and usually indicate the date the material was manufactured. Batch numbers are usually found somewhere on the material containers stamped in ink. If they are not stamped on the containers or aerosol cans, they may be found on the box the cans were shipped in or the certificate of compliance (C of C) received with the shipment. The penetrant batch number will be recorded on the inspection report along with the part numbers of all the penetrant.


LIQUID PENETRANT MATERIAL FAMILIES

A-1 Fluorescent Water Washable (Group IV)

SHERWIN HM-420, HM-430,

HM-604

Water D-90G, D-100, D-100NF
ARDROX P133D or P134D Water 9D1B, 9D4A, 9D6/D495A,

D499C

MAGNAFLUX ZL-56 or ZL-67 Water ZP-4B or ZP-9F

B-I Visible Dye Water Washable (Group III)

SHERWIN DP-50 or DP-51 DR-60 or Water D-90G, D-100, D-100NF
ARDROX 996/P303A Water 9D1B, 9D4A, 9D6/D495A,

D499C

MAGNAFLUX SKL-WP SKC-S or Water ZP-4B, SKD-NF, SKD-S2

A-3 Fluorescent Solvent Removable (Group VII)

SHERWIN RC-65 or RC-77 DR-60 or DR-61 D- 100 or D-100NF
MAGNAFLUX ZL-27A SKC-NF/ZC-7 or SKC-S SKD-NF/ZP-9 or ZP-9F
ARDROX 996/P300A 9PR50, 9PR551, K410C,

PR1

9DIB, 9D6/D495A,

D499C

CROWN 1032 1031 1033

B-3 Visible Dye Solvent Removable (Group I)

TURCO Dy-Chek Remover #3 NAD
CROWN 1075 1071 1079
MAGNAFLUX SKL-LO or SKL-SP SKC-NF/ZC-7 or SKC-S SKD-NF/ZP-9 or SKD-S2
SHERWIN DP-40 DR-60 or DR-61 D-100 or D-100NF
ARDROX 996/P300A 9PR50, 9PR551, K41OC,

PRl

9D1B, 9D6/D495A,

D499C

CASTROL 222  

S – 72

LD-3
JOHNSON and ALLEN JAP JAC or JAC II JAD


SAFETY

Liquid Penetrant Materials and Usage

The materials used in Liquid Penetrant testing can be harmful to the test operator or the component under test. Generally speaking, it is a relatively safe method of testing unless it is abused or certain simple precautions are not taken. Although flash points of penetrants and emulsifiers average above 200°F, they are still considered flammable, especially when used in open dip tanks. Liquid Penetrant materials should NEVER be used near open flames, electrical arcing such as welding, or exposed to extremely high heat sources above their operating temperature range.


Vapors from the penetrants and emulsifiers are basically harmless to the test operator. Prolonged skin contact can cause skin rashes and should be avoided. Rubber gloves and a rubber protective apron should be worn when possible. Safety glasses should ALWAYS be worn to avoid eye contact safety shoes with steel toe tips should be standard attire. Handling parts coated with penetrants are slippery and can be easily dropped.


Solvents can be dangerous because of their high volatility, low flash points, high flammability, and toxic vapors. ALWAYS use in a well ventilated area with good air circulation. Breathing the vapors can cause dizziness. Enclosed areas will require filtered breathing apparatus such as a respirator to be worn. The solvents should NEVER be used near open flames or potential electrical arcing.


Non-aqueous developers also contain the same solvents used for cleaning and penetrant removal, in addition to developer powder. The same precautions should be observed as when using the solvents for cleaning. Although developer powders are considered nontoxic, excessive inhalation should also be avoided.

Storage and Handling

Care should be exercised during storage, handling, and transporting of penetrant materials. Storage should be in dry areas, preferably at room temperatures. Exposure of materials to direct sunlight and extreme temperatures outside of their normal operating range, even in sealed containers, can cause contents to separate permanently or degrade their sensitivity. Fluorescent penetrants are susceptible to dye separation and fading. Non-aqueous developers tend to coagulate and get lumpy in the aerosol can. Solvent removable penetrant materials in aerosol cans are susceptible to exploding in temperatures above 120°F ( 50°C ), regardless of their flash point. The propellants in the aerosol cans expand proportionally with increases in heat.


Testing Precautions

Any of these materials may be harmful to the test article if plastics or rubbers are involved. If possible, a sample test article should be inspected first to determine if the penetrant materials will damage the test article. Some rubbers expand when in prolonged contact with penetrants and some plastics may melt or become permanently stained. Performing Liquid Penetrant testing on assembled parts with gaskets should be avoided. If possible, the component should be disassembled and done in individual pieces. This also provides accessibility to flange mating surfaces.

Equipment

Black light ultraviolet emissions are harmless to the skin and eyes provided the equipment is maintained. The black light will not cause sunburn and is not harmful if shined in your eyes as long as the proper filter is in place. However, light emission from an unfiltered mercury vapor arc bulb is extremely harmful to the human eye and will cause sunburn.

SURFACE PREPARATION

Surface Cleaning

Pre-cleaning is the very first step when performing a liquid penetrant inspection. The effectiveness of a penetrant test is based upon the ability of the penetrant to enter surface discontinuities. Contaminants including grease, carbon, dirt, scale, varnish, oil, oxides, corrosion and water must be removed from the test surface and the discontinuity cavity. All paint, plating, core material is the most common contaminant, the test surface should also be thoroughly dry before the penetrant is applied to the surface.


Liquid penetrant placed on the surface of a test specimen does not only seep into a flaw cavity, it is pulled into them by capillary action. Proper cleaning is essential to liquid penetrant testing for three reasons :


Contaminant will prevent the penetrant from wetting the surface properly and block the entrance of penetrant into the flaw cavity. Discontinuities must be open to the surface.

If all traces of penetrant materials are not removed after the test, they may have a harmful effect on the test specimen. Sulfur and halogens will promote corrosion and in some cases hydrogen Embrittlement in some alloys.

Acids, water and salts can affect the sensitivity of the penetrant. This is specially true for fluorescent penetrants.


A visual inspection will always be accomplished before, during and after the pre-cleaning procedure. The purpose is to select the proper pre-cleaning method, assure that the test surface is contaminant free, identify gross discontinuities and identify any areas of interest where an indication will be expected to occur. A contaminant is defined as any foreign material on the surface that will prevent the penetrant materials from performing their intended functions. An area of interest is defined as any irregularity on the surface where a penetrant indication will be expected to form.


There are several contaminant removal methods to choose from. The selection of the proper method depends on the type of the contaminant you wish to remove and the type of material you wish to remove it from. The ideal method selected will remove the contaminants and not disturb or damage the surface of the material to be tested.


  1. DETERGENT SOLUTIONS : are a common means of pre-cleaning to remove contaminants and residual chemical films from the component surface. Initial pre-cleaning is for removal of dirt and soil. Some industrial detergents will also remove oil and grease. Secondary pre-cleaning is for removal of residual chemicals or oily films after paint stripping, acid or alkaline cleaning or an etching procedure has been accomplished. Detergent cleaning is accomplished by scrubbing with a soft bristle brush, rinsing and drying.


  1. STEAM CLEANING : is performed with a heated degreasing or detergent solution applied in a high pressure spray. It is particularly adaptable to the cleaning of large or bulky articles which can not be handled easily.


  1. SOLVENT CLEANING :   may be applied by flushing the test surface with spray, a wipe on and off technique or immersed in a dip tank. It is the most commonly used method for pre-cleaning and must be performed in a well ventilated area due to the toxicity of the vapors.


  1. ACID & ALKALINE CLEANERS : are used for corrosion, rust and scale removal. They are usually applied by dipping or brushing and allowed to dwell on the surface for a certain period of time and rinsed off. The manufacturers instructions should be closely adhered to or this method could damage the part. An acid or alkaline cleaning is always followed by a detergent washing or solvent flushing to assure the test surface is totally free of residual chemicals.


  1. VAPOR DEGREASING : is the most desirable method for removal of oil, grease and similar contaminants. However, certain alloys such as titanium have an affinity for specific elements used in vapor degreasing which may cause structural damage. Vapor degreasing is performed by dipping the part in a tank of degreasing vapor and usually accompanied by heat. When allowed to soak in the vapor for a sufficient time, the vapor will penetrate into the discontinuity openings. This makes vapor degreasing a very through cleaning method.

(In Next Article We Discuss the Remaining Topics of Non Destructive Testing ( Liquid Penetrant Testing)….)


NON DESTRUCTIVE TESTING


NON DESTRUCTIVE TESTING (NDT):

LIQUID PENETRANT TESTING


INTRODUCTION TO NON DESTRUCTIVE TESTING:

Non destructive Testing NDT  includes a variety of testing methods. Non destructive testing NDT is defined as examination of a material or a component to determine the physical soundness of the specimen without damaging, altering, or impairing its usefulness.


Non destructive Testing NDT  is one of many tools used to assure the quality and reliability of a product during manufacture and while it is in-service. The primary objective of any Non destructive Testing NDT method is to find defects before they become large enough to cause expensive repairs or a component failure. Industrial applications include all levels of material usage.


  1. Raw Materials.
  2. Fabrication processes.
  3. Finishing Processes.
  4. In-Service.
  5. Overhaul
    NON DESTRUCTIVE TESTING

    NON DESTRUCTIVE TESTING


Raw materials are examined before fabrication begins to avoid manufacturing or repairing a component with defective material. Manufacturing productivity is increased by avoiding unnecessary delays.’ Non destructive Testing NDT is accomplished after all fabrication and finishing processes to assure a manufacturing procedure has not uncovered a defect in the material or damaged the component. These precautions reduce wasted manpower and unnecessary component failures in the field. Statistical analysis has proved conclusively that a well planned and wisely implemented Non destructive Testing NDT quality control program is safer and far more economical than a program consisting of build now and fix later.


The most common Non destructive Testing NDT methods are:


  1. Visual Examination (VT).
  2. Penetrant Testing (PT).
  3. Magnetic Particle Testing (MT).
  4. Eddy Current Testing (ET).
  5. Ultrasonic Testing (UT).
  6. Radiographic (RT)

LIQUID PENETRANT TESTING

Introduction to LIQUID PENETRANT TESTING

Liquid Penetrant testing is capable of revealing only those discontinuities which are open to the surface. All discontinuities which are subsurface will require an alternate Non destructive Testing NDT method for detection. Radiography and Ultrasonic testing are most commonly used to detect subsurface discontinuities while Liquid Penetrant and Magnetic Particle testing are most commonly used to detect surface discontinuities. A discontinuity or flaw is defined as an interruption in the normal configuration of a component. If a discontinuity or flaw will interfere with a components’ usefulness, it is then called a defect.


Liquid Penetrant is an improvement over visual inspection. Penetrant testing increases the sensitivity of flaw detection by highlighting a discontinuity for easier visual detection. The discontinuity is magnified in size by an indication produced on the surface being examined as a direct result of the test. By increasing the dimensions of the surface defect, flaws previously undetectable with the naked eye become visible. Usage of highly contrasting colors in the penetrant materials also provides increased see-ability. Penetrants are usually bright red or fluorescent green. Developer is always white to highlight the color of the penetrant.


The indication is larger than the actual discontinuity


The primary purpose of PT is to make discontinuities highly visible for speedy detection and interpretation. Visual inspection of large components or large quantities of test articles is neither efficient nor economical and relatively small defects can not be detected with a high degree of confidence. Liquid Penetrant testing provides for


accelerated component scanning speeds with an increased confidence level for the detection of small defects. Fluorescent liquid penetrant testing is capable of detecting an indication 0.01 inch ( 0.254 mm ). When the correct penetrant materials are used and the procedure followed properly, an indication 0.03 inch ( 1/32″ or 0.76 mm ) is the standard size indication which should be confidently detected.

Testing can be performed on a wide range of materials including metals, composites, glass, ceramics, plastics, and rubbers. Liquid Penetrant testing is the most effective and works the best when used on smooth and nonporous materials. Porous materials can be tested with special penetrant materials that are specifically designed for this purpose.

ADVANTAGE:

Liquid Penetrant Testing (PT) is the most widely used Non destructive Testing NDT inspection method. It is very inexpensive, does not require an extraordinary amount of training, and is more sensitive than a visual inspection alone. It provides direct indications produced by the discontinuity. The average penetrant test should only take approximately one hour to perform. As compared to the other NDT methods, it is one of the relatively slower methods because it will not yield instantaneous results. The primary advantage of PT is its versatility because it can be used to test a variety of materials at a low cost.


Some of the other advantages of PT are its ease of application, ability to test irregularly shaped components with complex geometries, field portability, and simplicity. The PT test procedure consists of six basic steps that follow a logical sequence and are relatively simple to perform. All PT tests include the use of a liquid penetrant, some type of cleaner or remover, and a developer. The application of the materials may vary, the equipment requirement may differ, additional steps may be inserted in the more complicated methods, but the six basic procedure steps will always remain the same.


The six basic steps to a liquid penetrant test are:


  1. Surface Preparation
  2. Penetrant Application
  3. Removal of the excess penetrant
  4. Developer Application
  5. Inspection
  6. Post-cleaning


One of the biggest traps associated with PT is attitude. The tendency is to oversimplify the method. As we will find out in the remainder of this course, PT requires technique and experience to interpret and evaluate indications as well as to recognize when something is going wrong with the test.

DISADVANTAGE:

PT has a limited operational temperature range. To be effective, testing should be performed when the temperature of the surface to be tested is between 60°-125°F ( 16°- 52°C ). The surface temperature of the test article will directly affect the speed the penetrant will work. There are special penetrants available which are designed for testing outside the operational temperature range.


The success of any PT test depends on the visibility of the indications. We already know that penetrant testing is only capable of revealing discontinuities open to the surface and the test surface should be clean, dry, and smooth. Anything that could block the penetrant from entering the opening of the discontinuity must be removed. Contaminants that must be removed includes : dirt, rust, oil, grease, scale, water and acids. The most common contaminant encountered is water. Water is heavier than liquid penetrant and has a higher specific gravity, therefore, penetrants will tend to float and bead up on the surface of a test article that is wet. All paint and corrosion inhibitor coatings must also be removed.


Surface preparation prior to a PT test by the use of any method that mechanically removes material such as sanding, grinding, or sand blasting is not recommended. The use these surface preparation methods could possibly close the discontinuity opening. Chemical removal methods are preferred for surface preparation but they take time. We can now see that careful and sometimes extensive surface preparation is a limitation to PT.

NON DESTRUCTIVE TESTING NDT

NON DESTRUCTIVE TESTING NDT


BASIC PROCEDURE:

The six basic steps of a Liquid Penetrant examination are illustrated below as follows:


Step 1 – The test surface is pre-cleaned and a pre-visual inspection performed to identify

areas of interest where an indication will be expected to form.


Step 2 – Penetrant is applied and Dwell Time / Penetration Time is allowed for the penetrant

to seep into the discontinuity opening.


Step 3 – The excess penetrant is removed from the test surface.


Step 4 – Developer is applied. Time is allowed for the penetrant to be drawn out of the

discontinuity opening and for an indication to form. Development Time.


Step 5 – The test surface is visually examined and indications are Interpreted to determine

their cause and Evaluated against specifications to determine if the discontinuity will

interfere with the usefulness of the test specimen.


Step 6 – The test surface is post-cleaned to remove the remaining penetrant materials to

prevent corrosion. A post-visual inspection is performed to assure the test specimen

has not been damaged during the test.

BASIC THEORY AND PRINCIPLES

NON DESTRUCTIVE TESTING

NON DESTRUCTIVE TESTING

Capillary Action

Liquid Penetrant testing is a nondestructive means of locating surface discontinuities based on CAPILLARY ACTION. This refers to the natural ability of a liquid to be pulled or drawn into a small opening. The liquid penetrant consists of two parts. The penetrant consists of an oil based “Liquid Vehicle or Carrier” which must transport the “Dye content” in suspension and into the discontinuity opening. The properties of liquid penetrant materials are tailored to maximize this ability. Capillary action is employed twice during the PT test procedure.


In the Liquid Penetrant test procedure, the surface of the test specimen is thoroughly cleaned and dried. The liquid penetrant is applied to the surface of the specimen and sufficient time is allowed for the penetrant to enter any openings of surface discontinuities. CAPILLARY ACTION assists the penetration into the discontinuity openings. The excess penetrant on the test surface is removed, leaving the penetrant inside of the discontinuity cavities or openings. CAPILLARY ACTION is again employed when a coating of developer powder is applied to the test surface. The developer acts as a blotter to draw penetrant out of the discontinuity cavity forming a highly visible indication. The indication is then evaluated and the results compared to an acceptance standard.


If the discontinuity is small or narrow, as in a crack or pinhole, capillary action assists the penetration. Capillary action of a penetrant increases as the size of a discontinuity opening decreases. This is why penetrant will work on the underside of a test component. Penetration does not depend on gravity. The cohesive and adhesive properties of the penetrant and the material of the component under test will promote or hinder capillary action. The forces of cohesion and adhesion are described as the molecular attraction of the liquid and the test surface to themselves and between each other. Cohesion is defined as the forces of attraction of like molecules to each other, whereas, Adhesion is the attraction of unlike molecules to each other.

Penetrant enters the discontinuity at the 6 o’clock position

We can determine the capillary action of any liquid by witnessing the height or depression of capillary rise. A small diameter tube called a capillary tube is placed in a container of penetrant for a specified amount of time. The height of the liquid rise in the tube is the point where the liquids adhesive, cohesive, and surface tension forces are all equalized. The capillary tube represents a discontinuity opening.

Capillary Action in Different Size Openings

SURFACE TENSION AND CONTACT ANGLE

SURFACE TENSION and CONTACT ANGLE are the terms used when referring to the working properties of a liquid penetrant. A liquid with a high cohesive force has high surface tension and will cause a liquid to form a droplet or bead. This will cause the liquid to stay in a round droplet formation and will not allow the liquid to spread out into a thin film. Mercury is an example of a liquid with an extremely high surface tension.

Surface Tension can be determined by measuring the Contact Angle of the penetrant in relation to the way the penetrant lays on the test surface. The contact angle of the penetrant in relation to the test surface must be 90 degrees or less. A good penetrant will have a contact angle of 5 degrees or less. The ideal penetrant will have a low enough surface tension to be able to spread out into a thin continuous film without breaking up. This ability to provide a complete and continuous coverage of the test surface is referred to as wetability. Wetability is totally dependent upon Surface Tension and Contact Angle.

The penetrant must completely coat the test surface to assure that any discontinuity opening is covered. The penetrant, obviously, has no chance to enter an opening if it does not cover it. If the penetrant beads up on the test surface after penetrant application, something has gone wrong with the test and the test surface must be cleaned and the test started over. Water or solvent not thoroughly dried on the test surface is the most common causes of this happening. Grease or oil left on the test surface will also cause this condition.

Cohesive and Adhesive forces are affected by the material the test specimen is made of. and the condition of the test surface. Surface Tension of a penetrant is naturally higher on steel as opposed to aluminum. The same can be said about a smooth surface condition as compared to a rough surface. Although a smooth surface is the best for a PT test, a shiny or polished surface will cause a significant increase in surface tension and a higher contact angle. High surface tension makes it more difficult for the penetrant to enter any openings.

Prices depend on Financial Risk Management etc. We can hire can even in the most of threat of numbers and changed my assignment. Of Management courses.

QA/QC JOBS

QA/QC JOB WANTED..

PUBLISHED IN TIMES OF INDIA ON OCTOBER 14,2015..

QA/QC JOBS

QA/QC JOBS

ESL INDUSTRIAL SUPPORT SERVICES  GIVING A TRAINING FOR QA/QC COURSES…

TO KNOW A DETAILS ABOUT QA/QC  COURSE TRAINING VIEW OUR BROCHURE..

QA/QC JOBS

QA/QC JOBS


WELDING JOBS


JOB WANTED


Welding jobs wanted in Chennai with the salary package of 8,000 to 25,000

PUBLISHED IN DHINA DHANDHI  ON OCTOBER 14,2015…

ARC WELDING:

Arc welding is a type of welding that uses a welding power supply to create an electric arc between an electrode and the base material to melt the metals at the welding point. They can use either direct (DC) or alternating (AC) current, and consumable or non-consumable electrodes. The welding region is usually protected by some type of shielding gas, vapor, or slag. Arc welding processes may be manual, semi-automatic, or fully automated. First developed in the late part of the 19th century, arc welding became commercially important in shipbuilding during the Second World War. Today it remains an important process for the fabrication of steel structures and vehicles.


WELDING JOBS

WELDING JOBS