NON DESTRUCTIVE TESTING |PT |MT

NON DESTRUCTIVE TESTING

  1. Liquid Penetrate Inspection
  2. Magnetic Particle Inspection

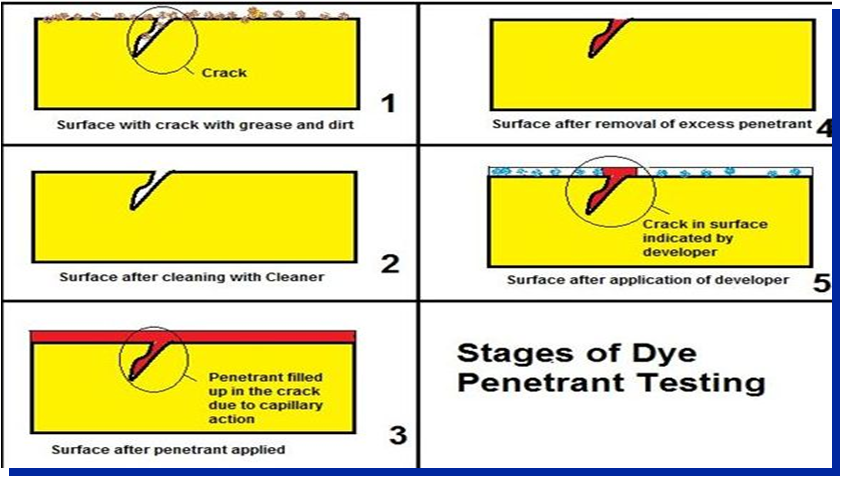
Liquid Penetrate Inspection:

Liquid penetrate is an NDT method that utilizes the principle of capillary action in which liquid of suitable physical properties can penetrate deep into extremely fine cracks or pitting that are opened to the surface without being affected by the gravitational force.

NON DESTRUCTIVE TESTING NDT


Advantages :-

  • Simple to perform
  • Inexpensive
  • Applicable to materials with complex geometry

Limitation :-

  • Limited to detection of surface breaking discontinuity
  • Not applicable to porous material
  • Require access for pre- and post-cleaning
  • Irregular surface may cause the presence of non-relevant indication

Magnetic Particle Inspection:

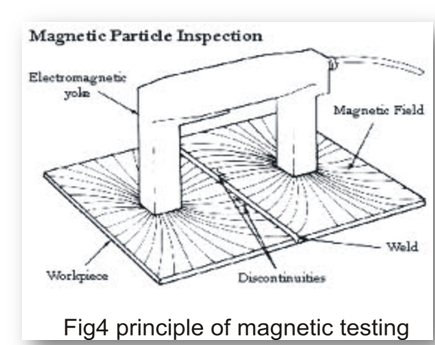
Magnetic particle testing (MT) is a NDT method that utilizes the principle of Magnetization.

Material to be inspected is first magnetized through one of many ways of magnetization.

Once magnetized, a magnetic field is established within and in the vicinity of the material.

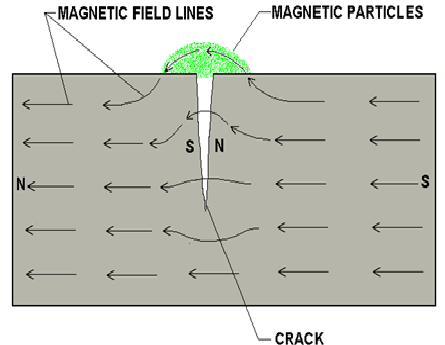
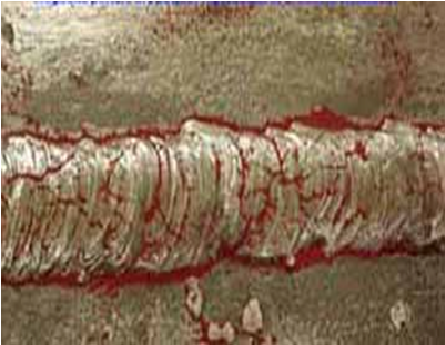
Finely milled iron particles coated with a dye pigment are then applied to the specimen. These magnetic particles are attracted to magnetic flux leakage fields and will cluster to form an indication directly over the discontinuity.

They provide a visual indication of the flaw.

NON DESTRUCTIVE TESTING NDT


The presence of surface breaking and subsurface discontinuity on the material causes the magnetic field to ‘leak’ and travel through the air.

Such a field is called ‘leakage field’. When magnetic powder is sprayed on such a surface the leakage field will attract the powder, forming a pattern that resembles the shape of the discontinuity.

This indication can be visually detected under proper lighting conditions

NON DESTRUCTIVE TESTING NDT


NON DESTRUCTIVE TESTING NDT


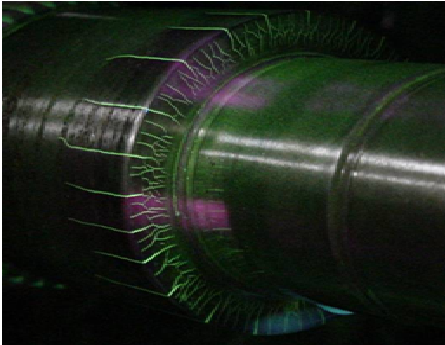
Examples of visible dry magnetic particle indications

NON DESTRUCTIVE TESTING NDT


Indication of a crack in a saw blade

NON DESTRUCTIVE TESTING NDT


Indication of cracks in a weldment

NON DESTRUCTIVE TESTING NDT


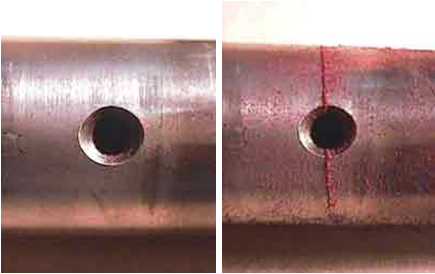
Before and after inspection pictures of cracks emanating from a hole

NON DESTRUCTIVE TESTING NDT


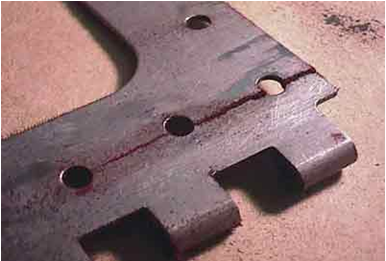
Indication of cracks running between attachment holes in a hinge

Advantages :-

  • Inexpensive
  • Equipment are portable
  • Equipment easy to operate
  • Provide instantaneous results
  • Sensitive to surface and subsurface discontinuities

Limitations :-

  • Applicable only to ferromagnetic materials
  • Insensitive to internal defects
  • Require magnetization and demagnetization of materials to be inspected
  • Require power supply for magnetization
  • Material may be burned during magnetization
NON DESTRUCTIVE TESTING NDT:
  • Introduction to NON DESTRUCTIVE TESTING NDT
  • Overview of Six Most
  • Common NDT Methods
  • Principle, Working & Application

INTRODUCTION:

  • What is  NON DESTRUCTIVE TESTING  NDT ?

                           The use of noninvasive techniques to determine the integrity of a material, component or structure or quantitatively measure some characteristic of an object.

i.e. Inspect or measure without doing harm.

What are Some Uses  of NON DESTRUCTIVE TESTING NDT Methods:

  • Flaw Detection and Evaluation
  • Leak Detection
  • Location Determination
  • Dimensional Measurements
  • Structure and Microstructure Characterization
  • Estimation of Mechanical and Physical Properties
  • Stress (Strain) and Dynamic Response Measurements
  • Material Sorting and Chemical Composition Determination

When are NON DESTRUCTIVE TESTING NDT Methods Used?

                There are NON DESTRUCTIVE TESTING NDT application at almost any stage in the production or life cycle of a component.

To assist in product development

To monitor, improve or control manufacturing processes

To verify proper processing such as heat treating

Fatigue and Creep damage prediction

To inspect fitness-for-service evaluation

Major types of NON DESTRUCTIVE TESTING  NDT:

  • Detection of surface flaws
  1. Visual
  2. Magnetic Particle Inspection
  3. Fluorescent Dye Penetrant Inspection
  • Detection of internal flaws
  1. Radiography
  2. Ultrasonic Testing
  3. Eddy current Testing
 

Liquid penetrant testing

ESL INDUSTRIAL SUPPORT SERVICES


Liquid penetrant testing

1.Liquid penetrant testing is based on the principle of:

(a) Polarized sound waves in a liquid

(b) Magnetic domains

(c) Absorption of X rays

(d) Capillary action

2.When a small diameter tube is placed in a glass of water, water rises in the tube to a level above the adjacent surface. This is called:

(a) Viscosity

(b) Capillary action

(c) Surface tension

(d) Barometric testing

3.How is the size of a liquid penetrant indication usually related to the discontinuity it represents:

(a) Larger than

(b) Smaller than

(c) Equal to

(d) Not related to

4.A penetrant that is self-emulsifying is called:

(a) Solvent removable

(b) Water washable

(c) Post-emulsified

(d) Dual sensitivity method

5.A penetrant process which employs an emulsifier as a separate step in the penetrant

removal process is called:

(a) Solvent removable

(b) Water washable

(c) Post-emulsified

(d) Dual sensitivity method

6.A penetrant process in which excess penetrant is removed with an organic solvent is called:

(a) Solvent removable

(b) Water washable

(c) Post-emulsified

(d) Dual method

7.Which of the following statements accurately describes the capabilities of liquid penetrant testing?

(a) Liquid penetrant testing is useful for locating subsurface discontinuities in a

test piece

(b) Liquid penetrant testing is useful for locating discontinuities in porous

materials

(c) Liquid penetrant testing is useful for locating discontinuities which are open to

the surface in non-porous materials

(d) none of the above

8.Which of the following discontinuity types could typically be found with a liquid penetrant testing?

(a) Internal slag in a weld

(b) Internal slag in a casting

(c) Sensitization in austenitic stainless steel

(d) Fatigue cracks

9.Which of the following chemical elements are normally held to a minimum in liquid penetrant tesing materials, when testing stainless steel and titanium?

(a) Hydrogen

(b) Chlorine

(c) Carbon

(d) Oil

10.Which of the following chemical elements are normally held to a minimum in liquid

penetrant materials when testing nickel based alloys?

(a) Sulphur

(b) Oxygen

(c) Carbon

(d) Nitrogen

11.Which of the following is the most desirable method of pre-cleaning a test piece prior

to penetrant testing?

(a) Sand blasting

(b) Vapour degreasing

(c) Emery cloth

(d) Wire brushing

12.Which of the following pre-cleaning processes is not recommended?

(a) Detergent cleaning

(b) Vapour degreasing

(c) Shot blasting

(d) Ultrasonic cleaning

13.A wire brush should be used for pre-cleaning:

(a) When grease and oil must be removed

(b) Only as a last resort

(c) When rust is to be removed

(d) When grinding burrs must be removed

14.A hydrometer is used to measure:

(a) Penetrant viscosity

(b) Specific gravity of water based wet developers

(c) Penetrant specific gravity

(d) Cleaner specific gravity

15.Visible, solvent removable penetrants are most advantageous for:

(a) Inspecting parts with rough surfaces

(b) Inspecting batches of small parts

(c) Inspecting parts at remote locations

(d) Inspecting parts with porous surfaces

16.For adequate test results, the black light used in fluorescent penetrant examination should provide what minimum black light intensity at the test surface?

(a) 100 foot candles per square centimetre

(b) 1000 microwatts per square centimetre

(c) 800 foot candles

(d) 35 microwatts per square centimetre

17.What minimum warm-up time is required for acceptable performance of a mercury

Vapour arc black light?

(a) None

(b) 2 minutes

(c) 5 minutes

(d) 10 minutes

18.Which of the following penetrants contains an emulsifying agent?

(a) Solvent removable

(b) Water washable

(c) Post emulsifiable

(d) Fluorescent

19.Which of the following penetrants must be treated with an emulsifier prior to water

removal?

(a) Solvent removable

(b) Water washable

(c) Post emulsifiable

(d) Fluorescent

20.What is the function of an emulsifier?

(a) To remove the excess penetrant

(b) To develop indications with a post emulsifiable penetrant system

(c) To assist penetration with a post emulsifiable penetrant system

(d) To make a post emulsifiable penetrant water washable

ANSWERS:

1 d

2 b

3 a

4 b

5 c

6 a

7 c

8 d

9 b

10 a

11 b

12 c

13 c

14 b

15 c

16 b

17 c

18 b

19 c

20 d

API 510 Question

API 510 Question

1.A PQR was qualified in SG position using a new welder. But production welding is to be done by   the same welder in 3G position. Which of the following are applicable as a minimum?

  1. Both procedure and welder shall be re-qualified in 2G position.
  2. The qualified procedure can be used, only welder needs to be re-qualified in 3G position.
  3. The welder is qualified, but the procedure needs re­-qualification.
  4. Both procedure and welder need not be re-qualified.

2.A procedure is required with preheat temp = 2S0oF. Two WPS were made based on this PQR. All other parameters being same WPS (A) showed preheat temp = 280°F and WPS (B) showed preheat temp = 140°F, will you:

  1. Reject (A) & (B)
  2. Accept (A) only
  3. Accept (B) only
  4. Accept both

3.In a certain PQR for SMAW, the electrodes used for all passes were of AWS classification (E7018). Corresponding WPS also showed filler materials as E 7018. Now the manufacturer proposes to change the filler material in WPS to E 701S. Will you ask manufacturer to:

  1. Quality new PQR with E 7015 electrodes.
  2. Revise only WPS showing the change from E 7018 to E7015 and submit WPS as a new    revision.
  3. Revise only the PQR showing the change and resubmit for approval.
  4. Revise both WPS and PQR showing the change and resubmit for approval.

4.A PQR in GTAW process was qualified with PWHT with A 516 grade 70 materials, ¾” thick. The thickness for production welds is 1.0”, but without PWHT. The manufacturer claims that same PQR will be O.K. What is your assessment?

  1. It qualifies required conditions hence no new PQR is required.
  2. It qualifies thickness but not It does not qualify “No PWHT” condition, hence new PQR is   required.
  3. It qualifies “no PWHT” condition, but not thickness. New PQR is required.
  4. It does not qualify both thickness as well as “No PWHT” – condition, hence new PQR is    required. ­

5.For 515 grade 60 material, the following results were obtained for two tensile test specimen during   a PQR qualification.

Specimen T1: failed in B.M. at 57,400 psi

Specimen T2: failed in weld metal, at 59,500 psi

Your assessment is:

  1. PQR test is OK since both are within acceptance criteria
  2. PQR test is rejected as both T1 and T2 are not within the acceptance criteria
  3. PQR in rejected because T1 is OK but T2 has failed
  4. PQR in rejected because T1 is failed thoughT2 is OK

6.A procedure is qualified with Base metal THK. = 20mm. Two WPS were made based on this PQR. Other parameters being same, WPS (A) showed Base Metal Thk. = 38 mm and WPS (B) showed Base Metal Thk. = 6mm.

Your assessment is:

  1. Reject (A) & (B)
  2. Accept (A) only
  3. Accept (B) only
  4. Accept both

7.A welder has made 25 SMAW groove welds, but the guided bend test for the welder’s qualification was never performed. In order to avoid cutting out all of the production welds made by this welder, which of the following minimum steps would be taken to validate the qualification?

  1. Radiograph the welder’s first production weld and accept the qualification based on acceptable weld quality by radiography.
  2. There is no alternative to qualifying a welder by the guided bend test.
  3. Have the welder prepare a test coupon and have the bend test done on that. If bend test is okay,    accept the welds already made.
  4. Radiograph all 25 welds, regardless of the governing specifications for sample selection.

8.In a radiographic examination of butt weld (Thk= 3.5 in.) the Geometric un-sharpness shall not exceed?

  1. 0.02″
  2. 0.04″
  3. 0.03″
  4. None of above

9.Select suitable Hole Type (Source Side) penetrameter for following weld joint:

Base Mertal Thk. = 7/8”

Backing Strip Thk. = 3/16”

Weld Re-enforcement Thk. = 1/8”

  1. No. 20
  2. No. 25
  3. No. 30
  4. None of the above

10.If type of penetrameter in above question is changed to wire type what shall be the wire designation (wire diameter In Inch)?

  1. 0.025 dia. (No.10)
  2. 0.016 dia. (No. 8)
  3. 0.032 dia. (No.11)
  4. None of the above

11.For steel plates and welds to be checked by LPI what shall be the penetration time for the Penetrant?

  1. 10 min for weld, 5 min for plate
  2. 5 min for both
  3. 10 min for both
  4. 5 min for weld, 10 min for plate

12.After applying the developer the examiner checked four welds for surface defects after following period, weld A after 5 minute, weld B after 10 minutes, weld C was checked after 30 minutes and welds D after 65 minutes. Which of the welds were checked wrongly?

  1. Weld A and B
  2. Weld C and D
  3. Weld D only
  4. Weld A and D

13.For MT examination by Prod Technique the spacing between prods shall be between?

  1. 4 inch to 12 inch
  2. 4 inch to 10 inch
  3. 3 inch to 10 inch
  4. 3 inch to 8 inch

14.Calculate estimated inspection period for external and internal inspection for a vessel whose remaining life is estimated as 12 years?

  1. Internal = 6 years, external = 10 years
  2. Internal = 6 years, external = 5 years
  3. Internal = 5 years, external = 10 years
  4. None of the above

15.As per WPS the material used is SAS16 Gr.70 and the electrode used is E-7018. What are the P. No. and F No.?

  1. 1 and 4
  2. 4 and 1
  3. 2 and 4
  4. 4 and 2


­Q. NO. ANSWER
1 D
2 B
3 B
4 B
5 C
6 D
7 A
8 B
9 B
10 D
11 D
12 D
13 D
14 B
15 A


API American Petroleum Institute | API Training in Trichy

API American Petroleum Institute: an Introduction

Exam Preparation Training for API American Petroleum Institute’s Certification Programs

API:

  1. The American Petroleum Institute (API) is the only national trade association that represents all aspects of America’s oil and natural gas industry.
  2. Established in 1924, API American Petroleum Institute has been the leader in developing equipment and operating standards for the oil and natural gas industry.
  3. Each year, API American Petroleum Institute distributes over 300,000 documents worldwide, and continuous to strive to enhance safety operations, improve quality assurance, and promote the global acceptance of petroleum products and best practices.

API CERTIFICATION:

  1. API certification is the most desirable and trusted credential in the petrochemical industry. Obtaining API certification increases your marketability and earning potential and makes you a highly regarded professional in the field.
  2. API certification means that an individual has met all the requirements of a given certification program, including passing a difficult professional test.
  3. Trainers in ESL conducts exam preparation training for individuals aiming to be certified by API.

API STANDARDS:

  1. A standard is a document that provides requirements, specifications, guidelines or characteristics that can be used consistently to ensure that materials, products, processes and services are fit for their purpose.
  2. API has led the development of petroleum and petrochemical equipment and operating standards.
  3. API maintains more than 500 standards and recommended practices, many of which are being adopted by the International Organization for Standardization (ISO), a global federation of more than 100 standards groups.

TRAINING DESCRIPTION : Pressure Vessel Design, Construction, Repair, Operation, Inspection and Supervision

API 510 Inspector Training Program

Duration: 6 days

TRAINING DESCRIPTION : Piping System Design, Construction, Repair, Operation, Inspection and Supervision

API 570 Inspector Training Program

Duration: 6 days

TRAINING DESCRIPTION : Above Ground Storage Tank Design, Construction, Repair, Operation, Inspection and Supervision

API 653 Inspector Training Program

Duration: 6 days


NON DESTRUCTIVE TESTING NDT


NON DESTRUCTIVE TESTING NDT

NON DESTRUCTIVE TESTING NDT:

  • Introduction to NON DESTRUCTIVE TESTING NDT
  • Overview of Six Most
  • Common NDT Methods
  • Principle, Working & Application

INTRODUCTION:

  • What is  NON DESTRUCTIVE TESTING  NDT ?

                           The use of noninvasive techniques to determine the integrity of a material, component or structure or quantitatively measure some characteristic of an object.

i.e. Inspect or measure without doing harm.

What are Some Uses  of NON DESTRUCTIVE TESTING NDT Methods:

  • Flaw Detection and Evaluation
  • Leak Detection
  • Location Determination
  • Dimensional Measurements
  • Structure and Microstructure Characterization
  • Estimation of Mechanical and Physical Properties
  • Stress (Strain) and Dynamic Response Measurements
  • Material Sorting and Chemical Composition Determination

When are NON DESTRUCTIVE TESTING NDT Methods Used?

                There are NON DESTRUCTIVE TESTING NDT application at almost any stage in the production or life cycle of a component.

To assist in product development

To monitor, improve or control manufacturing processes

To verify proper processing such as heat treating

Fatigue and Creep damage prediction

To inspect fitness-for-service evaluation

Major types of NON DESTRUCTIVE TESTING  NDT:

  • Detection of surface flaws
  1. Visual
  2. Magnetic Particle Inspection
  3. Fluorescent Dye Penetrant Inspection
  • Detection of internal flaws
  1. Radiography
  2. Ultrasonic Testing
  3. Eddy current Testing
Visual Inspection:

  1. Most basic and common inspection method.
  2. Visual inspection refers to an NON DESTRUCTIVE TESTING  NDT method which uses eyes, either aided or non-aided to detect, locate and assess discontinuities or defects that appear on the surface of material under test.
  3. Tools include fiberscope’s, borescopes, magnifying glasses and mirrors.
  4. Defects such as corrosion in boiler tube, which cannot be seen with naked eyes can easily be detected and recorded by using such equipment.

APPLICATIONS:

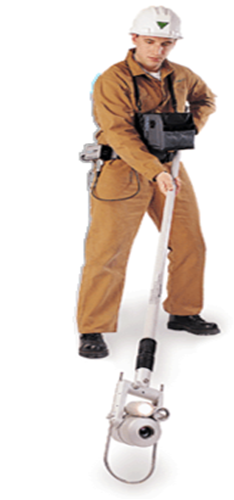
  1. Portable video inspection unit with zoom allows inspection of large tanks and vessels, railroad tank cars, sewer lines.
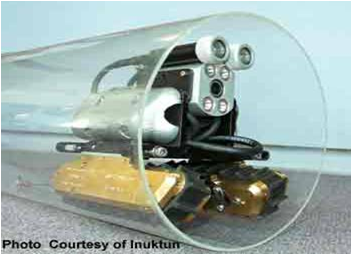
  2. Remote visual inspection using a robotic crawler.
  3. Robotic crawlers permit observation in hazardous or tight areas, such as air ducts, reactors, pipelines

NON DESTRUCTIVE TESTING  NDT


NON DESTRUCTIVE TESTING  NDT


Advantages :-

  • Cheapest NON DESTRUCTIVE TESTING NDT method
  • Applicable at all stages of construction or manufacturing
  • Do not require extensive training
  • Capable of giving instantaneous results

Limitation :-

  • Limited to only surface inspection
  • Require good lighting
  • Require good eyesight


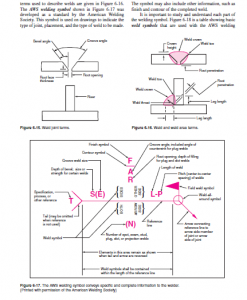
Welding Joints- Diffternt Types


Welding Joints

Diffternt types of  Welding Joints

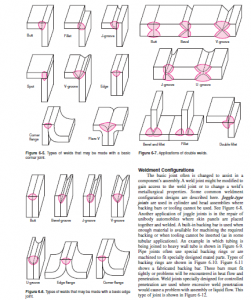
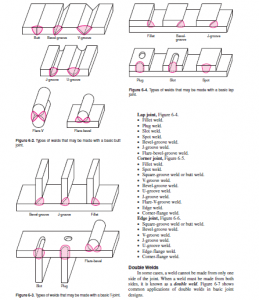
Five Basic Welding Joints:

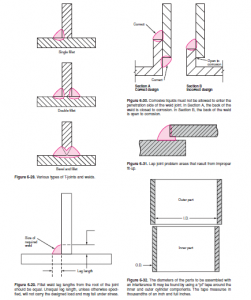
1. Butt Joint

2. Corner Joint

3. T – Joint

4. Lap Joint

5. Edge Joint

Butt Joint:

Butt joint- a joint between two members aligned approximately in the same plane

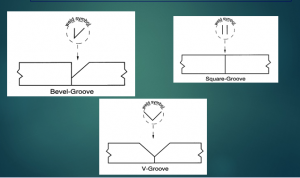
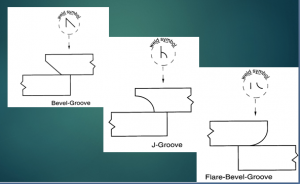
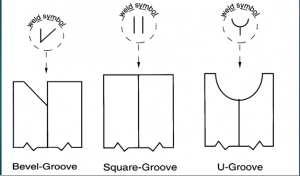
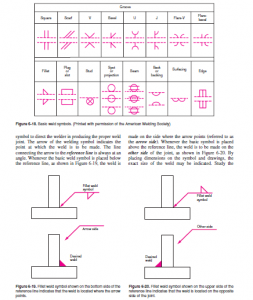
Different Edge Shapes and Symbols for some Butt-Joints:

Welding Joints

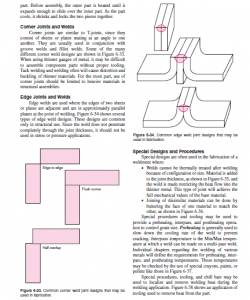
Corner Joint:

Corner joint – a joint between two members located at right angles to each other

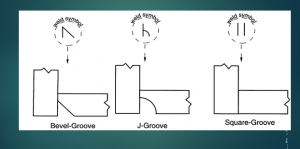
Some Different Edge Shapes and Symbols for Corner Joints:

Welding Joints

T-Joint:

T- joint – a joint between two members located approximately at right angles to each other in the form of a T

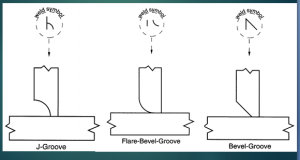
Some Different Edge Shapes and Symbols for T-Joint:

Welding Joints

Lap Joint:

Lap Joint- a joint between two overlapping members

Some Different Edge Shapes and Symbols for Lap Joints:

Welding Joints

Edge Joint:

Edge joint- a joint between the edges of two or more parallel or nearly parallel members

Some Different Edge Shapes and Symbols for Edge Joints:

Welding JointsWelding Joints Welding Joints Welding Joints Welding Joints Welding Joints Welding Joints Welding Joints Welding Joints Welding Joints Welding Joints Welding Joints Welding Joints


WELDING PROCESS | ESL SCHOOL OF WELDING | TIG-MIG-ARC TRAINING

WELDING PROCESS

RESPONSIBILITIES OF A WELDING ENGINEER

BEFORE WELDING:

  • REVIEWING OF DRAWINGS AND     SPECIFICATIONS
  • CHECKING OF QUALIFICATION OF PROCEDURES TO BE USED
  • REVIEWING OF MATERIALS TO BE USED (WELDING CONSUMABLE, SHIELDING GAS, BACKING, etc)
  • CHECKING OF SURFACE CLEANLINESS
  • CHECKING FITUP AND ALIGNMENT OF WELD JOINTS

DURING WELDING:

  • PREHEAT TEMPERATURE
  • QUALITY OF ROOT BEAD
  • INTERPASS TEMP.
  • SEQUENCE OF WELD PASS
  • INTER PASS CLEANING
  • CONFORMANCE TO APPLICABLE PROCEDURE (VOLTAGE, CURRENT, HEAT INPUT AND TRAVEL SPEED)

AFTER WELDING:

  • POST HEATING
  • FINAL WELD APPEARANCE
  • PRESENCE OF DISCONTINUITIES
  • POST WELD HEAT TREATMENT
  • AMOUNT OF DISTORTION

WELDING:

  • Welding joins two pieces of metal / material by the use of heat, pressure, or both
  • Brazing or soldering involves a filler metal which has a lower melting point than the metal pieces to be joined
  • Metal cutting is done by heating the metal with a flame and directing a stream of pure oxygen along the line to be cut

WELDING PROCESSWELDING PROCESSES:

COMMON WELDING PROCESSES:

1.SHIELDED METAL ARC WELDING

2.SUBMERGED ARC WELDING

3.GAS TUNGSTEN ARC WELDING

4.FLUX CORED ARC WELDING

CODES, STANDARDS AND SPECIFICATIONS TO BE FOLLOWED FOR FABRICATION:

  • ASME
  1. SEC. IX FOR WELDING PROCEDURE SPECIFICATION
  2. SEC. IIC FOR WELDING CONSUMABLE SELECTION
  3. SEC.IIA FOR FERROUS METAL SPECIFICATION
  4. SEC.VIII FOR PRESSURE VESSEL FABRICATION
  • EN 288 FOR WPS QUALIFICATION & EN 287 FOR WPQ.
  • IBR

MANUFACTURING PRODUCTS:

I) HEADERS:                                         V) COILS:

WATER WALL HEADER            1. ECONOMISER COIL

SUPER HEATER HEADER            2. SUPER HEATER COIL

REHEATER HEADER            3. EVAPOURATOR COIL

ECONOMISER HEADERS            4. BED SUPER HEATER

DRAIN HEADERS

II) DRUM:

HP DRUM

LP DRUM

STEAM DRUM

III) STORAGE TANK

IV) DEAERATOR

WPS & PQR:

Welding Procedure Specification:

It is a written document that provides direction to the welder for making production welds in accordance with code requirements.

Any WPS must be qualified by the manufacturer.

WPS specifies the condition (ranges) under which welding must be performed called variables.

WPS addresses essential, supplementary essential and non essential variables

Purpose of WPS Qualification:

To determine that the weldment is capable of providing the required properties for the intended application.

WPS establishes the properties of the weldment and not the skill of the welder.

Procedure Qualification Record:

It documents what occurred during welding the test coupon and the results of the test coupon.

PQR documents the essential variables and other specific information and the results of the required testing. In addition, when notch toughness is required for procedure qualification, the applicable supplementary essential variables shall be recorded.

Procedure Qualification:

PQR is a record of welding data to weld a test coupon. It also contains test results.

Completed PQR shall document all essential variables including ranges.

PQR to be certified accurate and shall not be subcontracted.

If more than one process then weld deposit thickness for each process and filler metal to be recorded.

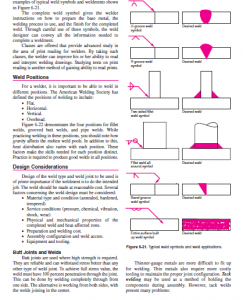
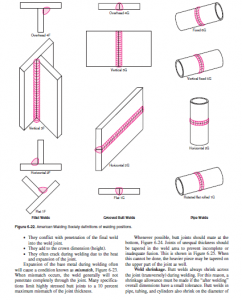
Weld Orientation:

Plate groove positions 1G, 2G, 3G, 4G

Pipe groove positions 1G, 2G, 5G, 6G

Plate fillet positions 1F, 2F, 3F, 4F

Pipe fillet positions 1F, 2F, 2FR, 4F, 5F

1F – 0 to 30

2F – +15 -10 wrt 45

4F – 0 – 125

3F – 125 – 235

Base Metal Classification:

P nos depend on composition, weldability & mechanical properties.

Group nos classify metals within P nos for procedure qualification where notch toughness requirements are specified. But base metals can not be indiscriminately substituted.


API Training Institute in Trichy | API 570 Question | ESL Industrial Support Serivces

API 570 Question

1.For 8” ND Sch 40 and   8” ND Sch 80 pipes,

    1. OD for both pipes will be same
    2. IDs and ODs for both pipes will be different
    3. Average pipe diameters for both will be same
    4. ID for both pipes will be same


2.Hot tapping is best described by statement:

    1. It is technique of heating the pipe to specified temperature and gently tapping with 1 lb. rounded hammer to detect thinning of pipe wall
    2. It is technique of providing a tapping connection while pipe system is in operation
    3. It is technique of fixing a water tap on hot water lines for use during winter
    4. It is act of using the tap and die for threading the pipe when the pipe is hot


3.Which of the following defines the term hold point?

    1. The point at which a pipe hanger is attached to a pipe.
    2. A point at which a U-clamp is fixed on the pipe.
    3. A point at pipe beyond which work may not proceed until inspections have been performed and documented
    4. A trunnion, or sliding shoe used for piping support systems


4.Which of the following statements is true?

    1. Flange rating indicates flange diameter.
    2. Other factors remaining same, ERW pipes can withstand higher pressure than seamless pipes.
    3. Deadlegs means pipes with broken supports.
    4. API 570 is applicable for metallic pipes only.


5.Post weld heat treatment is carried out

    1. To increase Hardness
    2. To increase Tensile strength
    3. To release locked-up stresses in the weld
    4. None of above.


6.What section of the ASME boiler and pressure vessel code is the basic document for welding procedure qualification?

    1. Section III
    2. Section VIII
    3. Section IX
    4. ASME Section II C


7.What can be caused to ferrous metals by the low operating temperatures?

    1. Increase of ductility
    2. Loss of ductility and toughness
    3. Increase in plasticity or deformation
    4. Decrease in yield strength


8.API 570 is intended to apply to:

    1. New piping in the chemical Industry
    2. Piping that has been placed in service
    3. New piping in the Petroleum Refinery
    4. New piping in the Paper Industry


9.If a welder is to be qualified in all positions he must pass test in which positions?

    1. 1G, 2G, 3G and 4G
    2. 5G and 4G
    3. 6G
    4. 5G and 4G


10.ASTM A 106 Gr B pipes belong to which type?

    1. Seamless only
    2. ERW only
    3. Seamless or ERW depending on type of Grade
    4. None of above


ULTRASONIC TESTING | ESL INDUSTRIAL SUPPORT SERVICES | QUESTION BANK

ULTRASONIC TESTING

QUESTION BANK

ultrasonic testing

ULTRASONIC TESTING:

  • Ultrasonic testing uses high frequency sound energy to conduct examinations and make measurements.
  • Ultrasonic examinations can be conducted on a wide variety of material forms including castings, forgings, welds, and composites.
  • A considerable amount of information about the part being examined can be collected, such as the presence of discontinuities, part or coating thickness; and acoustical properties can often be correlated to certain properties of the material.

1.The displacement of particles from its mean position is called

  1. Mean free path
  2. Cycle
  3. Wave length
  4. Vibration

2.Ultrasonic waves pass through

  1. Solids
  2. Liquids
  3. Gases
  4. a, b & c
  5. Solids, liquids, gases except vacuum.

3.If wave length is increased, the frequency will

  1. Increase
  2. decrease
  3. Remains the same
  4. None of the above
  5. All the above.

4.Calculate the frequency for a wave length of 1.5 mm at a velocity of 6.1 km/sec.

  1. 3 MHZ
  2. 4 MHZ
  3. 5 MHZ
  4. 4 MHZ

5.Longitudinal waves are the ones in which the particle motion is

  1. Perpendicular to the direction of propagation
  2. In the same direction of propagation
  3. Elliptical in the direction of prorogation
  4. Is dispersive.

6.The wave which travels through solids, liquids and gases is

  1. Longitudinal wave
  2. Surface wave
  3. Shear wave
  4. Plate waves

7.The transverse waves do not propagate through liquids and gases because

  1. Liquids and gases don’t posses modules of elasticity
  2. The alteration between actions or modules is small
  3. Either (a) or (b)
  4. None of the above

8.Lamb waves are used to inspect

  1. Bar stock
  2. forging
  3. Thick plates
  4. Thin sheets


9.The general law that explains wave behavior at the interface is called

  1. Einstein’s theory
  2. Huygens’s principle
  3. Newton’s Law
  4. Snell’s Law


10.Second critical angle is the angle of incidence at the interface of the dissimilar materials when

  1. Mode converted longitudinal wave angle becomes 90°
  2. Refracted, mode converted transverse wave angle becomes 90° resulting of which surface wave is generated at the plane of boundary
  3. Mode converted longitudinal wave is eliminated from the second medium
  4. (b) or (c)


11.Surface wave is generated at the boundary of Perspex and steel, at

  1. First critical angle
  2. The incidence angle of 40°
  3. Second critical angle
  4. Both a & b


12.Bending of sound waves at the tip or edge of a discontinuity is

  1. reflection
  2. refraction
  3. Interference
  4. diffraction
  5. c & d


13.The zone where the defect size can not be estimated exactly due to interference of wave fronts is

  1. Far field
  2. Fresnel zone
  3. Near Field
  4. (b) or (c)


14.The sound intensity in far zone decrease with the

  1. Distance of its travel
  2. length of refracted wave length
  3. Distance of travel and also across the beam
  4. both (b) and (c)


15.When frequency and dia of a crystal is decreased, the beam spread would be

  1. decreased
  2. increased
  3. No change
  4. either (a) or (b)


16.Beam divergence is a function of the diameter of the crystal and the wave length of the beam transmitted through a medium and it

  1. Increases if the frequency or crystal diameter is increased
  2. Decreases if the frequency or crystal diameter is decreased
  3. Increases if the frequency is increased and crystal diameter is decreased
  4. Decreases if the frequency is decreased and the crystal diameter is decreased
  5. None


17.A search unit that contains three or more individual transducer elements is known as

  1. Dual transducer
  2. Probe
  3. Mosaic transducer
  4. None of the above


18.Scattering of an ultrasonic wave occurs due to

  1. Homogeneous condition
  2. Non – homogeneous condition of materials like grain boundaries and minute non – metallic inclusions
  3. Diffraction
  4. Refraction


19.A-Scan equipment displays a data presentation which is related to

  1. Plan view of the area under inspection.
  2. Cross sectional view
  3. Elapsed time & elapsed time, from left to right and signal amplitude


20.The control which is taking care of frequency amplitude and the pulse repetition rate is

  1. Pulse length
  2. Amplifier
  3. Pulsar
  4. Receiver

21.Both the delay and range controls are

  1. In pulsar unit
  2. Rejection control
  3. Part of sweep generator
  4. None


22.In ultrasonic testing, the time duration of the transmitted pulse is referred to as

  1. the pulse amplitude
  2. pulse length or width
  3. the pulse shape
  4. None of the above.

23.An ultrasonic testing instrument that displays pulses representing the magnitude of reflected ultrasound as a function of time or depth of metal is said to contain

  1. continuous display
  2. `A’ scan presentation
  3. `B’ scan presentation
  4. `C’ scan presentation


24.The pulse repetition rate for thicker materials and thinner materials?

  1. Same
  2. lower
  3. higher
  4. higher for thinner and lower for thicker material

25.The echoes should always be read from

  1. Trailing part touching base line
  2. Height of the peak
  3. Foot of the leading echo

26.The crystal which can be used at elevated temperature is

  1. Lithium sulphate
  2. Polarized ceramics
  3. Quartz x-cut
  4. Both a & b

27.The Curie point or critical temperature is defined as

  1. The temperature at which the vibration of crystal suddenly falls to 50%.
  2. The temperature at which the vibration of crystal suddenly falls to 0%
  3. The temperature at which the crystal loses its piezo electric properties
  4. a & b

28.The efficiency of a transducer is described as

  1. Sensitivity
  2. Resolution, efficiency
  3. Sensitivity, resolution & energy conversion
  4. a & b & c

29.When using two separate search units, one a transmitter and another as receiver, the most efficiency combination is

  1. Quartz transmitter Lithium Sulphate as receiver
  2. Lithium Sulphate transmitter, Quartz as receiver
  3. Barium Titanate as transmitter and Lithium Sulphate as receiver
  4. Lithium Sulphate as transmitter and Barium Titanate as receiver.

30.The testing technique in which the crystal or transducer is parallel to the test surface and ultrasonic waves enter the material being tested in a direction perpendicular to the test surface is

  1. Angle beam
  2. Normal beam
  3. straight beam
  4. b or c
  5. surface beam

31.The advantages of using dual probe is

  1. Dead zone is eliminated
  2. The best of transmitters and receivers could be used as option
  3. We can use any range of frequency
  4. both a & b

32.By using immersion testing,

  1. Gross defects are noted
  2. Sensitivity is reduced
  3. Near surface resolution is achieved
  4. None of the above

33.The reason for attaching lenses to the transducer in immersion testing is

  1. to enhance sensitivity
  2. to reduce resolution
  3. to enhance resolution
  4. both a & c,
  5. both a & b

34.Line of focus is achieved in

  1. Spherical lens
  2. cylindrical lens
  3. Round lens
  4. point lens

35.With the aid of cylindrical lens, we will be able to achieve

  1. Line focus
  2. Point focus
  3. both a & b
  4. None


36.By using delay tip units, we are able to eliminate.

  1. Resolving power
  2. Sensitivity
  3. both a & b
  4. Dead zone

37.When using focused transducers non-symmetry in a propagation sound beam may be caused by

  1. Backing materials vibrations
  2. Porosity in lenses
  3. Lens centering or misalignment
  4. All of the above.

38.Which of the following test system has the best near resolution of the same frequencies?

  1. Straight beam probe with rubber membrane
  2. Straight beam probe with perspex delay
  3. Straight beam probe without protecting membrane
  4. Straight beam probe with low pulse strength

39.The efficiency to resolve two discontinues at different depths would be improved by

  1. Decreasing the frequency
  2. Shortening the pulse duration
  3. Increasing the amplitude
  4. None

40.The resolving power for frequency 4 MHZ compared to 2 MHZ is

  1. Same
  2. Worse
  3. Better
  4. None
Q.No Answer Q.No Answer
1 4 21 3
2 5 22 2
3 2 23 2
4 2 24 4
5 2 25 1
6 1 26 3
7 3 27 3
8 4 28 3
9 2 29 3
10 2 30 4
11 3 31 4
12 4 32 3
13 4 33 4
14 3 34 2
15 2 35 1
16 5 36 4
17 4 37 4
18 2 38 1
19 3 39 2
20 3 40 3